

 Thanks: 0
 Likes: 0
 Needs Pictures: 0
 Picture(s) thanks: 0
Results 46 to 60 of 88
-
22nd December 2011, 05:22 PM #46

 GOLD MEMBER


- Join Date
- Jul 2008
- Location
- near Warragul, Victoria
- Posts
- 2,500
 yes
Yes that is true PC .. OK I didnt explain it well . If the radius is large and mostly ground onto the front edge , rather than the side , then rotating the tip around will present the radiused edge facing the work piece . Harold Hall suggests this method . MIKE
yes
Yes that is true PC .. OK I didnt explain it well . If the radius is large and mostly ground onto the front edge , rather than the side , then rotating the tip around will present the radiused edge facing the work piece . Harold Hall suggests this method . MIKE Originally Posted by pipeclay

-
22nd December 2011 05:22 PM # ADSGoogle Adsense Advertisement
- Join Date
- Always
- Location
- Advertising world
- Posts
- Many
-
22nd December 2011, 06:53 PM #47Dave J Guest
Here you go Brendan, this works good on mild steel for me. Originally Posted by 19brendan81
Here it is taking 2mm deep cut
And this one a 0.05mm cut
The tool could do with a hone as I have used it a bit.
Dave
-
22nd December 2011, 06:57 PM #48Dave J Guest
I forgot to add that I grind the 3 faces, then hone them with a oil stone and put the nose radius on with the oil stone not the grinder. A few rubs around the nose give you what you need.
Dave
-
22nd December 2011, 07:05 PM #49
GOLD MEMBER
- Join Date
- Jul 2008
- Location
- near Warragul, Victoria
- Posts
- 2,500
nice
Dave , That looks like a knife tool ... we are all going to try that from now on

-
22nd December 2011, 07:13 PM #50Dave J Guest
Knife tool, not sure I have heard of that one. I just played with different grinds and this one seems to work the best on mild steel.
Although I don't recommend it, you will see I have miles of over hang on this bit of scrap, but the tool seem to slice the steel off and not want to grab into the work. I only had it that far out because I didn't want to chuck up the rusted area.
Those cuts where done at 200 rpm and the bar is about 35mm round (would have to check).
Dave
Edit,
I don't own any of these books you guys talk about, is there reference to a tool like this?
-
22nd December 2011, 07:34 PM #51
GOLD MEMBER
- Join Date
- Jul 2008
- Location
- near Warragul, Victoria
- Posts
- 2,500
book
Yes there certainly is ..in HH's books, he uses knife tools quite a lot . MIKE Originally Posted by Dave J
-
22nd December 2011, 07:39 PM #52
GOLD MEMBER
- Join Date
- Jun 2008
- Location
- Victoria, Australia
- Age
- 74
- Posts
- 6,132
Hi Mike,
I don't know what Harold Hall calls a Knife Tool? But... "That's not a knife!" ... (apologies to Mick Dundee)
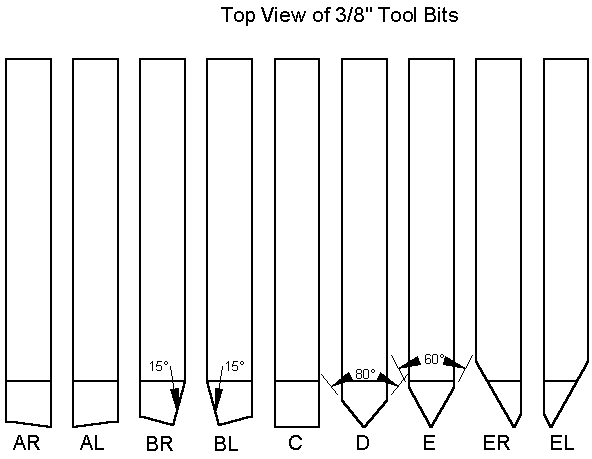
Style AR – Right Hand for turning to square shoulder. Used for general machining operations such as turning, boring, and chamfering.
Style AL – Left Hand for turning to square shoulder. Used for general machining operations such as turning, boring, and chamfering.
Style BR – Right Hand 15º Lead Angle for turning when no square shoulder is needed. Used for general machining operations such as turning, boring, and chamfering.
Style BL – Left Hand 15º Lead Angle for facing when no square shoulder is needed. Used for general machining operations such as turning, boring, and chamfering.
Style C – Square Nose for chamfering. A perfect general purpose tool of great utility for chamfering, facing, and turning. Tool can also be used to make special form tools.
Style D – Pointed Nose - 80º Included Angle used for undercutting and O.D. and I.D. chamfering.
Style E – Threading Tool. Standard 60º included angle for universal threading, V-Grooving, chamfering, turning, boring, and facing.
Style ER – 60º Offset Threading Tool. Tip is offset from the shank. For threading and V-Grooving to a shoulder.
Style EL – 60º Offset Threading Tool. Tip is offset from the shank. For threading and V-Grooving to a shoulder.
This is a knife...
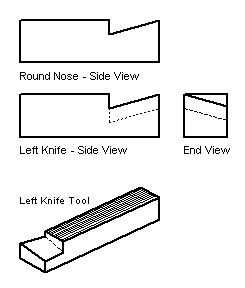
Hope that helps...
Regards
Ray
-
22nd December 2011, 07:57 PM #53Dave J Guest
Thanks Ray, maybe in Mikes book it has a tool similar to mine that he has named a knife tool. That one you posted looks like what they call a shear tool.
This shape is my standard work horse as most of what I do is in mild steel. I usually sharpen that other end as a left hand so it's only a matter of turning the tool around.
If anyones having trouble grinding this tool I could do a step by step process to help out.
Dave
-
22nd December 2011, 07:57 PM #54
GOLD MEMBER
- Join Date
- Jul 2008
- Location
- near Warragul, Victoria
- Posts
- 2,500
HH book
This is a scan from HH's book .he calls it a knife tool . Almost identical to DAVES. BTW HH doesn't use any back rake for his turning tools . As it says the rake is sideways , across , but not back MIKE
-
22nd December 2011, 08:01 PM #55Dave J Guest
Hi Mike,
I don't put a flat on the end of mine, I just put a small radius with the oil stone.But other than that it's similar.
Dave
Edit
I notice he calls his a finishing tool, mine is used for both roughing and finishing and works well both ways.
-
22nd December 2011, 08:03 PM #56
GOLD MEMBER

- Join Date
- Aug 2011
- Location
- Melbourne
- Posts
- 2,951
That's one of the books I have. That tool is described as a finishing tool, in this case used to make the final finish on the cylindrical squares I'm going to do..... once I get this finishing tool down pat. I think with all the info here I should be right. In theory! Originally Posted by morrisman
I do have to take into account the Simon retard factor though!
Simon
-
22nd December 2011, 08:25 PM #57Dave J Guest
The tool I posted above is the same type I used to finish my cylinder squares. You need to pay attention to the honing to get a great finish, like I said earlier you are only shaving off hair like material on the final pass. For roughing you can use it strait off the grinder and it will a reasonably good finish, but always give it a bit of a hone.
Dave
-
22nd December 2011, 11:26 PM #58
GOLD MEMBER
- Join Date
- Jun 2008
- Location
- Victoria, Australia
- Age
- 74
- Posts
- 6,132
Hi Phil, Originally Posted by Steamwhisperer
Nice one, I had a bit of a play with a shear tool, and works like a dream, weird shavings, beautiful finish
Regards
Ray
PS. Thanks Stuart for thebone.. I mean link... http://www.gadgetbuilder.com/VerticalShearBit.html
-
23rd December 2011, 12:08 AM #59
GOLD MEMBER
- Join Date
- Jul 2010
- Location
- Melbourne
- Posts
- 7,775
Looks like I might have to give it another try. In the vertical shear bits defence I did just try the one off the shaper, the angles might have been less than perfect and I know it was touchy on the shaper to set up. Originally Posted by RayG
Stuart
-
23rd December 2011, 12:11 AM #60
Awaiting Email Confirmation
- Join Date
- Jul 2010
- Location
- perth
- Posts
- 268
Wow, this thread has grown, performed a few tests today, but did not grind down the 1/2 inch bar, as these are worth a bit, have plenty of 5/16 HSS with no holder.
tested using my home made circular saw carbide tool, and the diamond tangential holder.
ignore the rough sections, kept it as is for an easier reference of the finishing cuts.
fig a/b show the finish.
section 1 is the carbide tool at 170 rpm and the feed about 20 percent off the slowest feed.
section 2 is hss run towards the tailstock, 70 rpm and the slowest feed
section 3 is hss run towards the chuck. 70 rpm and the slowest feed
section 4 is the carbide tool at 70 rpm and the slowest feed.
the depth of cut on all were 0.05mm.
noticed when cutting 0.05mm deep the cuts were not constant, was o.k at 0.1mm deep.
At 300 rpm and a feed rate 20% from the slowest setting, the carbide tool gives a better finish than the hss on the slowest speeds.
honed the hss with a new diamond sharpening stone with a shallow radius, and honed a round edge on the carbide tip.
fig-c/d show the carbide tool, and circular saw the tips came from.
The tool looks like crap, but works great, even works on broken rough cuts.
Dave, could you possibly post the angles of the tool, the finish looks great, what was the feed rate?
will definitely be grinding the 1/2 inch now.
Brendon, will try to copy Dave's tool first, if no success will take up the offer.


Similar Threads
-
Finishing the finish...??
By halminator in forum FINISHINGReplies: 11Last Post: 29th October 2011, 07:25 PM -
Tracy Owen Finishing Tool
By ticklingmedusa in forum WOODTURNING - GENERALReplies: 3Last Post: 21st June 2011, 01:01 AM -
Finishing and preparing to finish
By Clinton1 in forum FINISHINGReplies: 7Last Post: 16th August 2005, 07:41 AM -
finishing but first removing the finish
By Buba in forum FINISHINGReplies: 3Last Post: 16th July 2005, 11:19 AM -
Poor service + poor tools = angry Stinky
By Sir Stinkalot in forum HAVE YOUR SAYReplies: 9Last Post: 25th January 2005, 05:36 PM
