

 Thanks: 0
 Likes:
  Needs Pictures: 0
 Picture(s) thanks: 0
Results 31 to 45 of 279
Thread: Scraping Projects
-
7th November 2011, 05:56 PM #31
 Pink 10EE owner


- Join Date
- Aug 2008
- Location
- near Rockhampton
- Posts
- 4,304

static bearing points do not need to be that good as far as SPI goes compared to sliding bearing areas...
What connelly says and his book is by no means the bible as some people think it is, is that you do not go for spots per inch when you are still scraping for alignment... You just go get it off.... When I was scraping my square Marko had a look, noticed one small area had less SPI then the rest, he told it was good enough and that to improve that area would mean to scrape the entire blue area down... Scrape every blue spot as they were more of less of equal height...
You have to learn to read the blue and keep an eye on progress... Judging the right thickness of ink also can tell you a lot... It is not something you can learn in a couple of days but will come with experience.. more to come later tonight...got to go...Light red, the colour of choice for the discerning man.
-
7th November 2011 05:56 PM # ADSGoogle Adsense Advertisement
- Join Date
- Always
- Location
- Advertising world
- Posts
- Many
-
7th November 2011, 06:01 PM #32
GOLD MEMBER
- Join Date
- Jul 2010
- Location
- Melbourne
- Posts
- 7,775
Sure looks good enough to me. Luckily Melbourne isn't far for me. lol
Splitting spots is fine once you have consistent bearing. If you start splitting spots to finely to early it will just take more cycles. I tried drawing a little 2D landscape of how I think things go.
In the top cross-section pretty much everything above the red line has to go. If you just cut the spot on the right in half you end up with the second cross-section. then you have two spots to cut, then four. Yes you are closer but you'll have to do a few more cycles before you get to the bottom drawing. This can be at any scale you like depending on where you are starting and were you want to finish. Of course you dont want to dig to deep on the right and then have to being the left down to match that.
Once the blue gets fine enough you should see silver dots in the middle of the blue spots, scrap the silver, that's the highest spot. Ray might have some pictures, I'll go try and take some but I'm not sure it will come out.Last edited by Stustoys; 7th November 2011 at 06:03 PM. Reason: spelling, attachment
-
7th November 2011, 06:22 PM #33
SENIOR MEMBER
- Join Date
- Sep 2011
- Location
- Ballarat
- Age
- 65
- Posts
- 2,659
Hi Bryan
One thing I can remember about the shiney spots surrounded by the blue is that Marco made me take all of them off...everytime
Phil
-
7th November 2011, 07:03 PM #34
GOLD MEMBER
- Join Date
- Jun 2007
- Location
- sydney
- Age
- 64
- Posts
- 3,566
Have you blokes scrapped any steel yet or just cast.
-
7th November 2011, 07:33 PM #35
GOLD MEMBER
- Join Date
- Jul 2010
- Location
- Melbourne
- Posts
- 7,775
Did anyone mention you can see the silver spots easier from a low angle?
See how the blue seems to be two colors? scrap the light blue, leave the dark.
Its does photogragh very well as the flash messes with the blue. I'll leave it and try again tomorrow.
Hi PC, I've scrapped some angle iron once a few years back using an old file, at the time I thought it worked out ok for a first attempt. I'll go have another look and if its not to embarassing I'll take a picture.
Stuart
-
7th November 2011, 07:41 PM #36
GOLD MEMBER
- Join Date
- Jun 2008
- Location
- Victoria, Australia
- Age
- 74
- Posts
- 6,132
Hi Stuart,
I'd hit that shiny spot first...
PC, As for scraping steel, I did a small piece just for practice, scraped fine.
Regards
Ray
-
7th November 2011, 08:06 PM #37
GOLD MEMBER
- Join Date
- Jul 2010
- Location
- Melbourne
- Posts
- 7,775
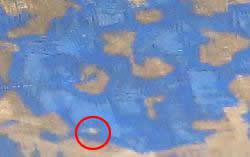
I've checked the photo record and then is infact a low spot Ray, at least I'm pretty sure it is. Now I guess I'll bring the block inside and track it down to be sure. I got what I think is a much better picture.
Stuart
Forgot the steel one brb,
-
7th November 2011, 08:09 PM #38
Pink 10EE owner
- Join Date
- Aug 2008
- Location
- near Rockhampton
- Posts
- 4,304
I think that is a low spot..... The light blue bits are the higher spots... Originally Posted by RayG
 Light red, the colour of choice for the discerning man.
-
7th November 2011, 08:14 PM #39
GOLD MEMBER
- Join Date
- Jun 2008
- Location
- Victoria, Australia
- Age
- 74
- Posts
- 6,132
Hi .RC, Stuart,
Yes, it's surrounded by the darker blue, which means it's probably a low spot.
I look for a polished look to those sort of high spots, and as Stuart says, they stand out better with a glancing light source.
Regards
Ray
-
7th November 2011, 08:34 PM #40
GOLD MEMBER
- Join Date
- Jun 2008
- Location
- Victoria, Australia
- Age
- 74
- Posts
- 6,132
This is another scraping project.. a cheap sharpener for touching up carbide scrapers.
I got a $39 (postage included) chainsaw sharpener off ebay, I got the cheapest I could find.
New 320W PRO CHAINSAW SHARPENER CHAIN SAW GRINDER | eBay
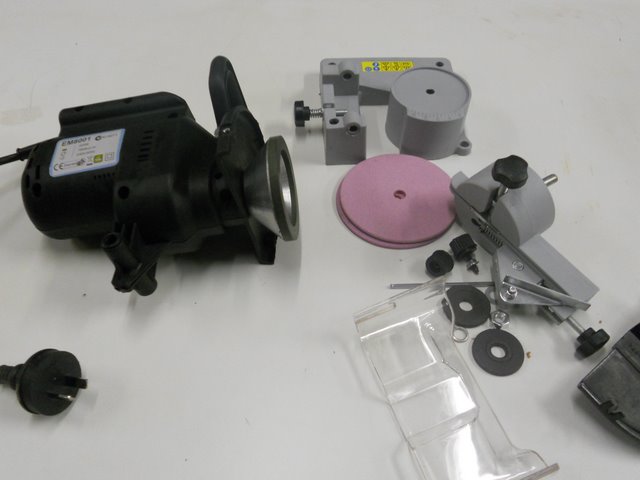
Pulled it apart and fitted a 75mm (400 grit) diamond cup wheel, same 10mm shaft diameter, motor is geared and spins the wheel at 7200rpm.
It needs a stand of some sort, but works fine just clamped to the bench..
Don't know what to do with the extra bits, but I'm sure they will be handy..
Regards
Ray
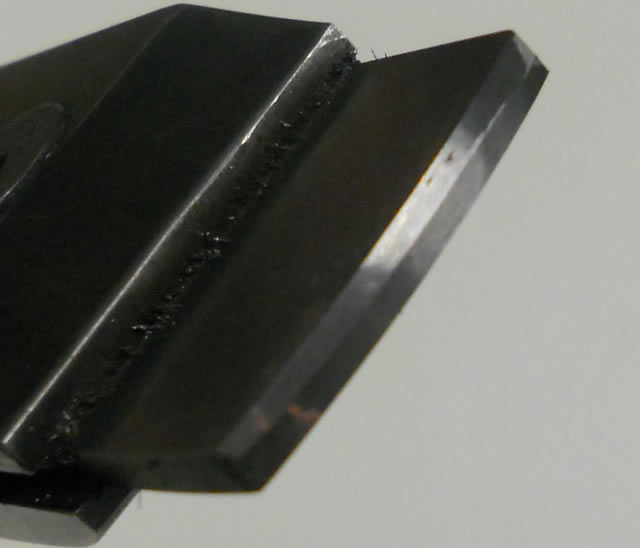
EDIT: I tried to get a picture of the edge... this is freehand sharpening off the 400 grit wheel..
-
7th November 2011, 08:39 PM #41
GOLD MEMBER
- Join Date
- Jul 2010
- Location
- Melbourne
- Posts
- 7,775
Here is the offending spot and one of my attempt on steel. As you can see I am still the king of scratching. Something I will work on fixing once I get my hone finished.
Stuart
-
7th November 2011, 09:13 PM #42
Distracted Member
- Join Date
- May 2010
- Location
- Lower Lakes SA
- Age
- 58
- Posts
- 2,557
Ray, nice work on the sharpener! Will be interested to hear how it performs.
Stuart I can see the halo effect as clear as day in your photos, but cannot seem to reproduce it. I tried amounts of blue in a range I would call medium to very light. Furthermore my spotting pattern has turned to ##### again!
-
7th November 2011, 09:34 PM #43
GOLD MEMBER
- Join Date
- Jul 2010
- Location
- Melbourne
- Posts
- 7,775
Ray, do you use any sort of rest or just two hands and eyeball it? (I got just a little done on mine today, but not as much as I would have liked, I'm also making a wood platform for it to sit on)
Bryan, I'll have a play tomorrow, my only guess atm is you aren't moving the work piece around on the plate enough(and that's a real WAG). Pictures?
Stuart
-
7th November 2011, 10:06 PM #44
GOLD MEMBER
- Join Date
- Jun 2008
- Location
- Victoria, Australia
- Age
- 74
- Posts
- 6,132
Hi Stuart,
I'm just free-handing it, at present, I plan to make a stand and maybe an adjustable platform so I can use the same setup on carbide inserts.
The previous system, was a 150mm 600 grit diamond cup wheel fitted to the normal bench grinder.
You should get an even better edge on yours with the diamond paste. But I'm not quite ready to build a dedicated honing setup just yet.
Regards
Ray
-
11th November 2011, 08:42 PM #45
Distracted Member
- Join Date
- May 2010
- Location
- Lower Lakes SA
- Age
- 58
- Posts
- 2,557
I wanted to check the alignment of the transverse way before I finished up the slides, so I could use the opportunity to correct the alignment. In case anyone's not familiar with the term (I only learned it from Mr Connelly) the transverse way is like a key that runs crossways between the TS body and base. Apart from clamping force, it's the only thing that keeps the quill pointing in the right direction. So it's important that it's a good fit and correctly aligned. So I set up an indicator on the cross slide and clocked the seat in the base.


Yikes. 0.32mm. Clocked the other side of the seat, same reading. Well that's too much to scrape out, so I might as well move on and worry about it later. Wait a minute, what's that noise? I think it's my bull#### detector. Could the cross slide be out? Yes, but that's not a can of worms I feel like opening right now. Why not measure it where it counts?


The carriage was locked and the readings taken by sliding the TS. Apols for photography. The error is .01/100mm. That'll do, Donkey. I don't know why, I don't really care. It's one less thing to worry about. The strip of sheet steel is to eliminate errors from vertical misalignment. Should I call my patent lawyer?

Righto. A few quick cycles and the slides are done. Being less anal about it seems to help.

Now to attack the body. But I have a decision to make. While I had it assembled I also checked the vertical alignment of the quill. It's better than it was. I left my notes in the shed but basically it divides in two. Nearer the TS end of the bed, it droops by about .06/100mm. Nearer the HS that pretty much doubles. And it's not a gradient. I checked it every 100mm, and it's stable at .06, then halfway along it suddenly doubles. So I have to decide which end of the bed I want the quill level at. It would be 'truer' to make it level at the TS end, because that's where the ways are less worn. But closer in is where it will be used more. Maybe I'll split the difference


Similar Threads
-
Scraping.
By derekcohen in forum FURNITURE, JOINERY, CABINETMAKING - formerly BIG STUFFReplies: 5Last Post: 26th July 2011, 09:10 PM -
Scraping practice
By jhovel in forum METALWORK FORUMReplies: 7Last Post: 11th July 2011, 07:01 PM -
Scraping
By wheelie in forum WOODTURNING - GENERALReplies: 8Last Post: 23rd September 2006, 09:40 AM -
Scraping
By 9Fingers in forum WOODWORK - GENERALReplies: 22Last Post: 28th January 2006, 04:32 AM
