

 Thanks: 0
 Likes: 0
 Needs Pictures: 0
 Picture(s) thanks: 0
Results 1 to 15 of 17
Thread: Vise Stops
-
4th November 2010, 12:30 AM #1Dave J Guest
 Vise Stops
Hi,
I haven't contributed for a while, so I thought I would throw this one up.
This vise stop is more suited to a Kurt style vise, but could easily be used on any style of vise by taping 2 holes into the back of the vise for it to be mounted.
I have seen a few good vise stop designs around the internet so I picked a bit here and there and added some of my own ideas.
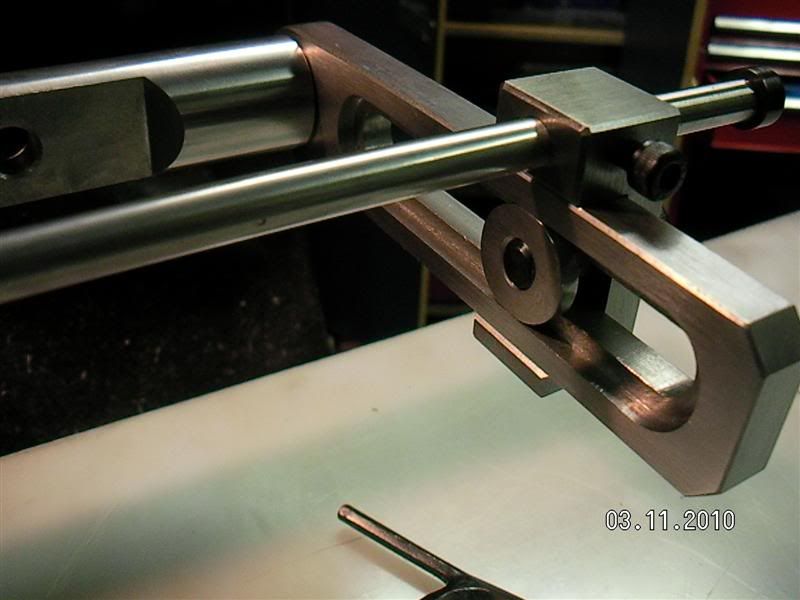
It is all made from mild steel I had laying around, the main round bar is 28mm round x 330mm long the slotted bar is 12x32x150mm long, the sliding block is 21x21x51 high and the adjustable stop rod is 8mm round x 210mm long. This rod is a hardened rod out of a pallet nailing machine. The son in law works their and these are changed out every so often and he picked them up for me (all my friends and family are helpful and are always bringing me things like this)
I machined a flat about 6mm deep in the main round bar to give it a flat so it sits firmly against the vise and countersunk the M10 socket head screws into the back of it to suit the vise. I drilled 3 holes so it is adjustable and taped each end M10 so it can be changed to either side of the vise easily.
The flat bar was drilled out all along with a 9mm drill bit, then slotted with a 10mm end mill and the again with a 20mm one for a recess for the T nut to slide in.
As seen in one of the pictures below I rounded it off with a end mill pivoting it around a socket screw clamped in the vise. Having the head of the socket screws on top stops it climbing up the end mill. It is just done by hand a little at a time but don't try climb milling when doing it or it will get ripped out of your hands, after each cut move the job away from the cutter to return it.
In another picture you can see the allen key I made up so it is only the one allen key to adjust anything on it to save time looking around for them. I just welded a piece of 4mm to the 8mm key.


The smaller vise stops are for clamping onto the top of the vise jaws and can be used for any vise. These are not new and Chinese one's are sold in the US. They can also be made with longer rods and be used as a table stops clamped from one T slot to the other.
Again I just made these from steel I had laying around and they are 33mm long x 18mm high x 9mm each side wide, with a 5.5mm x 5mm step machined into them to site on the vise jaw. The rods a 1/4inch and the socket head screws are 6mm. I heated them up and gave them a dunk in oil to blacken them when they were finished.
These have worked out to be more handy than I thought and I recommend them to you guys even if you buy them.
Dave


-
4th November 2010 12:30 AM # ADSGoogle Adsense Advertisement
-
4th November 2010, 08:00 AM #2
 SENIOR MEMBER


- Join Date
- May 2007
- Location
- Melbourne
- Age
- 58
- Posts
- 832
What a great idea. Thanks for sharing Dave.
All the best
Kevin
-
4th November 2010, 09:03 AM #3
GOLD MEMBER
- Join Date
- Jul 2006
- Location
- Adelaide
- Posts
- 2,680
great machining Dave...
please excuse my ignorance ....but why do I want a vice stop/s?...
-
4th November 2010, 09:45 AM #4
Mechanical Butcher
- Join Date
- Oct 2004
- Location
- Southern Highlands NSW
- Posts
- 920
They are used if you are making several similar operations - to quickly locate the job in a consistently fairly accurate position.
I also use the small type on my Douglas shaper, clamped to the slideway so the cross-slide bumps into it. I find it's handy to set the "end of traverse" position.
Only $3 from CDCO Machinery Corp., where they call them "work stops" in the milling tooling section.
Jordan
-
4th November 2010, 10:26 AM #5
GOLD MEMBER
- Join Date
- Jul 2006
- Location
- Adelaide
- Posts
- 2,680
thanks Jordan
-
4th November 2010, 10:32 AM #6
GOLD MEMBER
- Join Date
- Jul 2010
- Location
- Melbourne
- Posts
- 7,775
Nice work Dave.
Now if I can just get some shed time.
Thanks
Stuart
-
4th November 2010, 01:49 PM #7
GOLD MEMBER
- Join Date
- Jun 2008
- Location
- Victoria, Australia
- Age
- 74
- Posts
- 6,132
Hi Dave,
Nicely thought out, should be nice and rigid, and easily adjustable, and beautifully made (as always). I especially like the idea of welding the allen keys together.
I like the oil blackened stops.
I made a few fishtail chisels last week, using 01 steel, and left them oil blackened, (except for the back and bevel edges of course) I think it looks better, and provides a bit of rust resistance.
Regards
Ray
-
4th November 2010, 11:02 PM #8Dave J Guest
Thanks guys,
Eskimo,
I think Jordan has answered it for me. They are really handy for when say, you take things out of the vise to turn them over to do the other side and things like that.
I have been getting around this using a small clamp because I could never be bothered to make one up.LOL
Ray,
I am not sure if they are worth making just one for the price you can buy them. I made 3 at the same time so it made me feel better making them.
I sent one to Stuart with his tubing, so I have 2 left and only need one, would you like me to send you the other one? Just let me know and I will stick it in the post.
I am very efficient in sending things, just ask Stuart after his month wait for his tubing.LOL
With the oil blackening, I had a really good mix of dirty old sump oil that has done a good job for years. Just after doing these I went to pack up the propane and the lead caught the can and spilt it all over the floor. I am not sure which was worse loosing my good mix of oil or spilling it. LOL I had another can but it doesn't seem to work as good.
Dave
-
4th November 2010, 11:46 PM #9
GOLD MEMBER
- Join Date
- Jul 2010
- Location
- Melbourne
- Posts
- 7,775
And a big Thanks to Dave for his vice stop

As as for the tube, surprisingly I didn't get all my other jobs finished before it turned up so no biggy.
Stuart
-
5th November 2010, 08:10 AM #10
GOLD MEMBER
- Join Date
- Jul 2006
- Location
- Adelaide
- Posts
- 2,680
I note that the rest of us didnt get one.... Originally Posted by Stustoys


ah well guys, at least we now have a design we can copy
-
6th November 2010, 04:19 AM #11
Class Clown
- Join Date
- Jun 2008
- Location
- Bairnsdale
- Age
- 50
- Posts
- 798
A silly question.....When you heat the item to put into the sump oil for blackening, What temperature do you heat it to ??
And does it have any effect on the part you are treating ?? ie; Warping or putting the part out of square ??
And do you end up case hardening the steel ??
Also, Just out of curiosity does this method of blackening help stop rust ?? Or do rust prevention methods still need to be implimented..
Thanks people for and advice as this looks to be quite an interesting and cheap way to blacken steel.
MattWarning Disclaimer
-
6th November 2010, 09:56 AM #12
GOLD MEMBER
- Join Date
- Jul 2010
- Location
- Melbourne
- Posts
- 7,775
Hi Matt
Red hot, but if you cant get red hot anything over about 300C seems to work a little but you get more of a brown than black.
Dave heats to red hot, dips and repeats, it comes up great.
It could warp the part in theory I guess, it will release any stress in the part but I doubt you'd notice for the most part.
I've heard people say that there maybe some hardening depending on the oil used. I don't think it would be much and it certainly wouldn't be very deep.
It does seem so stop rust for indoor use.
A couple of warnings, one make sure your oil container is big enough for the size and amount of parts you are doing as obviously the oil gets hot. Also careful with sump oil the first few times, it can be pretty flammable and will flash a little when you put the parts in. So nice long handle pliers or wire.
Stuart
-
6th November 2010, 11:55 AM #13
Class Clown
- Join Date
- Jun 2008
- Location
- Bairnsdale
- Age
- 50
- Posts
- 798
Good on ya Stuart, Thanks Mate,
Looks like a good cheap alternative to chemical blackening for basic bits and pieces.
MattWarning Disclaimer
-
6th November 2010, 03:29 PM #14Dave J Guest
I just spent half an hour typing this and lost it.
 I am a slow typer.
No silly questions here, we all learn't off somebody. I showed my 88 year old Grandfather (who is a boiler maker) this a few years ago and it was new to him.
Stuart has just about covered it but I will ad this.
On small parts I get them red hot, but on larger parts I am lucky to get the to a dull red with the propane torch and it still works. I find I get good results with filthy black used oil, so save the next oil change or get one of your mates to.
I heat to as hot as I can get the part then dunk in the oil, pull it out then use the torch to dry out all the oil on the part and then dunk it again and leave it to cool. I was reheating to red hot but have tried just drying the oil off lately and it works the same and takes less time.
With warpage, I use a lot of hot roll so I don't see much and I usually only blacken brackets and stuff like that where it doesn't matter. I have done taper pins and things like that with no problems.
As for hardening I don't think it does anything to mild steel. If it was hardenable steel it would as normal hardening.
It stops rust unless you drop the part and chip the oil coating. It helps to keep it lightly oiled but the oil seems to stay on the part better unlike bare steel.
As Stuart said above about the warnings,
I use a coffee large can for my oil, after doing a few part the oil will become hot and catch fire. It is not a huge worry as it goes out or you can put the lid over it to put it out.
One thing I learned last night was to not point the torch flame in the direction of the smoke or it will make a small fire ball in the air.
I use tie wire to hold any parts I am doing and it is stiff enough to put a bend in it so your hand isn't directly above the part.
It's raining here at the moment and the large vise stop is showing signs of surface rust already so it's getting a oil blackening as well. Machined parts look nice but don't last in my steel ventilated shed.
For people that want to give it a go and don't have a torch but have a BBQ. Take the plate(s) off and hang your parts with wire over the flame on a steel rod across the BBQ to heat them up. Then do the process above.
Dave
-
7th November 2010, 05:51 PM #15
Senior Member
- Join Date
- Jul 2007
- Location
- On the Bellarine
- Posts
- 134
Dave...........I have been oil blackening for some time also and use the same method as you describe but add a couple of points I've found along the way..........I now use a small aluminium dish about 6" sq and 2" deep with a suitable metal covering lid as the oil always catches fire when I do it
 but is quickly smothered by the lid........I tried metal jars such as coffee tins or fruit cans but found some reaction with the tin/zinc coating in lots of cans??? I believe this caused 'blotching' on the small parts I do.....my opinion at least........that's when I drop it straight in.........sometimes I'll tie the piece in copper wire to suspend it if I can't fix permanently and keep it cherry red. The copper seems to cause less blotching than piano or other steel wire but is harder to keep from bending and the piece falling out with the lower MP.
I use Hypo90 diff oil instead of normal engine oil - mainly because I have more, but also I found the heavier the oil, the darker the "blackening"......maybe it's just me as I know others who swear by veggie oil...
Another point I've picked up is that it seems the higher the carbon content in the steel, the better the finnish with this method...in fact some parts I made from very old springs and axles - seemed to get the best blackening compared to some recent FCMS and BDMS I have.....???? I put it down to the carbon at least.....
Most of the parts I do are less than 2" long and relatively small....have no idea if my points transpond to larger pieces - others more experienced than me would know....from your piccies, I'd say you've got it nailed....nice work
Just my 2 bobs worth FWIW.........Lee


Similar Threads
-
Why are there three depth stops?
By CT in forum ROUTING FORUMReplies: 8Last Post: 21st September 2009, 01:34 PM -
Fence Stops
By niki in forum HOMEMADE TOOLS AND JIGS ETC.Replies: 7Last Post: 9th September 2007, 04:14 AM -
Lathe stops when it's not supposed to
By Tiger in forum WOODTURNING - GENERALReplies: 39Last Post: 25th October 2005, 09:20 AM -
Stops during my trip
By MikeK in forum WOODWORK - GENERALReplies: 8Last Post: 3rd October 2004, 08:55 PM
 Members who have read this thread: 0
There are no members to list at the moment.