

 Thanks: 0
 Likes: 0
 Needs Pictures: 0
 Picture(s) thanks: 0
Results 16 to 24 of 24
Thread: First Cartridge Pen
-
19th February 2009, 12:09 PM #16
 SENIOR MEMBER


- Join Date
- Nov 2008
- Location
- Houston Texas USA
- Age
- 65
- Posts
- 839

Not real sure how common 308 shells are over there, or how easy it is to obtain new brass from a reloading company or a manufacture...used brass will have ejector marks, and depending on how "hot" the load was, maby some receiver marks too...plus all the scratches and dings from hitting the ground after ejecting...we have found that buying new brass saves a lot of time in prep...you dont have to try and sand heavy scratches out or polish them as much.
-
19th February 2009 12:09 PM # ADSGoogle Adsense Advertisement
- Join Date
- Always
- Location
- Advertising world
- Age
- 2010
- Posts
- Many
-
19th February 2009, 12:50 PM #17
Retired Member
- Join Date
- Nov 2006
- Location
- Bendigo Victoria
- Age
- 80
- Posts
- 16,560
Thanks for the input Ed, always good to hear how people who actually make these pens do it, thanks for showing your pen as well.
The brass and bullets are relatively easy to get even in our over-regulated country. I purchased a bag of 50 .308 cartridges and a box of 100 .308 hollow point bullets. You're right, the bullets weigh a bit more than the kit tip, but everyone I have shown the pen to as well as pictures of other pens with kit tip seems to prefer the actual bullet.
I haven't wet sanded the brass as yet, just mop polished with white diamond, then brasso.
I'm sure a wet sand process will improve the finish and will try that on the next one. You're right about the finish on these cartridges, even new from the bag there are dings and pits etc.
Am looking to get some .30-06 cartridges as well, but our local gun shop was out of stock, he's getting some in. I believe these cartridges are a bit longer than the .308?
How do you fit the 7mm tube in the end of the .308 cartridge, there is a difference between the OD of the tube and the ID of the cartridge neck?
-
19th February 2009, 01:08 PM #18
SENIOR MEMBER
- Join Date
- Jul 2008
- Location
- gold coast
- Posts
- 3,956
Fred ! did a batch of these a while back, and I think it was "pasho" suggested some heat shrink about 1/2 inch long on the nib end , I found 2 bits was enough to make up the difference in od of tube and id of shell. A bit tricky come glue time as you have to line up the drilled hole from the nib end, slow set glue is good hehe !
G'day all !Enjoy your stay !!!
-
19th February 2009, 11:43 PM #19
SENIOR MEMBER
- Join Date
- Nov 2008
- Location
- Houston Texas USA
- Age
- 65
- Posts
- 839
Fred,
I will show you, but in two post because it is a little picture heavy....
Plus some explaination is needed.
We discovered a few years ago that CA dosent like brass...after a few months the glue degenerated and the tubes started to come loose. so we decided to solder the tube in place...which meant the shrink tube trick had to go in favor of brass spacers.
A few prepretory comments.
We do these in batches of 50 to 100 at a time, so the steps are done in production line order..ie all the spacers are made at once, all the casings are drilled at one time, so forth and so on...but doing a one off pair of shells would only take about an hour.
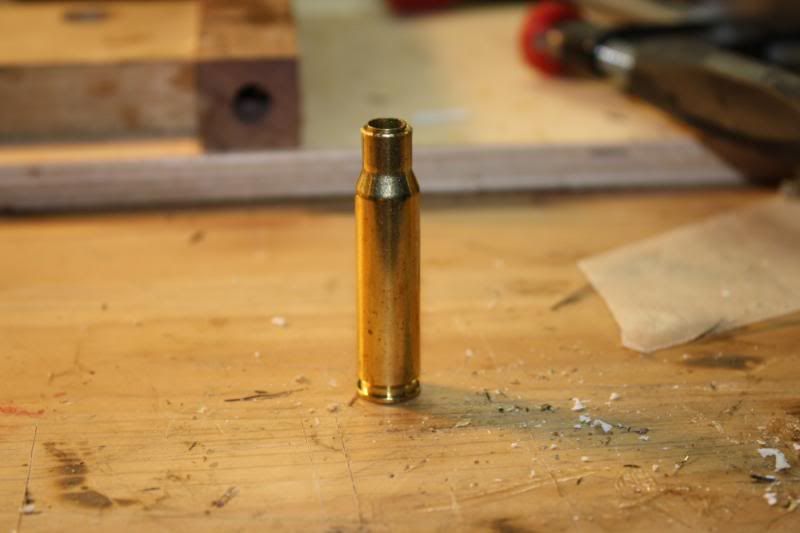
My partner drills the primer end with a 7 mm bit, then sizes or sweges the neck ID to 5/16" with his reloader set up...5/16 is the size of the bullet base anyway, so if you are using a bullet instead of a kit nib it still works.
He then takes a 5/16 diameter 6" long counter sink, and from the neck end, he reams the inside of the primer end slightly..sorta like putting a chamfer edge on the inside of the 7mm hole plus it de-burrs the drill hole...this facilitates lining up the tubes, but for just a few pens it would not be necessary.
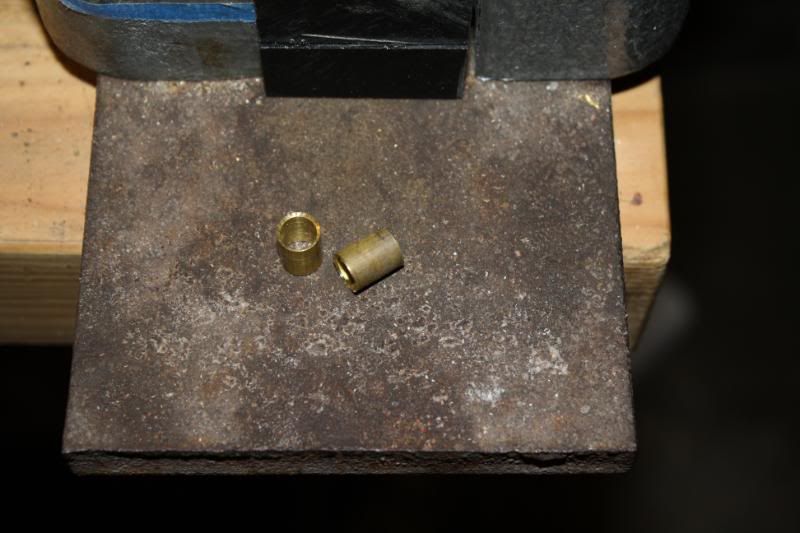
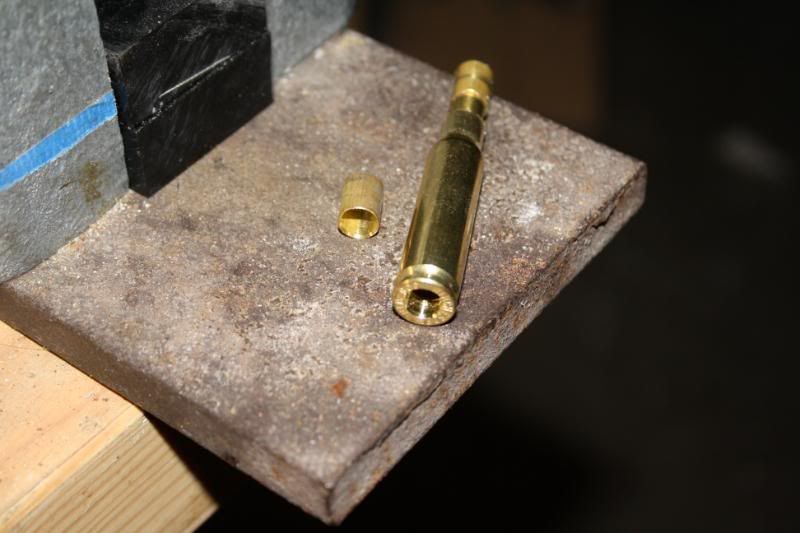
Here are the spacer I use...5/16 thick wall brass tube, drilled out to 17/64" ID, which is the true OD size of the pen kit tubes.
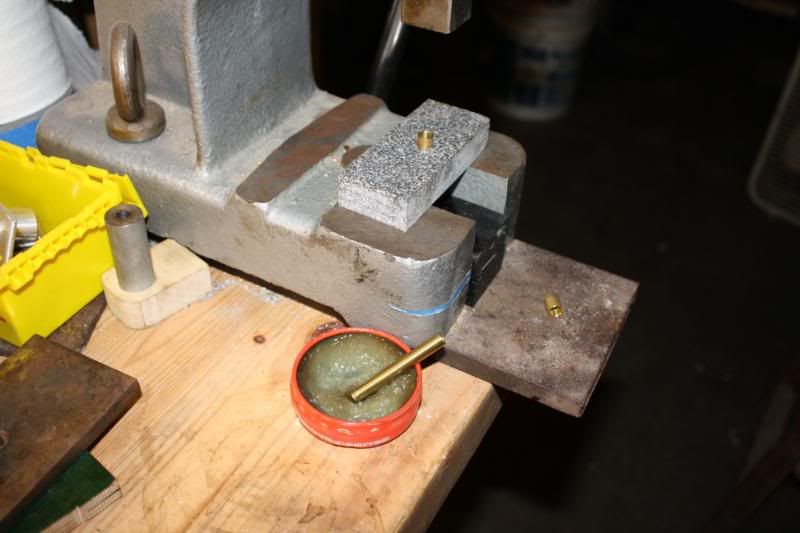
On a slow evening when nothing else is going on, I sit down and make several hundred of these...simply mount the stock in the 3 jaw and use a jacobs chuck in the tail stock, drill a inch or two of tube, then cut off with a tubing cutter, chamfer the inside edges.
You can do this with a midi lathe and a jacobs chuck in both the head stock and tail stock, but you are limited to small lengths of tubing due to the depth of the chuck...
-
19th February 2009, 11:51 PM #20
SENIOR MEMBER
- Join Date
- Nov 2008
- Location
- Houston Texas USA
- Age
- 65
- Posts
- 839
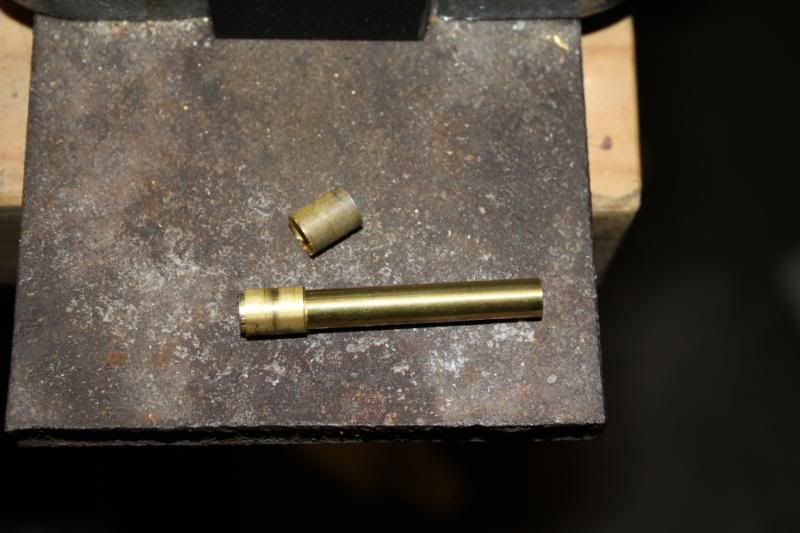
Simply roll the end of the kit tube in solder flux paste, and press the kit tube in place...the flux is used to draw the solder into the joint by capillary action, and acts as a lube when pressing the tube in the spacer.
I have a little jig that allows the tube to extend past the spacer about 1mm, because the kit tubes are about that much longer than the 308 caseing.
Photo 2 shows the finished tube...I make these up in big batches and keep them in a zip lock bag for future use.
With a little flux on a Q tip swab, I apply flux to the inside of the caseing neck, and most of the time, the tube assembly simply drops in place with hand pressure..the chamfer on the inside of the primer end helps trememdously here, but for a few pens at a time you could use a 1/4" dowel rod from the primer end to guide the tube in.
-
20th February 2009, 12:01 AM #21
SENIOR MEMBER
- Join Date
- Nov 2008
- Location
- Houston Texas USA
- Age
- 65
- Posts
- 839
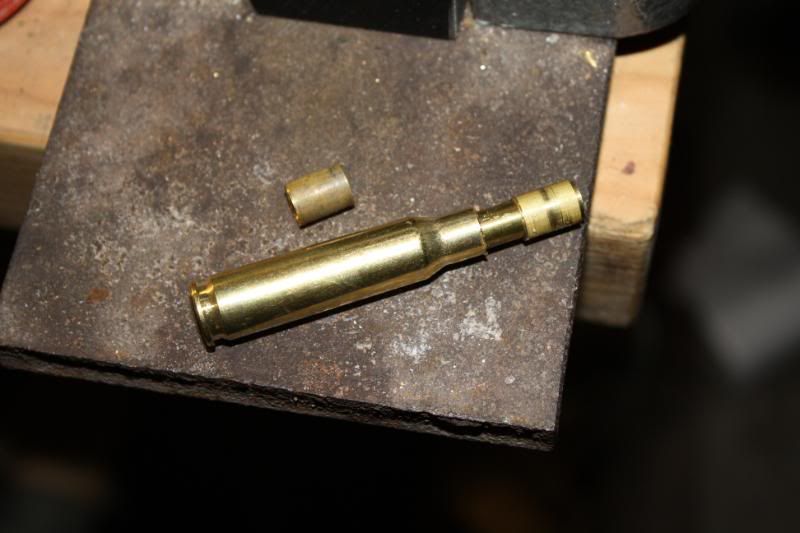
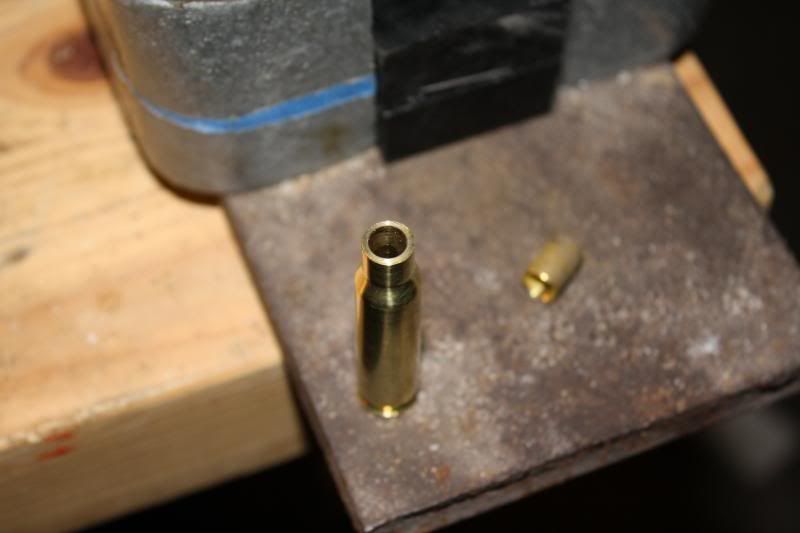
Not sure if you can tell, but the chamfer I was speaking of might show in this photo...you could use a drill bit in a hand held drill and insert it from the neck end to de-burr the inside of the 7mm hole in the primer end, which seems to be the biggest problem with inserting tubes anyway.
Casing ready for soldering...simply hit the top with a small torch or iron, and tap it with the solder...capillary action draws the solder between the spacer and the casing, and the tube and the spacer...any "bronzing" or discoloration to the brass will polish out, and any solder drips will sand off easily...if you use nickle casings, the solder dosnt like to stick to the nickle, so if you get a drip, you can usualy pop it off with a fingernail!
Finished casing...I use a pen mill to trim off the tube that extends past the neck, and square up the neck at the same time...you can press pen kits nibs in here or turn the base of a bullet and fit it up.
Keep in mind we do this is production line style...all the parts are ready when I sit down to start making up an order...but I timed it once to see what a single pen would take time wise.
About an hour from raw casing to finished pen.
-
20th February 2009, 08:41 AM #22
Retired Member
- Join Date
- Nov 2006
- Location
- Bendigo Victoria
- Age
- 80
- Posts
- 16,560
Thank you very much Ed, that is a very clear and helpful tutorial!

Must say when I read about the shrink tube method I thought that was a bit clunky and I wouldn't be happy to let one of my pens out the door like that.
I did a similar thing to your method on the primer end, except in reverse. I used a centre drill first which has an OD slightly larger that the 7mm tube (I bought a set of 9 different sizes), then I drill with the 7mm drill. This leaves the recess nice and smooth and has less chance of chatter.
In my one and only pen so far, I turned the black PR blank down to the ID of the neck and that worked very well, but of course that wouldn't work if you aren't using a split cartidge and a PR blank but only the cartridge.
Where do you buy the 5/16 tube?
I will try your method and see how I go.
Once again, thank you for taking the time to give such a comprehensive answer/tutorial
-
20th February 2009, 08:52 AM #23
SENIOR MEMBER
- Join Date
- Nov 2008
- Location
- Houston Texas USA
- Age
- 65
- Posts
- 839
I have a local metal tubing supplier...5/16 by .025 thick wall tubeing runs me $12.00 American for a 12 foot stick...but I bet you could find something sutiable from K&S craft metals in your local hobby shop in 24" lengths...the main concern is the OD of 5/16...you will be reaming or drilling the ID anyway, so as long as the ID works out to under 17/64ths you are ok...
-
20th February 2009, 11:50 AM #24
Skwair2rownd
- Join Date
- Nov 2007
- Location
- Dundowran Beach
- Age
- 76
- Posts
- 19,922

Nice work from both Fred and Ed.


 Reply With Quote

Similar Threads
-
Latest cartridge pen
By Simomatra in forum WOODTURNING - PEN TURNINGReplies: 4Last Post: 15th October 2008, 09:16 PM -
Another Cartridge Pen
By mag in forum WOODTURNING - PEN TURNINGReplies: 5Last Post: 28th September 2008, 09:12 PM -
30.06 Cartridge
By bdar in forum WOODTURNING - PEN TURNINGReplies: 8Last Post: 7th August 2007, 10:39 PM -
For Bullet Cartridge Pens
By Penpal in forum WOODTURNING - PEN TURNINGReplies: 2Last Post: 23rd February 2007, 09:52 PM -
Cartridge Filters for D.C.
By echnidna in forum HAND TOOLS - POWEREDReplies: 2Last Post: 23rd May 2004, 01:37 PM
