

 Thanks: 0
 Likes: 0
 Needs Pictures: 0
 Picture(s) thanks: 0
Results 1 to 12 of 12
Thread: Ooops!!!
-
15th January 2009, 09:54 PM #1
 SENIOR MEMBER


- Join Date
- Jul 2008
- Location
- gold coast
- Posts
- 3,956
 Ooops!!!
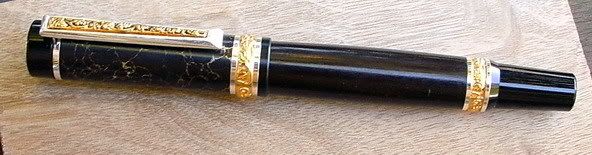
Long story short ,this is not how I expected this first attempt at a cambridge,and a truestone

Bottom line I turned and drilled the truestone in my engine lathe ,no problems at all, only had to leave a few thousands of an inch for polishing. I did the cap end no problem, as soon as I applied some pressure for sanding on the nib end it started to fall apart,beyond any sort of repair I am up to. As the blank was a one off ,I decided to try and resurrect the pen by other means , the photo does not do it justice at all , the cap end is truestone black with gold filigree, there was enough black in the kit to warrant a recovery in black, so I used some SA black ebony, the result is worthwhile I think. By the way on checking the broken bits off the cap end I found the wall thickness was .024" of truestone ,just too thin for such brittle stuff,I don't know if others have found this with the cambridge kit.
Its going to my wifes work tomorrow for appraisal hehe!
-
15th January 2009 09:54 PM # ADSGoogle Adsense Advertisement
- Join Date
- Always
- Location
- Advertising world
- Posts
- Many
-
15th January 2009, 10:47 PM #2
SENIOR MEMBER
- Join Date
- Aug 2008
- Location
- Sydney
- Posts
- 990
Thats why its so important to get a good bond between the brass tube and tru stone. Thick CA or epoxy is a good medium to achieve it. Apply the glue to the blank, then coat as much of the tube before inserting it together. Sometime with the more expensive blanks, I put on gloves and coat the entire brass tube. The fingers get glue all over them, but the gloves keep them off.
I found that by coating both surfaces, blow out has been drastically reduced.
Also with the tru-stone, be careful of heat when sanding. The brass tubes get really hot and expands and cracks the blank. Or the blank get really hot and cracks as well, just like when your drilling the stuff.
Timberbits.
-
16th January 2009, 12:09 AM #3
SENIOR MEMBER
- Join Date
- Jul 2008
- Location
- gold coast
- Posts
- 3,956
yep! definately the glueing as heat was not an issue I drilled right through the full blank with a 7mm drill and barely warmed it ,mind it was only going at 295 RPM hehe. But the gap between tube and drilled hole was a minimum of .010 ,and somehow I don't think I got enough ca to fill all the gaps properly,hence it started to flex when I started sanding, won't happen again though hehe, unless you start selling some of those stone blanks of yours ,the cost and shipping from the US is not viable for me at least, But I did prove what I set out to do, that the metal lathe makes light work of it lol.Never sharpened the tool once

-
16th January 2009, 07:18 AM #4
SENIOR MEMBER
- Join Date
- Aug 2008
- Location
- Sydney
- Posts
- 990
What did you use to glue the blank onto the tube?
I will be getting the stones in soon. Within 4 weeks hopefully.
Timberbits.
-
16th January 2009, 07:33 AM #5
SENIOR MEMBER
- Join Date
- Jul 2008
- Location
- gold coast
- Posts
- 3,956
I used medium CA , But obviously not enough
 . When I did the Black ebony with the same tube ,I went and got a 12mm drill bit,which was the same size as the tube , a slight clean out of the drilled hole meant that the fit was just a sliding fit used the same CA to glue it,but the support was much better the second time and of course added some more meat on the wall thickness . Cheers will see what you end up with in a few weeks re blanks.
-
16th January 2009, 08:02 AM #6
SENIOR MEMBER
- Join Date
- Aug 2008
- Location
- Sydney
- Posts
- 990
See if you can get your hands on a bottle of CA in the Miter Fix box.
I now use that to glue all my tubes to the blanks. It is thick CA and hasn't let me down so far.
-
16th January 2009, 09:27 AM #7
GOLD MEMBER
- Join Date
- Apr 2005
- Location
- Aberglassly,NSW
- Age
- 80
- Posts
- 4,983
Good save John, it would have looked spectacular in solid Tru-stone though.
Make sure you wet sand and keep lots of water on the blank, If you have a coolant in the metal lathe use that as well when turning
-
16th January 2009, 09:57 AM #8
Skwair2rownd
- Join Date
- Nov 2007
- Location
- Dundowran Beach
- Age
- 76
- Posts
- 19,922

Great save gawdelpus! Looks good!

-
16th January 2009, 03:20 PM #9
SENIOR MEMBER
- Join Date
- Jul 2008
- Location
- gold coast
- Posts
- 3,956
Well lucky I took some pics, I am not going to see it again ! Got snapped up at my wifes work today, Homemade box still in the process hehe. I knew it looked better than the pic, I put up, I was mainly trying to show that all need not be lost when things go wrong
Sam I don't have a coolant supply on the lathe just ye olde squirt bottle ,but at 295 RPM and a few squirts now and then got no heating at all, was only three cuts to get the corners off the blank with the carbide tip tool. It turned a little strange a bit like delryn , and powdery , I think the waste would make good grinding paste hehe.
-
16th January 2009, 08:00 PM #10
GOLD MEMBER
- Join Date
- Oct 2006
- Location
- Trinity Beach, Qld.
- Age
- 76
- Posts
- 5,313
Good save John, in fact I can not really see the repair, your advice is well taken. the pen looks great and the the public has proved that correct. Amos
Good, better, best, never let it rest;
Til your good is better, and your
better, best.
-
16th January 2009, 08:10 PM #11
SENIOR MEMBER
- Join Date
- Jul 2008
- Location
- gold coast
- Posts
- 3,956
Amos ! you can't see a repair cause there was nothing left to repair, It was a complete substitute of material ,so the cap is truestone ,and the body is black ebony, turned out a good match up it seems
-
16th January 2009, 09:51 PM #12
SENIOR MEMBER
- Join Date
- Sep 2008
- Location
- Maryvale, Queensland
- Posts
- 2,338
I don't think the quality of the pen has anything to do with it really, I just thing John's missus can sell ice to the Eskimo's :P
Russell.Pen Affair Craft Supplies - Cheapest Pearl Ex & Pemo Polymer Clay in Australia
http://craftsupplies.penaffair.com


 Reply With Quote


Similar Threads
-
Ooops...Epoxy Mistake
By DALukens in forum Michael Storer Wooden Boat PlansReplies: 14Last Post: 24th August 2008, 02:24 AM -
Ooops
By ozwinner in forum NOTHING AT ALL TO DO WITH WOODWORKReplies: 25Last Post: 27th March 2007, 08:47 AM
