

 Thanks:
  Likes:
  Needs Pictures:
  Picture(s) thanks:
Results 1 to 9 of 9
Thread: A segmented Zen pen
-
3rd November 2013, 01:53 PM #1
 SENIOR MEMBER


- Join Date
- Oct 2008
- Location
- new jersey
- Posts
- 531
 A segmented Zen pen
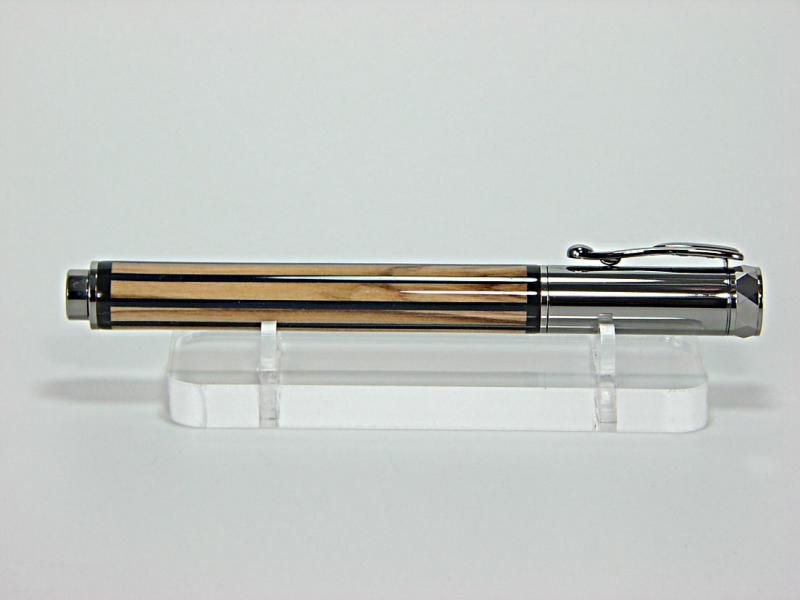
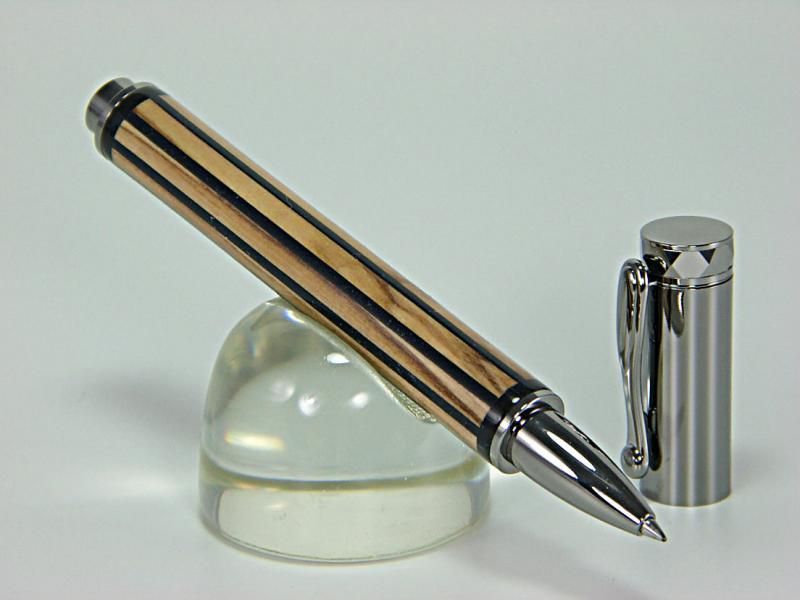
Here is a Zen pen with a segmented blank I made. It is a BOW and black acrylic inlayed blank with 6 coats of med CA as the finish. This is the first Zen pen I made and I am not sure if I like the magnetic cap. I need to give this a test run before I include it in my line.
Anyway thanks for looking and any questions or comments are alwys welcomed.
-
3rd November 2013 01:53 PM # ADSGoogle Adsense Advertisement
- Join Date
- Always
- Location
- Advertising world
- Posts
- Many
-
3rd November 2013, 02:03 PM #2
GOLD MEMBER
- Join Date
- Apr 2006
- Location
- near Mackay
- Age
- 59
- Posts
- 4,635
Looks good JT, I like the effect.
Brad.
-
3rd November 2013, 02:50 PM #3
GOLD MEMBER
- Join Date
- Mar 2009
- Location
- Sale - Gippsland
- Posts
- 1,893
the looks fantastic JT, great job
did you glue together small pieces or cut channels in the blank and fill with slivers of acrylic
either way would have been time consuming
MIKNo Result Without Effort
Mecha Blanks now on Facebook - Miks Blanks
Mecha Blanks now Available at Perfect Pens and Pencils
Find me on Facebook - Pens by MIK
-
3rd November 2013, 04:58 PM #4
SENIOR MEMBER
- Join Date
- Aug 2008
- Location
- Sydney
- Posts
- 990
Hi JT
That is one fine looking blank. I like it so much that, your tempting me to make one too.
I have found that the magnetic pens, the plating on them wear away very quickly because of the metal on metal rub.
Thanks for sharing.
TimberbitsDirect Importer of pen kits. Lowest prices and largest range.
Pen kits and pen blanks - www.timberbits.com
-
3rd November 2013, 07:51 PM #5
Skwair2rownd
- Join Date
- Nov 2007
- Location
- Dundowran Beach
- Age
- 76
- Posts
- 19,922

Love it JT!!!

-
3rd November 2013, 11:10 PM #6
SENIOR MEMBER
- Join Date
- Oct 2008
- Location
- new jersey
- Posts
- 531
 Originally Posted by MBUMIK

Hello MIK. Thanks for the kind words. This blank was made by cutting slots in the BOW and then I inserted the black acrylic. I used my router and router jig setup on my lathe to do this so that I can be able to use the indexing feature to give it exact distance segments. The ends are just small pieces of acrylic cut to fit. As far as time consuming, not really. It is pretty straight forward cutting and gluing. It is actually a simple segmented piece. Another way to make these type blanks which is abit more time consuming is to cut small staves and insert inlay material that way. Have done that also. I will usually use that method when I want the inlay material thinner than 1/16" . In this case the black acrylic is 1/16" thick. Thanks for looking.
Originally Posted by timberbits
Hello David.
Thanks for the kind words. As far as the kit goes, as I mentioned I am still kicking this one around. You may be right about the plating. The thing that seems strange is if you bump the cap the cap moves and tilts. Doesn't fall off because of the magnets but just feels weird. I am used to a solid feel of cap and body with the threading of each piece.
The plus factor of the kit is the long barrel which lends itself to a large canvas to work with to show off those special blanks without having a center band to interupt the flow. Now what you need to do is to have a kit made that incorporates the following, screw cap, long barrel, thickness for embedding items, and great plating, and rollerball or fountain pen capabilities. I expect to see this kit by next year. I do not ask for too much (he he he )
-
3rd November 2013, 11:29 PM #7
GOLD MEMBER
- Join Date
- Oct 2006
- Location
- Trinity Beach, Qld.
- Age
- 76
- Posts
- 5,313
Love that design, very attractive, Amos
 Good, better, best, never let it rest;
Til your good is better, and your
better, best.
-
4th November 2013, 07:35 AM #8
GOLD MEMBER
- Join Date
- Sep 2006
- Location
- A.C.T
- Age
- 89
- Posts
- 2,769
JT,
Beautiful looking pen and scrupulously finished to perfection, a pen to remember the cap tempts me to design a pen around that, alas too many projects just now.
So many pen kits so little time but great to view them.
Kind regards Peter.
Nil Desperandum
-
4th November 2013, 07:42 AM #9
 Keeper of the wood
- Join Date
- Jan 2011
- Location
- Ormeau, Gold Coast, Australia
- Posts
- 2,491
Wow, great lines, simple but elegant, I like it a lot.
Regards Rumnut.
SimplyWoodwork
Qld. Australia.


 Reply With Quote


Similar Threads
-
Another segmented pen
By JTTHECLOCKMAN in forum WOODTURNING - PEN TURNINGReplies: 11Last Post: 15th February 2012, 12:54 PM -
Segmented Pen
By JTTHECLOCKMAN in forum WOODTURNING - PEN TURNINGReplies: 20Last Post: 12th February 2012, 11:19 PM -
First segmented pen
By sturina in forum WOODTURNING - PEN TURNINGReplies: 5Last Post: 2nd April 2011, 03:57 PM -
a segmented pen
By kruger in forum WOODTURNING - PEN TURNINGReplies: 13Last Post: 26th February 2007, 08:50 AM -
First segmented pen
By ciscokid in forum WOODTURNING - PEN TURNINGReplies: 5Last Post: 8th February 2007, 12:11 AM
