

 Thanks: 0
 Likes: 0
 Needs Pictures: 0
 Picture(s) thanks: 0
Results 1 to 15 of 21
-
11th July 2009, 04:06 AM #1
 New Member


- Join Date
- Jun 2008
- Location
- Shahlit, nahth kak-o-lackey
- Posts
- 6
 Dovetails on Incra Jig Process Imporovement
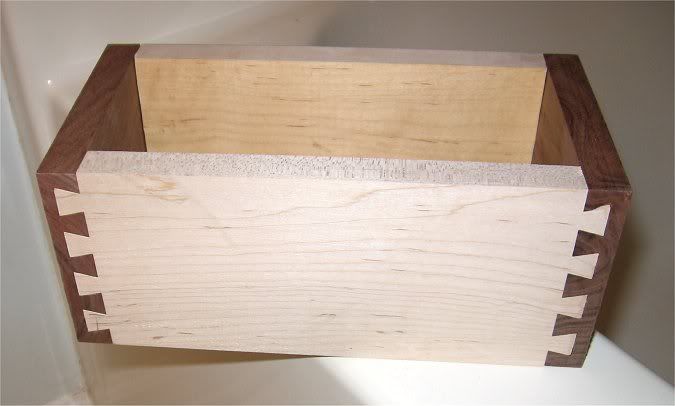

Had trouble with getting the Incra Ultra to cut joints the way I wanted consistantly. Loose joints drive me crazy! Anyway I set to tighten things up with a process approach towards improvement.
My system now cuts flawless 1/2 blind and full dovetails about every time now. I'm now looking forward to progressing some of the more advanced joinery thats possible with the Incra system.
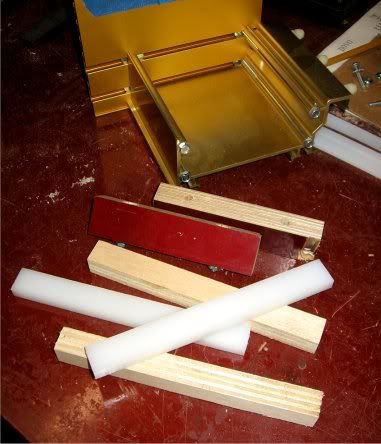
Of particular note: replaced the slightly chewed up runners on the base of the Horizontal fixture with custom made plywood/polyethylene runners. Extended them another 2" out the back from the originals for added support. The polyetylene was cut from a large cutting board purchased from sams club. That stuff even joints nice! The fixture slides much better now.
Hope this is helpful to somebody out there. Let me know if you have any questions.
I very much appreciate all that I've learned from you good folks here.
TJ
Charlotte NC USA
Life is too short...this is not a rehearsal.
-
11th July 2009 04:06 AM # ADSGoogle Adsense Advertisement
- Join Date
- Always
- Location
- Advertising world
- Posts
- Many
-
15th July 2009, 01:51 AM #2
New Member
- Join Date
- Jun 2008
- Location
- Shahlit, nahth kak-o-lackey
- Posts
- 6
http://img.photobucket.com/albums/v8...a/IMG_1295.jpg
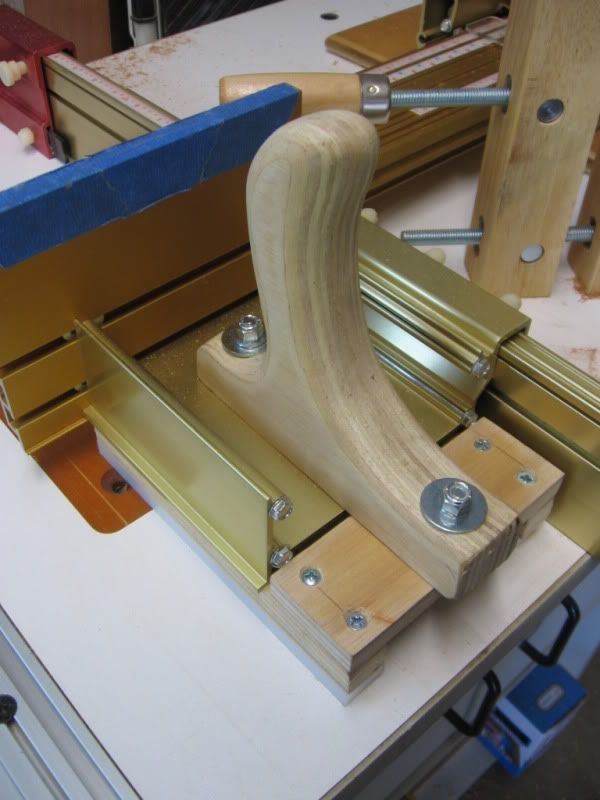
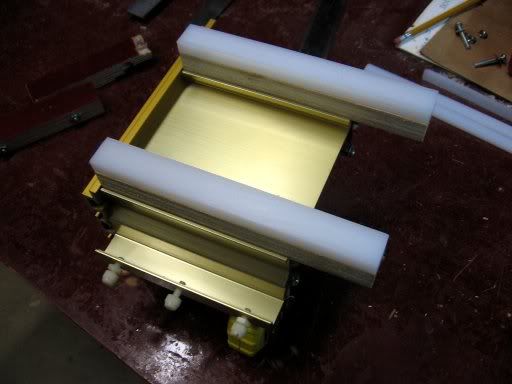
I added a handle and a cross plate for the extended base runners. It feels like it adds control to the cuts by permitting more downward and right pressure to keep base of fixture on the fence.
It also adds degree of safety as I use one hand to hold the stock to the top of the fixture to minimize any vibration, and the other hand to push the stock through the bit with the handle. This ensures both hands are out of the path of the bit as it moves through the work.
-
15th July 2009, 11:09 AM #3
GOLD MEMBER
- Join Date
- Mar 2005
- Location
- In the shed, Melbourne
- Age
- 52
- Posts
- 6,883
G'day tprofera,
Sounds like you've sorted out the problem that I'm trying to work my head around to get tighter d/tails. What in the scheme of things did you do/mean by tightening up the process and was it more than just put extended polyethylene runners on the jig?
-
15th July 2009, 10:44 PM #4
New Member
- Join Date
- Jun 2008
- Location
- Shahlit, nahth kak-o-lackey
- Posts
- 6
Waldo;
Thanks for the reply. I now realize that cutting quality dovetails of any sort (in a box for example) requires a level of precision that may not be necessary in other WW enbdeavors. As such I set about to make precise the many factors that might have an influence on the result. During some down time at work I made a listing of these items and although I'm not completely finished working on them I now have the confidence to make near perfect (or at least from what my eyes see) dovetails with the Incra jig on the router table.
Here is my list. Please bear in mind there are still items to be attended to:
DONE Tighten all Screws on Fence and jig
DONE Verify Incra Jig Fence is 90 to router table top (or leaning away from the bit at the top) shim if needed
DONE Remove jig from table and blow out dust blow out and brush black incra jig teeth
DONE Adjust Router Table plate to be level with table top height
DONE Verify Router Plate is tightly secured to router table plate
DONE Measure dovetail router bits with calipers to ensure correct sizing to +/- .001
DONE oMark all bits with indelible marker on bit shaft size and angle.
DONE Clean dovetails bits of pitch and touch up with diamond stone.
Make dovetail rabbeting standup push jig.
DONE Make new Horizontal jig jig runners from UHMW or Polyethylene Cutting Board.
DONE Make spares runner part for future use (both 5 and 7)
Add Aluminum or Wood Cross Member to runner extensions.
Add Lead Weight to top of base of Horizontal Fixture.
Add a handle to Horizontal fixture to push with.
Install UHMW on inside of horizontal fixture Al slide.
Test cuts with an MDF backer board on Horiz. fixture?
DONE Test locking the router height. Note: not needed
FUTURE Install in the table dust collection?
FUTURE Install a tabletop dust collection catch.
-
15th July 2009, 11:16 PM #5
GOLD MEMBER
- Join Date
- Mar 2005
- Location
- In the shed, Melbourne
- Age
- 52
- Posts
- 6,883
-
16th July 2009, 11:05 AM #6
Senior Member
- Join Date
- Apr 2006
- Location
- Sydney, Australia
- Posts
- 226
tprofera,
Your timing for this thread is excellent and just what I have been looking for. Just last week I purchased a "Incra Jig Ultra" (from what I can tell a very cheap price). I am in the process of making a new router table, being a copy of Norm Abram, Deluxe Router Station and trying to make sure the setup is right and make any necessary modifications.
Squirrel
-
17th July 2009, 04:00 AM #7
Senior Member
- Join Date
- Jun 1999
- Location
- Cheshire England
- Age
- 71
- Posts
- 252
Snap! Here is my version of a handle on my Incra RAJ, which also has the slippy plastic runners, all plastic, no ply and a throw-away sacrificial support at the bottom (MDF), stuck to the plastic with doublesided tape.
-
19th July 2009, 08:33 PM #8
Stupid Husband
- Join Date
- Mar 2004
- Location
- Teven, NSW
- Posts
- 179
There's some good ideas there for improving the right angle fence. I found that what really matters in making tight dovetails is preparing the timber, setting the bit height and centering the timber, especially for through dovetails. Follow the instructions carefully and remember that for through dovetails you cannot adjust the bit height to your timber thickness; you have to make test cuts to get the height precise for the fit you want. I thickness the timber to just below that recommended for the particular bit, then do test cuts. Centering has to be exact, and any thing that puts it off will affect the dovetail eg bits of dust, chips between fence and timber. Keep it clean between fence adjustments. Check timber pieces are square after you clamp them to the fence, sometimes the clamp pressure will move them slightly. Hand screw clamps seem to work best for me.
Good luck with them.
Regards
BarrieThis bit should be completely ignored, although I know that despite this warning, you will read it through to the very end.
-
19th July 2009, 09:12 PM #9
Senior Member
- Join Date
- Apr 2006
- Location
- Sydney, Australia
- Posts
- 226
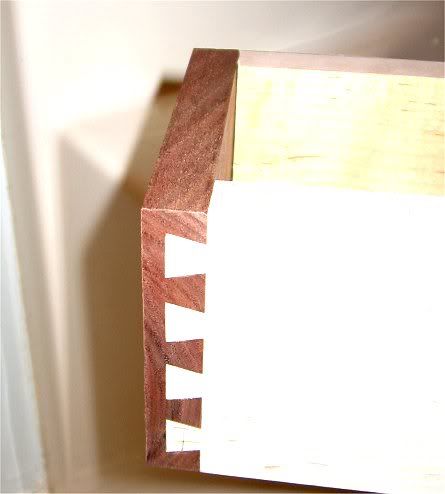
Very nice and neat looking dovetails. For those who have purchased the Incra book, is it worth while.
I haven't used my jig as yet, got other projects that I have to finish before I build my new router table.
Tempted to buy the book but it is a bit exy.
Squirrel
-
19th July 2009, 09:51 PM #10
Stupid Husband
- Join Date
- Mar 2004
- Location
- Teven, NSW
- Posts
- 179
Hi Squirrel
Not sure what book you refer to. The Master Reference Guide is a must as it contains 59 or so templates for every type of dovetail that you can think of, as well as all the instructions you will ever need. The Project Book is useful but not essential. It has a lot of good tips and some nice designs. The author has a few handy tables eg templates organised in groups according to the router bit to be used with them, and the stock thickness for blind or through dovetails. You can work this out for yourself from the Master Reference Guide.
If you havent already got it, get the Master Reference Guide. Then get someone to give you the Project book as a birthday/Xmas present (or borrow one!).
Regards
BarrieThis bit should be completely ignored, although I know that despite this warning, you will read it through to the very end.
-
19th July 2009, 10:42 PM #11
Senior Member
- Join Date
- Apr 2006
- Location
- Sydney, Australia
- Posts
- 226
This is the book, I think once I get my Incra Jig Ultra set up it will be a must have.
Squirrel...
-
5th August 2009, 07:26 AM #12
New Member
- Join Date
- Jun 2008
- Location
- Shahlit, nahth kak-o-lackey
- Posts
- 6
Another tip is to clean out all the chips with fine sandpaper from the insides of pins and tails before assembly. Makes for a cleaner fit without pounding with a mallet.
-
23rd September 2009, 12:12 PM #13
New Member
- Join Date
- Sep 2009
- Location
- Annapolis, MD, USA
- Posts
- 4
Another improvement idea
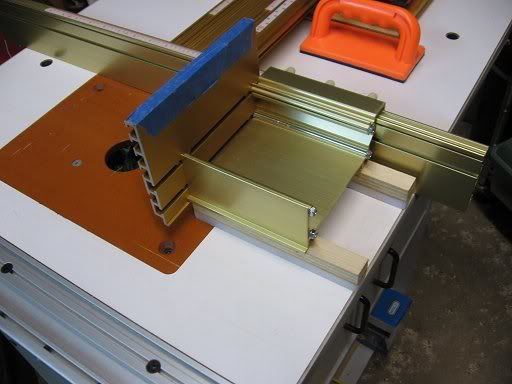
Thanks for the great ideas on improving the incra right angle! I put on the UHMW runners and a jig handle and it slides perfectly. I am making a bookcase that will require dovetailing a 48" piece upright, so I also added a larger phenolic face plate to provide a bigger area to clamp to. Given the weight in the front, I also used a leftover piece of UHMW to provide a top slide that attaches to the fence above the runner that sticks out in the back. It prevents it from tipping forward at all, and it can only move forward and backward. Hope this helps.
Pics attached...
-
23rd September 2009, 06:08 PM #14
Senior Member
- Join Date
- Jun 1999
- Location
- Cheshire England
- Age
- 71
- Posts
- 252
I like the addition of the slide limiter on the fence to stop the RAJ tilting.
-
23rd September 2009, 10:00 PM #15
New Member
- Join Date
- Jun 2008
- Location
- Shahlit, nahth kak-o-lackey
- Posts
- 6
John, That top guide you added is a really nice upgrade

 Reply With Quote


Similar Threads
-
Cutting dovetails to cut dovetails
By derekcohen in forum HOMEMADE TOOLS AND JIGS ETC.Replies: 14Last Post: 18th June 2008, 04:27 PM -
Antler pen (in process)
By Matt88s in forum WOODTURNING - PEN TURNINGReplies: 1Last Post: 7th October 2007, 11:23 PM -
Making process
By charlieart66 in forum WOODWORK - GENERALReplies: 13Last Post: 25th April 2007, 03:20 PM -
My Sharpening Process
By LineLefty in forum WOODWORK - GENERALReplies: 83Last Post: 11th August 2005, 11:46 PM -
We have all this wood, but what's the best way to process it !!?
By hardwoodswa in forum TIMBERReplies: 15Last Post: 14th November 2004, 11:33 PM
