

 Thanks: 0
 Likes: 0
 Needs Pictures: 0
 Picture(s) thanks: 0
Results 1 to 15 of 34
Thread: 1st go at Celtic Knots
-
21st October 2008, 08:38 PM #1
 Dungeon Dweller


- Join Date
- Aug 2005
- Location
- Tokyo Japan
- Age
- 59
- Posts
- 591
 1st go at Celtic Knots
After seeing the video video about "Celtic Knots" >> "http://www.ncwoodworker.net/pp/showphoto.php?photo=26591&ppuser=2069" << of a very talented young man, AlexL aged eleven, I figured I'd have a go.
The tip that I gained the most from, was when cutting for the inlay piece, to not cut all the way through, this certainly has made things MUCH easier.
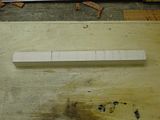
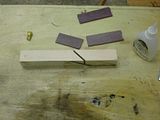
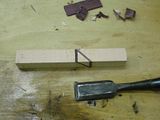
OK, I started out with a simple maple blank, a little under 3/4"
I also cut some Purple Heart, to use as the inlay.
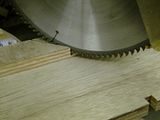
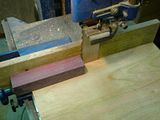
I did not use the bandsaw to make the cut, I used my SCMS to make the cut. I do not know if any other saws have this function, I'd have to think they would. I can set the depth of cut for the saw, so I put a piece of plywood on the saw, to give me a flat base, and another piece to bring the blank to be cut away from the fence a bit, then I set the saw to 45 degrees, and set the depth of cut, to just not cut through the blank all the way. Since I'm a beginner on this stuff, I also numbered each side of blank, so I could keep track.
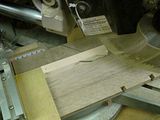
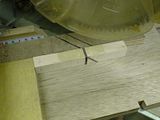
Ready to make the first cut
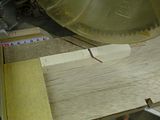
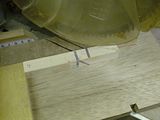
First cut made!

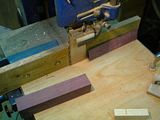
I then glued the inlay in place, using medium CA glue, and then pared off the extra wood to make the blank square again.
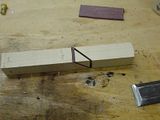
Ready to make the 2nd cut, 2nd cut made, 2nd inlay glued in place..........It's a Family thing.....
-
21st October 2008 08:38 PM # ADSGoogle Adsense Advertisement
- Join Date
- Always
- Location
- Advertising world
- Age
- 2010
- Posts
- Many
-
21st October 2008, 09:05 PM #2
Dungeon Dweller
- Join Date
- Aug 2005
- Location
- Tokyo Japan
- Age
- 59
- Posts
- 591
.................
Ready to cut the 3rd cut, and then the 4th cut.

I also did a piece with Quince inlay, here it is ready to turn.
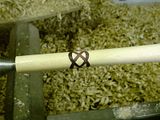
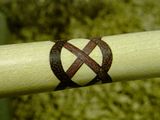
Here is the Purple Heart inlay piece, I think I did not bad for a first try.
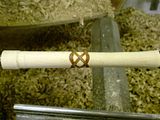
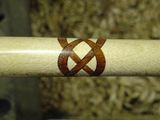
Here is the Quince inlay piece, again, I really like this, it is almost magical
Now these two pieces were just for fun, for practice and to see if this way of making the cuts etc. would work, and I think I like this
I can certainly see making some pens from this, and I can see doing this on other items, lets say the toothpick holders or some other items.
Cheers!It's a Family thing.....
-
21st October 2008, 09:30 PM #3
Dances with splinters
- Join Date
- Jul 2005
- Location
- Oberon, NSW
- Age
- 63
- Posts
- 13,360
Not bad at all! Originally Posted by Stu in Tokyo

 (Actually, my fingers are itching to grab hold of the piece for closer investigation.)
I love turning celtic knots, there are a few variations that can make them even more interesting. eg. by making layered inlays you can add a "shadow-line" effect to the knots. (Just thought I'd mention that to get you thinking... )
)
Also, doing opposite cuts (so the inlays form an X on one side) in one timber and then doing the remaining two in yet another contrasting timber gives a very nice effect. You do need to make the cuts in correct order, though.
- Andy Mc
-
21st October 2008, 09:41 PM #4
Dungeon Dweller
- Join Date
- Aug 2005
- Location
- Tokyo Japan
- Age
- 59
- Posts
- 591
Oh yeah, the possibilities are great, are they not
I saw Eli Avisera do a bunch of inlay things with inlay that was sometimes 3 and 4 layers, really amazing stuff.
I need to try some more for sure, might even make some thing this time, instead of just practice
I've got some Dessert Iron Wood to try, that stuff is not riddled with tiny holes like the Quince and Purple Heart is, so it should be even nicer
Cheers!It's a Family thing.....
-
21st October 2008, 10:26 PM #5
Enemy of mediocrity
- Join Date
- Jun 2004
- Location
- Mornington Peninsula
- Age
- 48
- Posts
- 2,825
Great photo tutorial and love the tip for not cutting all the way through the blank
It's only a mistake if you don't learn from it.
-
21st October 2008, 10:50 PM #6
Banned
- Join Date
- Jun 2007
- Location
- Otautahi , Te Wa'hi Pounamu ( The Mainland) , NZ
- Age
- 69
- Posts
- 2,114
Good find that Stu .
Much as I admire the art , and some of it holds me in awe, I have never had a hankering to do segmented turning .
But ,
that young lad has piqued my interest . May be a cultural memory thing
Not pens tho , never done any ,
something different is nudging the back of me brain .
I like the look of your quince one Stu , nice colour contrast .
Jock
-
22nd October 2008, 12:50 AM #7
You've got to risk it to get the biscuit
- Join Date
- Jan 2006
- Location
- Canberra
- Age
- 32
- Posts
- 4,195
cool
S T I R L O
-
22nd October 2008, 04:09 AM #8
SENIOR MEMBER
- Join Date
- Aug 2008
- Location
- Pensacola Florida
- Age
- 78
- Posts
- 3,199
Who says you can't make round things with straight cuts!!
Terrific post, Stu.Cheers,
Ed
Do something that is stupid and fun today, then run like hell !!!
-
22nd October 2008, 08:55 AM #9
Senior Member
- Join Date
- Feb 2008
- Location
- N.S.
- Posts
- 252
For those who have not tried these, make sure the angled cuts are all exactly the same distance from one end of the blank or the lines won't cross right.
-
22nd October 2008, 10:29 AM #10
SENIOR MEMBER
- Join Date
- Sep 2008
- Location
- Texas
- Posts
- 547
Do y'all cut the inlays at the same angle (45 degrees or whatever) so that the grain orientation is the same for all the pieces?
Richard in Wimberley
-
22nd October 2008, 11:05 AM #11
SENIOR MEMBER
- Join Date
- Oct 2004
- Location
- Oakleigh East, Sunny Vic
- Posts
- 656
Thanks for an amazing post. It is pretty hard to get my head around the transformation when you turn the inlays.
Cheers,
Steck
-
22nd October 2008, 06:08 PM #12
Ad de Crom
- Join Date
- Jan 2008
- Location
- the Netherlands
- Age
- 83
- Posts
- 1,445
Stu, I saw this before, you did it very well. Always very nice to figure out how it works huh.
Already finished with the work for your daughters room? You notice I keep an eye on you.
All the best Stu.
Ad
-
22nd October 2008, 06:46 PM #13
I've got wood
- Join Date
- Feb 2008
- Location
- Deloraine Tasmania
- Age
- 59
- Posts
- 1,092
Love this effect Stu, never seen it before. i pulled up this page at the community shed to show the woodturning boys, they are all very interested. I recon we'll be seeing some celtic knots turning up before long.
-
23rd October 2008, 07:59 AM #14
Senior Member
- Join Date
- May 2004
- Location
- Portland Vic. Australia.
- Age
- 71
- Posts
- 289
Pretty good suff, heres another one you may be interested in.
http://marleyturned.com/id180.htm
Cheers Steven
The hurrier I go, the behinder I get.
-
23rd October 2008, 09:35 AM #15
Senior Member
- Join Date
- Feb 2008
- Location
- N.S.
- Posts
- 252
I found the glue-up procedure in the video to be more complicated than it needs to be but enjoy making the celtic knots. If they are made near one end of a glue-up the block can then be bored using a forstner bit, a plug made to fit the bore (the plug should have a shoulder about equal to the wall thickness you want), placethe setup between centers and a goblet is then easy to make. Of course a purist would do the bore on the lathe but that has othe complications.


 Reply With Quote


Similar Threads
-
Celtic Knot
By wheelinround in forum WOODTURNING - ORNAMENTAL TURNINGReplies: 13Last Post: 30th December 2008, 03:28 PM -
Celtic Knot Sierra
By Sawdust Maker in forum WOODTURNING - PEN TURNINGReplies: 10Last Post: 17th September 2008, 11:37 PM -
Celtic knot Pens
By nfld steve in forum WOODTURNING - PEN TURNINGReplies: 7Last Post: 17th September 2007, 10:54 PM -
NZ Celtic influence
By Andy Mac in forum NOTHING AT ALL TO DO WITH WOODWORKReplies: 1Last Post: 3rd August 2006, 04:56 PM
