

 Thanks:
  Likes:
  Needs Pictures: 0
 Picture(s) thanks: 0
Results 16 to 30 of 45
Thread: Identifying a lathe.
-
19th January 2014, 11:28 PM #16
 Senior Member


- Join Date
- Apr 2008
- Location
- Melbourne Australia
- Age
- 61
- Posts
- 264
 New update.
Gday Folks,
Now that the shed is getting organised the lathe has a permanent home right in front of a window with a skylight overhead. I glued up some blocks for the lathe to sit on made from a laminated beam that was laying around the shed. After taking some measurements the lathe was about 125mm short of the ideal height and as the beam was 60mm thick and 300mm wide it was cut into four pieces 700mm long by 2 and 500mm by 2 and then glued and clamped with one end flush. This afternoon the friend who helped me pick the lathe up came over to help remove the castors the lathe sat on and replace them with these blocks.
Again, why oh why so heavy!!! The tail stock was no problem but thankfully he has some friends arrive so while the friends wife stayed and did what wives do, the husband came over to see what we were up to. It took all three of us to lift the head stock end up and slide the block underneath. The blocks were fixed to the lathe with 14gx100mm screws through the brackets at its base and then the whole thing was triple man handled into its final resting place.
As a test all three of us lent up against the lathe with no movement, it took a good push by all of us to get it to move at all.
Next job is to clean it up and give it a new paint job, a can of vivid white is my thinking at the moment. The new motor and VSD will be added shortly then its on to making shavings.
I'll post picks of the progress tomorrow or the next day.
Ross.
-
19th January 2014 11:28 PM # ADSGoogle Adsense Advertisement
- Join Date
- Always
- Location
- Advertising world
- Age
- 2010
- Posts
- Many
-
20th January 2014, 05:21 AM #17
GOLD MEMBER
- Join Date
- Sep 2008
- Location
- North Carolina, USA
- Posts
- 2,327
Fozz,
Quit complaining about heavy. With heavy you get; quiet, smooth, headstock, tool rest, and tailstock staying in the relationship to one another, no tool chatter marks from tool rest bouncing up and down, lathe staying in one place rather than wandering around the shed.
I have a 350mm swing Hegner that was my first "good" lathe. It cost about $2000 new. It has a square tube bed that flexes, so when I have an out of balance bowl blank to start, everything is flailing around at a different rate.
My 500mm swing short bed Woodfast is all cast iron and mounted on a steel cabinet. I took it all to pieces to get it home and in the shed. It probably weighs twice what the Hegner does. It is smooth, quiet, and steady as a rock.
I can put a 20 inch stump on it and it gently sways back and forth until I get the out of balance chunks cut off.
Be happy with heavy. If you need to move it again make a platform of plywood and roll it around on three pieces of pipe. If on concrete 3/4 inch will do. Use a pry bar to lift one end, stick pipe under, scoot toward where you want to go 500mm, put pipe under leading edge, repeat.So much timber, so little time.
Paul
-
20th January 2014, 06:02 AM #18
Senior Member
- Join Date
- Apr 2008
- Location
- Melbourne Australia
- Age
- 61
- Posts
- 264
Hey Paul,
I do hope you realise that when I've mentioned the weight of this lathe it is very tongue in cheek. My very first lathe, a mini, has little weight so of course it does vibrate at times. I waited awhile for a heavier lathe which I got and restored and during that process I actually added weight to it the make it more stable. That lathes head, tail and banjo weighed quite abit but because the frame I made didnt weigh enough it was a tad unstable so I waited for another lathe to come along.
Not one but two weighty lathes then appeared in my workshop so I had to weigh up which lathe to keep and whilst the other lathe was brand new and this one 30+ years I chose to keep the weightier one for the exact same reason you mentioned.
So whilst I have mentioned the weight of this lathe a few times now it is exactly what I've waited a long time for.
Hope this clears everything up,
Ross.
-
20th January 2014, 07:21 AM #19
GOLD MEMBER
- Join Date
- Nov 2011
- Location
- Sutherland Shire, Sydney
- Age
- 71
- Posts
- 1,301
There are two types of gravity when talking about wood lathes.
The good gravity reduces vibrations, increases stability and makes for an all round good turning experience.
The bad type of gravity causes double hernias when it comes time to move the beast.
As far as I know, you can't have one without the other.
Fortunately, the bad type of gravity is rarely a problem, unless you are in the habit of shifting the lathe around the workshop every second day.
The good type of gravity you will appreciate every time you use the beast.
You have a nice beast there, can't see you ever wearing it out, and should be many a long day before you will have to fight with bad gravity again.
Alan...
-
20th January 2014, 10:56 AM #20
GOLD MEMBER
- Join Date
- Sep 2008
- Location
- North Carolina, USA
- Posts
- 2,327
Ross,
I did not see your tongue in cheek when you were going on and on about the weight. Sorry.
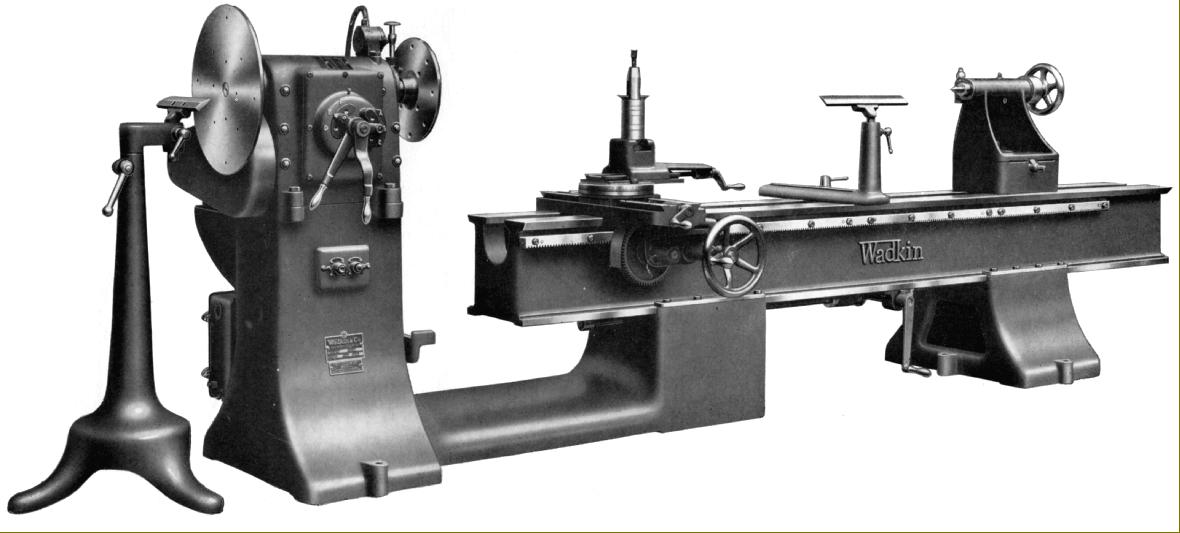
Here is my idea of the right size lathe, image from http://www.lathes.co.uk/index.html:
 So much timber, so little time.
Paul
-
20th January 2014, 07:53 PM #21
Senior Member
- Join Date
- Apr 2008
- Location
- Melbourne Australia
- Age
- 61
- Posts
- 264
No probs Paul, just didnt want you annoyed with me as your posts have helped me before and I hope that will continue in the future.
So, today I started painting the lathe, got the tailstock done then thought I'd better see about making a hand wheel. As the rear of the head shaft has no thread the thinking was to find a piece of hardwood to turn and then jam it onto the shaft. After turning the wheel, drilling the holes needed for the shaft, the cap that keeps the shaft in place and the through hole for the knock out bar it was time for a test fit. DAMN, if I measured the shaft once I measured it five times and the hole is a gnats whisker too big......, so what to do? There is a key way in the shaft so after scrounging around the shed a small bit of metal was found and fashioned into a key, put in place and the hand wheel jammed on. A little medium CA glue was added at the same time and it works a treat.
More updates to follow, and pics too,
Ross.
-
21st January 2014, 08:22 AM #22
GOLD MEMBER
- Join Date
- Jun 2005
- Location
- Townsville. Tropical Nth Qld.
- Posts
- 1,244
Ross, looking at the photo of the outboard end of the headstock, it looks like there is enough meat to have it threaded. It might be worth your while to pull the shaft out and visit your local machine shop and get a quote on having it threaded so you can turn outboard. Just my 0.20 cents worth.
rgds,
Crocy.
-
21st January 2014, 07:50 PM #23
Senior Member
- Join Date
- Apr 2008
- Location
- Melbourne Australia
- Age
- 61
- Posts
- 264
Croc, thanks for the idea, will speak to a machinist friend about it.
-
22nd January 2014, 09:11 PM #24
Senior Member
- Join Date
- Apr 2008
- Location
- Melbourne Australia
- Age
- 61
- Posts
- 264
Hand Wheel
Good evening Folks,
As promised a couple of pictures of the hand wheel and a thin parting tool made from a reciprocating pruning blade and two pieces of blackwood.
-
24th January 2014, 09:23 AM #25
GOLD MEMBER
- Join Date
- Sep 2008
- Location
- North Carolina, USA
- Posts
- 2,327
WONDERFUL hand wheel. Very nice cut off tool.
So much timber, so little time.
Paul
-
27th January 2014, 09:03 PM #26
Senior Member
- Join Date
- Apr 2008
- Location
- Melbourne Australia
- Age
- 61
- Posts
- 264
New news
Hello Folks,
Today was to be THE BIG DAY for the lathe. My friend came around this morning and after test wiring the new motor it was fired up and run from 10 hertz up to 100 hertz, the motor ran smoothly, the VSD starts the motor and breaks it amazingly fast.
Now, just so you all know, where all this electrical stuff is concerned I know exactly enough to be dangerous.
After removing the old motor and switches the new motor was test fitted to the lathe. The first thing to be overcome is some new pulleys as the old motors spindle is 16mm and the new motors spindle is 28mm. The other thing to do is make the opening in the side of the lathe larger to accept the new motors spindle. The new motor is about four times the weight of the old motor and three times the size so the mounting frame will be modified as well.
The VSD was then mounted to the wall next to the lathe, again wired to the motor and the potentiometer soldered to the wiring and then the whole thing powered up. The motor ran from 10 hertz right up to 70 hertz and would not run one hertz faster so the potentiometer was disconnected and we tried again just using the VSD and got right up 100 hertz so the thinking at the moment is to get a higher rated potentiometer.
By this time it was about 3pm and so hot in the garage the spiders were falling out of their webs, 52c on the thermometer, so we finished up for the day with my friend taking home the motor, a steel plate for the new mount and the pulleys and do some number crunching while leaving a list of things for me to do during the week. I need to cut the opening wider, organise the new pulleys after the number crunching then go down to my friends engineering business to make the new mount.
So while things didnt quite go to plan the ground work has started and the lathe should be a goer by this time next week, fingers crossed.
Further updates to come,
Ross.
-
28th January 2014, 03:40 AM #27
GOLD MEMBER
- Join Date
- Sep 2008
- Location
- North Carolina, USA
- Posts
- 2,327
Wunnerful, Wunnerful!!!
With screw on chucks and face plates it is best to have coast down mode rather than brake on your VSD. If braked too much the chuck or faceplate and bowl blank can come unwound and go flying across the shed.
I have seen a photo where a very large bowl and chuck came off, hit the floor, bounced and imbedded itself in a wall 4 meters above the floor, 8 meters from the lathe.
Some chucks have a threaded hole for a set screw to keep the chuck on. If the set screw binds on a thread, a brass pellet can be made to go against the thread with the steel screw behind.
Working between centers with small diameter stuff should be no problem with braking.So much timber, so little time.
Paul
-
29th January 2014, 10:09 PM #28
Senior Member
- Join Date
- Apr 2008
- Location
- Melbourne Australia
- Age
- 61
- Posts
- 264
Paul, thanks for the info about the braking, definitely have to watch out for that. I had a chuck come loose on the mini lathe when I first started turning, scarey stuff.
Another minor update...001.jpg002.jpg as mentioned earlier the new motor shaft is alot bigger so 3 cuttings discs and much sparks later the hole will now hopefully accept the new motor
-
2nd February 2014, 01:55 PM #29
GOLD MEMBER
- Join Date
- Sep 2008
- Location
- North Carolina, USA
- Posts
- 2,327
Save your old almost used up sandpaper and make a strip about 20 mm wide, tape on to a dowel, chuck dowel in drill and run it around inside the curved slot to smooth it so you don't cut yourself on the edges. Go around with the dowel at 90 degrees, then at 45 one way and 45 the other way.
If you get several wraps, when the paper exposed is used up, tear off the end and resume.So much timber, so little time.
Paul
-
10th February 2014, 12:16 AM #30
Senior Member
- Join Date
- Apr 2008
- Location
- Melbourne Australia
- Age
- 61
- Posts
- 264
Dropped in on Sam tonight to pick up the motor, mounting plate and turned down pulley block that Sam did for me. So this week the plan is the mount the motor in position, change the potentiometer from the 10k to the new 25k one then see if that set up will do the trick of getting 100hz. I'll take some picks of the pulley and mounting plate tomorrow and post them so you can see the progress.
Thats it for now, bed is calling,
Ross.

 Reply With Quote
Similar Threads
-
Help in identifying my lathe
By moxonvee in forum THE HERCUS AREAReplies: 4Last Post: 26th August 2012, 10:46 PM -
Help identifying a saw
By Newoodworker in forum HAND TOOLS - UNPOWEREDReplies: 7Last Post: 12th September 2011, 09:55 PM -
Need help identifying
By wun4us in forum JOINTERS, MOULDERS, THICKNESSERS, ETCReplies: 0Last Post: 4th July 2011, 10:35 PM -
Need help identifying these
By wannabe in forum METALWORK FORUMReplies: 14Last Post: 23rd November 2008, 09:47 PM -
Identifying ski boat
By Stringy in forum BOAT BUILDING / REPAIRINGReplies: 1Last Post: 11th September 2006, 09:00 PM
