

 Thanks: 0
 Likes: 0
 Needs Pictures: 0
 Picture(s) thanks: 0
Results 1 to 14 of 14
-
12th October 2007, 04:04 AM #1
 GOLD MEMBER


- Join Date
- Sep 2002
- Location
- Paignton. Devon. U.K.
- Posts
- 6,062
 a box with a drop down lid in lacewood
I have started a new box using lacewood.
This time I intend to have a drop down lid which has had rebates prepared prior to cutting off the lid from the bottom portion of the box.
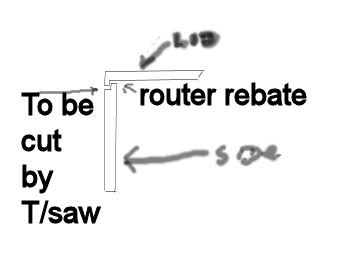
Freehand sketch below, I have not seen a box prepared previously in this manner but other members might tell me it is old hat. ..
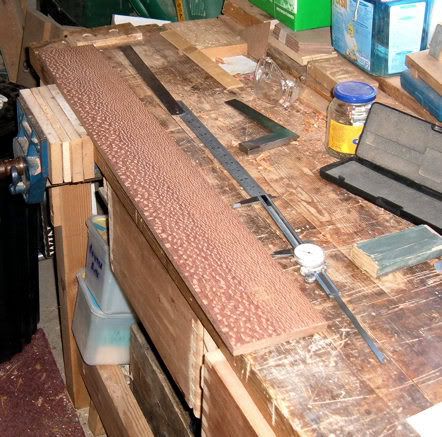
Picture of the 36 x 4 ½ 12mm prepared lacewood.
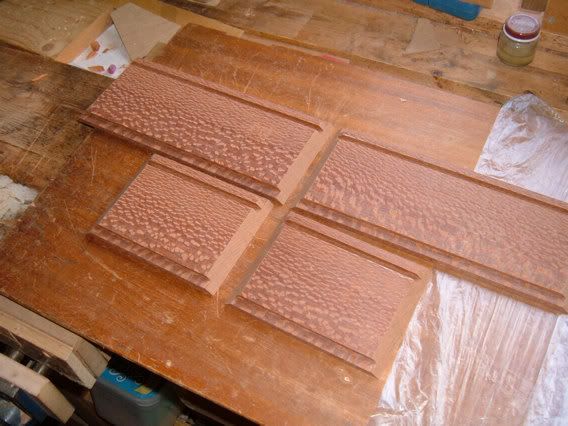
Picture showing rebates done on router.
A rebate on lip of lid. Not a dado
A rebate in preparation for drop on lid (a dado)
A rebate to insert base (not a dado)
Box glued up and ready for a veneered lid to be inserted. ( the base will be inserted when lid cut off at a later time.
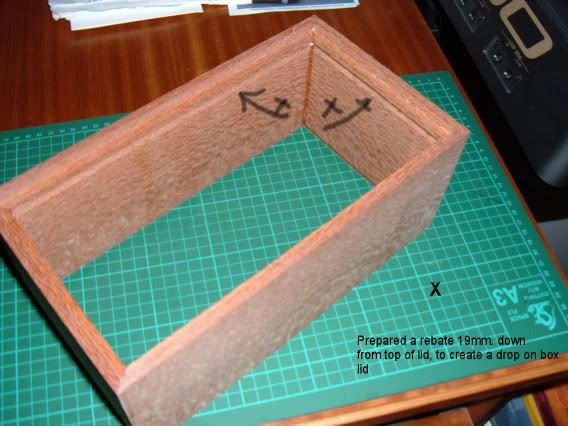
The tablesaw will cut into the box 6mm deep from the front sides just below the dado created inside. Hopefully the cuts will line up and the lid will then drop down on to the lower box section.woody U.K.
"Common looking people are the best in the world: that is the reason the Lord makes so many of them." ~ Abraham Lincoln
-
12th October 2007 04:04 AM # ADSGoogle Adsense Advertisement
- Join Date
- Always
- Location
- Advertising world
- Posts
- Many
-
12th October 2007, 10:04 AM #2
Lover of Limbs (timber)
- Join Date
- Mar 2007
- Location
- Mt Crosby, Brisbane
- Age
- 64
- Posts
- 415
Looks good, very nice piece of wood. How was the routing? Beefwood tends to tear slightly and you have to be careful.
Regards
Billy
-
12th October 2007, 05:31 PM #3
GOLD MEMBER
- Join Date
- Sep 2002
- Location
- Paignton. Devon. U.K.
- Posts
- 6,062
No problem with the routing but I did most probably 4 passes to get down to the depth perhaps that is why it went OK.
woody U.K.
"Common looking people are the best in the world: that is the reason the Lord makes so many of them." ~ Abraham Lincoln
-
12th October 2007, 11:12 PM #4
GOLD MEMBER
- Join Date
- Jun 2003
- Location
- Paralowie SA
- Age
- 62
- Posts
- 1,315
Make sure when cutting the lid off with the saw that
1) you make sure the bottom is in to stop the box twisting
2) you first cut opposite sides then put in spacers & tape them in to stop the lid from grabing the saw blade or make the cut .5 mm shallower then use a sharp blade to to divide the box the carefully clean the edges up
As I use a very simular process to make my boxes
have a play with some scrap first & you then get to make a mistake or two & not wreck that beautiful timber
regards Michael
-
13th October 2007, 12:47 AM #5
GOLD MEMBER
- Join Date
- Sep 2002
- Location
- Paignton. Devon. U.K.
- Posts
- 6,062
Thanks Michael, that sounds some very sensible advice.
woody U.K.
"Common looking people are the best in the world: that is the reason the Lord makes so many of them." ~ Abraham Lincoln
-
13th October 2007, 02:06 PM #6
GOLD MEMBER
- Join Date
- Mar 2007
- Location
- Munruben, Qld
- Age
- 83
- Posts
- 10,027
Thats the method I prefer to use. Originally Posted by coffenup
 Reality is no background music.
Cheers John
-
13th October 2007, 02:18 PM #7
Dehydrated Hydrographer
- Join Date
- Jun 1999
- Location
- Westleigh, Sydney
- Age
- 77
- Posts
- 9,550
-
13th October 2007, 06:04 PM #8
GOLD MEMBER
- Join Date
- Sep 2002
- Location
- Paignton. Devon. U.K.
- Posts
- 6,062
Thanks above. I wished I had known of that one Alexs, I am having unpleasant dreams at the present time. Got to fit a lid yet so perhaps I can cobble something together to match the inside slot before its closed up.
woody U.K.
"Common looking people are the best in the world: that is the reason the Lord makes so many of them." ~ Abraham Lincoln
-
15th October 2007, 06:00 PM #9
GOLD MEMBER
- Join Date
- Sep 2002
- Location
- Paignton. Devon. U.K.
- Posts
- 6,062
OK, I have got the lid off, quite a lot of fitting required and I have got it down to less than 1mm equal gap all round. I will get the calliper on the job later today and find where the high spot is and hopefully close the gap.
Also I will have to use a tripod with the camera for later shots, I think the camera is having difficulty focusing because of the wood grain!
 woody U.K.
"Common looking people are the best in the world: that is the reason the Lord makes so many of them." ~ Abraham Lincoln
-
16th October 2007, 05:09 AM #10
Senior Member
- Join Date
- Sep 2007
- Location
- Finland
- Posts
- 360
Great box on the way. I love that kind of clean shapes combined with super-wild grain looks.
It may sound silly, but to me it looks like a "talent having proper education". (I don't know why I thought so..)
sumu
-
16th October 2007, 01:51 PM #11
Senior Member
- Join Date
- Dec 2006
- Location
- Council Bluffs, Iowa
- Posts
- 297
Very nice indeed, I like the simple top with that lacewood. Great job!
Corey
-
16th October 2007, 02:01 PM #12
SENIOR MEMBER
- Join Date
- Nov 2006
- Location
- t
- Posts
- 961
Nice looking box for sure.....
Couple of points though, with WIP shots we went from carcass to completed box.
Am still no clearer as to what a "drop down lid" actually entails.
'Tis lovely work for sure and looks very nice
-
16th October 2007, 06:28 PM #13
GOLD MEMBER
- Join Date
- Sep 2002
- Location
- Paignton. Devon. U.K.
- Posts
- 6,062
It has been quite a difficult project to do WIP shots because the grain of the timber upsets the autofocus mechanics of my camera. Originally Posted by Cruzi
However two shots done this morning and I have used photoshop techniques to emphasise the edges.

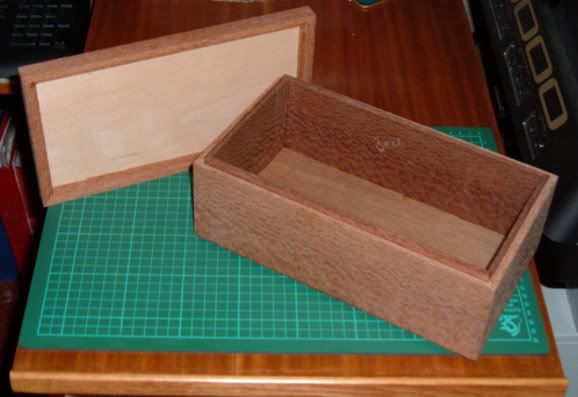
The idea is to have the boxes carcass perfectly square at corners so that the lid will drop on to the carcass either location , proving that the box has not been cobbled together.
This also means when machining saw lines must match up to dadoes already in place.
It also saves me buying hinges, and at over 20 boxes in two years my pocket money might feel the pinch.woody U.K.
"Common looking people are the best in the world: that is the reason the Lord makes so many of them." ~ Abraham Lincoln
-
16th October 2007, 06:33 PM #14
SENIOR MEMBER
- Join Date
- Nov 2006
- Location
- t
- Posts
- 961
Thanks for that


 Reply With Quote


Similar Threads
-
World's cheapest Triton dustbag - The dust box WIP
By toddles in forum TRITON / GMCReplies: 3Last Post: 28th May 2007, 10:45 AM -
Small Birch Box w/Walnut Lid
By Hickory in forum WOODTURNING - GENERALReplies: 2Last Post: 14th January 2007, 11:16 AM -
When is a box a BANDSAWN BOX
By baxter in forum BANDSAWN BOXESReplies: 26Last Post: 3rd January 2007, 10:13 PM -
Box lid question
By Gecko in forum BOX MAKINGReplies: 4Last Post: 1st January 2007, 04:04 PM -
Box with tiled lid
By Dangermouse in forum BOX MAKINGReplies: 5Last Post: 14th December 2006, 11:13 PM
