

 Thanks: 0
 Likes: 0
 Needs Pictures: 0
 Picture(s) thanks: 0
Results 1 to 11 of 11
-
4th November 2007, 04:56 AM #1
 GOLD MEMBER


- Join Date
- Sep 2002
- Location
- Paignton. Devon. U.K.
- Posts
- 6,062
 a replacement pin box for the wife
The wife needs a larger pin box to replace her plastic freebie she has had many years.
So my first attempt at a glue up a couple of days ago failed because of low temperatures, so this time its back to the kitchen for the glue ups.
I'm wanting to make this a lightweight box so reducing side thicknesses down to around 4mm and less at a later time when box has been made.
So used double sided carpet tape on some MDF and had no trouble getting Br. Mahog. down to 4mm.
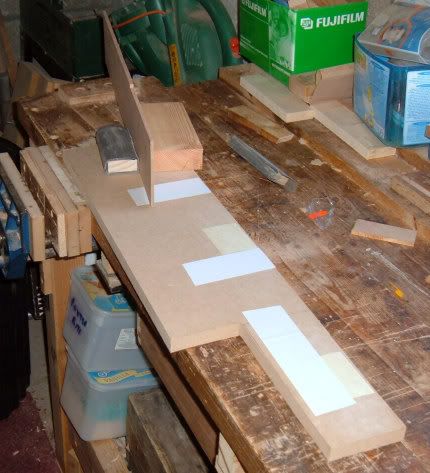
Then I cut into 35mm strips on the tablesaw using a 60t blade.

Prepared a former from some 4x2" covered with cling film and glued up the strips on to a thick base (for now)
Took into kitchen to set glue.

When the glue had set I had trouble getting the box off the former, so I put in some 2" screws.

Got the former out by clamping the screws in the vice and dragging off.

Brought box base back into kitchen for next 24 hours and then will do a clean up.
Will start to prepare for the lid next and at the same time I am struggling to prepare timber for the next project a chevron box.woody U.K.
"Common looking people are the best in the world: that is the reason the Lord makes so many of them." ~ Abraham Lincoln
-
4th November 2007 04:56 AM # ADSGoogle Adsense Advertisement
- Join Date
- Always
- Location
- Advertising world
- Posts
- Many
-
4th November 2007, 08:27 AM #2
GOLD MEMBER
- Join Date
- Dec 2006
- Location
- Virginia, USA
- Age
- 63
- Posts
- 1,904
Nicely done so far. I really like your spatula and spoon holding block.
 When all is said and done, there is usually a whole lot more said than done.
-
4th November 2007, 11:57 AM #3
Hoarder of Timber
- Join Date
- Jun 2006
- Location
- East Warburton, Vic
- Age
- 54
- Posts
- 14,208
That's getting nice and thin John, also what cicso said, utensils holder looks spiffy
Cheers
DJ
ADMIN
-
4th November 2007, 06:50 PM #4
GOLD MEMBER
- Join Date
- Sep 2002
- Location
- Paignton. Devon. U.K.
- Posts
- 6,062
And Dj. Originally Posted by ciscokid

Yeah the spatula holder was deliberately squeezed into the picture, it was one of my WIPs here around 3 years ago and is one of the most useful bits I have made. (never fallen over yet the wife says) It was a piece of 6x2 veneered, the veneering was my first attempt at the craft.
The crunch on the pin box will come when it is complete and put through the thicknesser
I might put some supporting splines across the corners, I made the jig the other week. But then that would most probably need to be done after the thicknessing.woody U.K.
"Common looking people are the best in the world: that is the reason the Lord makes so many of them." ~ Abraham Lincoln
-
6th November 2007, 06:09 AM #5
GOLD MEMBER
- Join Date
- Sep 2002
- Location
- Paignton. Devon. U.K.
- Posts
- 6,062
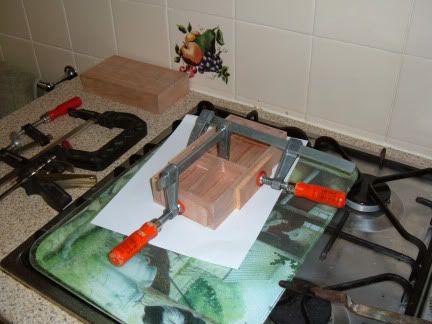
Had trouble with glue again today, the first on the lid failed, second go looks as if it will be OK but a lot cleaning up to do.
Used a fan heater played on the lid to get glue to set plus clamps and weights.

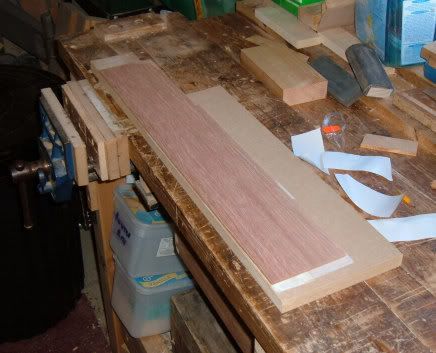
Removed the lid from the box base which has been sealed with polythene to stop glue holding everything together.
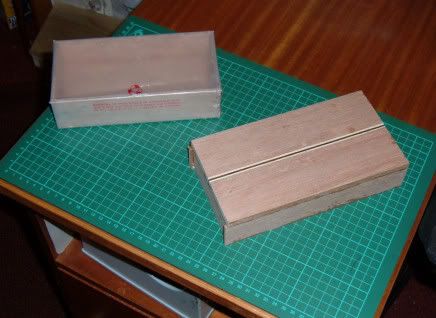
Polythene off the base section and first showing of the lid which has a separator added with Ash & Wenge through the centre of lid, partly to decorate and also to create a wider lid top than base so lid can slide over.

Looking forward to starting the chevron box shortly, (but got some plumbing to do first, new taps needed in the kitchen.)woody U.K.
"Common looking people are the best in the world: that is the reason the Lord makes so many of them." ~ Abraham Lincoln
-
7th November 2007, 05:08 AM #6
GOLD MEMBER
- Join Date
- Sep 2002
- Location
- Paignton. Devon. U.K.
- Posts
- 6,062
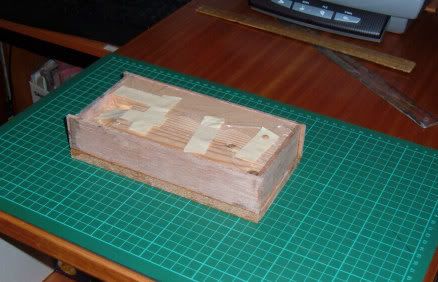
The first picture shows the box glued up and ready to go through the thicknesser to thin down base and lid from 10mm to 7mm.
Kept my fingers crossed.
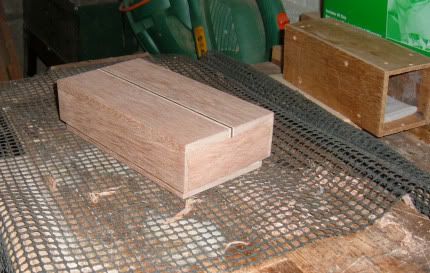
Pleased to say it was a success and no problems.

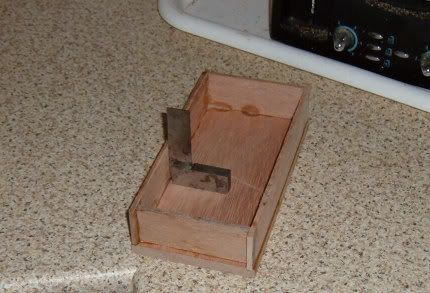
Partitions added and glued up in kitchen.
Leaves the insides to be lined and a shellac & wax finish outside tomorrow.woody U.K.
"Common looking people are the best in the world: that is the reason the Lord makes so many of them." ~ Abraham Lincoln
-
7th November 2007, 08:33 AM #7
SENIOR MEMBER
- Join Date
- Sep 2007
- Location
- Nicholls ACT
- Posts
- 728
It looks like it will be very good. I like the technique (especially the weights!). What was the rationale in putting the whole box through the planner rather than thicknessing the top and bottom first? Did you put the former back inside to help it stand up to the initial impact of the planner blades or were your cuts so fine as this was not a concern (well perhaps a concern but little risk)?
On a second point. It has puzzled me as why we have a super moderator in the UK but I am gratefull as we seem to get 24 hour service and your input has always been good.
Pusser
-
7th November 2007, 11:30 AM #8
Hoarder of Timber
- Join Date
- Jun 2006
- Location
- East Warburton, Vic
- Age
- 54
- Posts
- 14,208
Looking good John
, bet your heart was in your mouth when you were thicknessing
How is the wife taking it with clamps and all that spread over her kitchen bench Cheers
DJ
ADMIN
-
7th November 2007, 11:51 AM #9
GOLD MEMBER
- Join Date
- Mar 2007
- Location
- Munruben, Qld
- Age
- 83
- Posts
- 10,027
Nice work as usual
Reality is no background music.
Cheers John
-
7th November 2007, 06:52 PM #10
GOLD MEMBER
- Join Date
- Sep 2002
- Location
- Paignton. Devon. U.K.
- Posts
- 6,062
Originally Posted by Pusser
The reason for not bringing the thickness down before sides etc. are added is that the timber might not rebel (bow & cup and do its stress thing) therefore I can glue to flat surfaces.
I had great difficulty getting the former out and putting it back in so put the two pieces through the machine attached, but I started to get the feeling (the noise) that at 7mm it was enough, and it looks alright to me.
Happy to give some time as a moderator to the forum, there are some naughty boys and girls about around 17.00 GMT when you lot should be asleep.woody U.K.
"Common looking people are the best in the world: that is the reason the Lord makes so many of them." ~ Abraham Lincoln
-
7th November 2007, 06:58 PM #11
Ilayem
- Join Date
- Nov 2007
- Location
- Orstralia
- Posts
- 456
a replacement pin box for the wife
Good swap..


 Reply With Quote


Similar Threads
-
Husband & wife
By AlexS in forum WOODIES JOKESReplies: 1Last Post: 9th October 2007, 03:40 PM -
The honest wife
By Breslauer in forum WOODIES JOKESReplies: 0Last Post: 13th January 2006, 08:14 AM -
With reservations......
By Iain in forum WOODIES JOKESReplies: 1Last Post: 18th March 2005, 08:49 AM -
Toy Box
By silentC in forum WOODWORK - GENERALReplies: 15Last Post: 14th April 2004, 08:46 PM -
vac box for template routing
By soundman in forum ROUTING FORUMReplies: 4Last Post: 27th July 2002, 11:56 PM
