

 Thanks: 0
 Likes: 0
 Needs Pictures: 0
 Picture(s) thanks: 0
Results 1 to 15 of 21
Thread: Router lathe for stave drums
-
27th November 2008, 08:21 AM #1
 GOLD MEMBER


- Join Date
- Aug 2004
- Location
- Coffs Harbour
- Posts
- 2,019
 Router lathe for stave drums
I have been making a few stave drums and it takes a long time to get them round.
The more staves you have the easier it is to shape the square joints round but the more joints there are to get right and glue together.
I usually plane the high points then work up through the grits. It is steady work and the drums aren't perfectly round either.
Recently I found this jig using a router on a big frame that holds the rough drum shell. It was made by Koko on the drumshed forum.
This is my attempt.
MDF ends with 4 long threaded rods to hold the ends together. It can be adjusted for quite long drums.
Bearings are attached to each of the ends. You change their location to suit the diameter you need.
A set of round mdf templates are clamp bolted to the rough shell then mounted in the bearings.
Adjust the ends and the bearings to hold the shell.
The router runs on angled aluminium rails fixed to the top of the jig.
Shallow router cuts are made as you rotate the drum shell by hand (at this stage).
I have given it a short test and it looks fine.
It can be used to rout the inside of the shell by putting a set of rails inside the shell. I haven't added that yet.
Any comments and suggestions for improvement are welcome.Scally
__________________________________________
The ark was built by an amateur
the titanic was built by professionals
-
27th November 2008 08:21 AM # ADSGoogle Adsense Advertisement
- Join Date
- Always
- Location
- Advertising world
- Posts
- Many
-
27th November 2008, 09:28 AM #2
GOLD MEMBER
- Join Date
- Nov 2003
- Location
- Sydney
- Age
- 53
- Posts
- 8,879
I always wanted to something crazy like that, and you have finally done it for me. Here, have a greenie.

Love your work.Visit my website at www.myFineWoodWork.com
-
27th November 2008, 09:53 PM #3
GOLD MEMBER
- Join Date
- Aug 2004
- Location
- Coffs Harbour
- Posts
- 2,019
It works
You're a champ.
But the credit goes to Koko.
I have made one before to round a square board, about 50mmx50mm. A drilled on one end was used to rotate the rod.
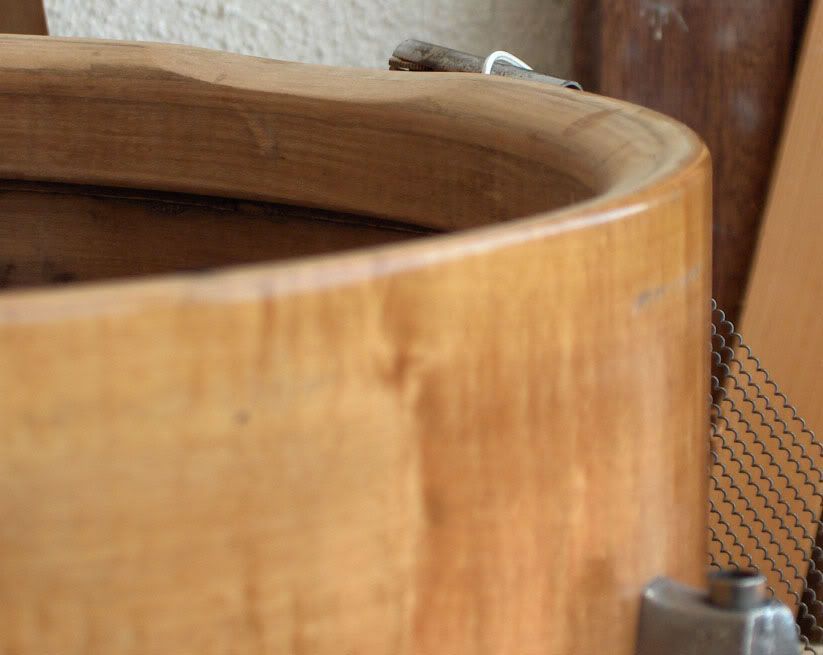
I couldn't wait for the weekend. This afternoon I tried it on the small drum shell in the above pics.
The shell is 24cm diameter by 40cm long with 24 staves(I think?).
Dry blackbutt reject floorboards.
It feels secure in the jig.
A little stiff to rotate.
Bigger bearings would help and smaller washers that don't put tension on the bearings.
I used a dishing router bit because it has a flat bottom cutting edge and round corners.
It took a dozen or more very shallow cuts. It still bites a bit.
Automating the rotation with a drill or similar would be an improvement. Then I could hold the router with two hands. It would feel better than doing it with one hand on the router and one rotating the drum.
I did about a dozen shallow cuts. Ended up covered in chips!
The finish still had slight scollops.
I used a ROS with 50# through to 240# while rotating the drum and it gave a very good finish.
Overall it took about and hour to do the routing and sanding and I was taking it steady.
Doing it by hand is hard work and it would take me a couple of days to get a reasonable finish.
This is much quicker, much easier and gives a much better result.
Know i want to do more....
Go on Scott......get yourself a sheet of mdf, threaded rod and a cheap skateboard.Scally
__________________________________________
The ark was built by an amateur
the titanic was built by professionals
-
27th November 2008, 10:01 PM #4
SENIOR MEMBER
- Join Date
- Nov 2007
- Location
- belgrave
- Age
- 61
- Posts
- 7,934
Very cool.
 anne-maria.
Tea Lady
(White with none)
Follow my little workshop/gallery on facebook. things of clay and wood.
-
28th November 2008, 09:41 PM #5
Sum ergo cogito (Cogito)
- Join Date
- Oct 2006
- Location
- Tallahassee FL USA
- Age
- 82
- Posts
- 4,650
Inverted, and on a router table, might be more stable. Also, if the ends are to be discarded, or if their centres can be later wasted, dead centres can be made from all-thread mounted on the jig plates. Or if otherwise, temporary waste blocks can be attached to the ends, and still use the dead centres.
Have a squint here for a variation: http://www.woodworkforums.ubeaut.com...ad.php?t=57412
JoeOf course truth is stranger than fiction.
Fiction has to make sense. - Mark Twain
-
29th November 2008, 12:08 AM #6
GOLD MEMBER
- Join Date
- Aug 2004
- Location
- Coffs Harbour
- Posts
- 2,019
Yes Tea Lady, I think so too.
That sounds interesting Joe.
I followed about 10% of what you are suggesting.
Can you give me some more details please?
The ends would be reused but the template bolted/clamped to the shell would be new for each shell. It needs to be close to the finished diameter.
I have never done any turning so I am not sure what a dead centre is.Scally
__________________________________________
The ark was built by an amateur
the titanic was built by professionals
-
29th November 2008, 10:13 PM #7
Sum ergo cogito (Cogito)
- Join Date
- Oct 2006
- Location
- Tallahassee FL USA
- Age
- 82
- Posts
- 4,650
Here goes, Scally: The apparatus supporting the router looked somewhat unstable, unless it were attached to your end plates. If the end plates rode on a router table, with the router below, it would be less likely to receive off-axis cutting. The "bookends" in my link served the same purpose. (They were inverted for cutting, with some lath strips across the "tops" for smooth running inverted on the router table.) Originally Posted by Scally

Live or dead centres provide a conical surface to engage a divot in the end of the workpiece, commonly used on the tailstocks of wood or metal lathes. The distinction between live and dead, is that the live centres have a bearing to support the rotating centre, so that the cone point doesn't rub in the divot; in a dead centre (much easier to make), the cone is allowed to gently rub in the divot. At high speed, the divot may be lubricated to reduce friction; at low, or negligible, speeds, this is less critical and lubrication can be safely ignored. One advantage of using such centres, is that the central axis location is better controlled. Your rollers need to be very accurately placed to achieve such control.
My four-wheel steady rest (http://www.woodworkforums.ubeaut.com...ad.php?t=68735 ) is my current avatar. To use it for hollowing vases and such, I support the workpiece with the tailstock, and adjust the wheels to intimately contact the already-rounded portion of the workpiece, then remove the tailstock. Because the wheels are adjustable, it occasionally gets knocked out of alignment by a combination of forces, but I can usually re-find the central axis.
Upon reflection, your rollers might be usable for non-circular shapes (e.g. ovals), but the geometry could get weird right quick, I think.
If your router support is attached to your end plates, it's more stable than it first appeared, and you can probably ignore most of what I've said, unless you want to remember it.
Cheers,
JoeOf course truth is stranger than fiction.
Fiction has to make sense. - Mark Twain
-
30th November 2008, 12:10 PM #8
GOLD MEMBER
- Join Date
- Aug 2004
- Location
- Coffs Harbour
- Posts
- 2,019
Thanks Joe.
I have seen a jig with a big rod through the centre and supported by a bearing around each end.
This solves the problem of having my bearings parallel.
I drilled all the holes before assembling the jig. I clamps both end pieces together so everything was even.
Of course I will need to pull it to pieces to drill holes for the next drum(s).
The jig is pretty stable but you wouldn't call it rigid. The rails across the top to guide the router do help stiffen it up.
You also need a good surface to sit the jig on and you wouldn't want to move it part way through the routing. You would probably twist it a bit.
It isn't like a good lathe.
If I made up the dead centres for the router table I would need to extend the top of the router table. Some of my drums are pretty long - nearly 900mm so far.
I would like to try a cone shaped drum and a conga drum.
My head can't work out how the locate the bearings/router to do them.
There is always something else to work on.
Cheers.Scally
__________________________________________
The ark was built by an amateur
the titanic was built by professionals
-
1st December 2008, 08:00 AM #9
GOLD MEMBER
- Join Date
- Aug 2004
- Location
- Coffs Harbour
- Posts
- 2,019
Inside routing
Here are a couple more pics of Koko's jig.
You can see how he uses the router to do the inside of a drum shell in the first pic.
The second shows a pully that he uses to rotate the shell while routing.
He clamps a drill to the jig and runs a belt to the pully.
I think he says it rotates the drum about 12 times per minute.
Nice and slow.Scally
__________________________________________
The ark was built by an amateur
the titanic was built by professionals
-
2nd December 2008, 08:25 AM #10
GOLD MEMBER
- Join Date
- Aug 2004
- Location
- Coffs Harbour
- Posts
- 2,019
Rotating the shell and Dust extraction
Attached are two more pics from Koko's jig.
The first is with the drill set up to rotate the shell.
The belt is a push bike tube.
Inside is a rubber wheel that runs against the shell.
It is all adjustable for different diameter shells.
The second is a dust hose fitted to remove dust when routing the inside of the shell. It would be hard to rout without a dust extractor because the shell would fill with dust and cover the cutting surface.Scally
__________________________________________
The ark was built by an amateur
the titanic was built by professionals
-
2nd December 2008, 06:48 PM #11
Senior Member
- Join Date
- Nov 2008
- Location
- Melbourne, Australia
- Age
- 38
- Posts
- 285
Scally interested in making me a shell or two?
-
3rd December 2008, 07:02 AM #12
GOLD MEMBER
- Join Date
- Aug 2004
- Location
- Coffs Harbour
- Posts
- 2,019
I am keen to make several now I have the jig set up.
I have requests for three sets of dunduns that will fill in a few hours over Christmas.
And I would like to try some shaped drums and experiment with different timbers.
What type of drums are you interested in?
Dimensions, timber, finish......Scally
__________________________________________
The ark was built by an amateur
the titanic was built by professionals
-
3rd December 2008, 11:00 PM #13
Senior Member
- Join Date
- Nov 2008
- Location
- Melbourne, Australia
- Age
- 38
- Posts
- 285
I was thinking woods like jarrah, tasmanian blackwood and png rosewood, purpleheart, rosegum. Originally Posted by Scally
Looking for snare drum shells - a 13.875" diametershell fits a 14" drumhead. 3/8" or 1/2" Stave/Shell thickness is fine.
Depth of shells of 4", 5.5", 6.5".
I like low sheen satin finishes.
-
4th December 2008, 10:14 PM #14
GOLD MEMBER
- Join Date
- Aug 2004
- Location
- Coffs Harbour
- Posts
- 2,019
I like your choice of timbers.
It would be straightforward to make the shells.
It might take some trial and error to get exactly 13.875". What tolerence is there?
My preference is to start with thicker shells. They can be made thinner but I think 1/2" plus would be stronger.
Danish oil would give a good satin finish and it is easy to maintain.Scally
__________________________________________
The ark was built by an amateur
the titanic was built by professionals
-
5th December 2008, 01:06 AM #15
Senior Member
- Join Date
- Nov 2008
- Location
- Melbourne, Australia
- Age
- 38
- Posts
- 285
Originally Posted by Scally
1/2" or even 3/4" shell thickness is fine. Whatever you're comfortable with.
You don't need spot on tolerance with the diameter. Anywhere on or between 13 & 3/4 to 13 & 7/8 and I'm happy. If the shell is larger in diameter than 13 & 7/8, chances are the industry standard (mylar) drumheads will be tight fitting and prevent the drum from sounding good. Conversely, if the shell is any smaller than 13 & 3/4 it will be hard to get the tension casings to line up with the hoops.
I like this kind of snare bed


 Reply With Quote


Similar Threads
-
Stave Vessels?
By Stryker223 in forum WOODTURNING - GENERALReplies: 21Last Post: 18th November 2008, 06:10 AM -
French Oak red wine stave
By Simomatra in forum WOODTURNING - PEN TURNINGReplies: 11Last Post: 6th September 2008, 09:07 AM -
Sanding Drums in a Router Table?
By Carry Pine in forum ROUTING FORUMReplies: 13Last Post: 7th July 2006, 10:41 PM -
Stave core construction...
By AlanS in forum WOODWORK - GENERALReplies: 6Last Post: 25th August 2005, 08:24 PM -
Compound-stave segmented bowls
By Reymundo in forum WOODWORK PICSReplies: 5Last Post: 29th September 2004, 05:41 AM
