

 Thanks:
  Likes:
  Needs Pictures: 0
 Picture(s) thanks:
Results 1 to 14 of 14
-
2nd May 2016, 07:06 PM #1
 GOLD MEMBER


- Join Date
- Mar 2008
- Location
- Townsville, Nth Qld
- Posts
- 4,236
 Trimming protruding dovetail joint pins
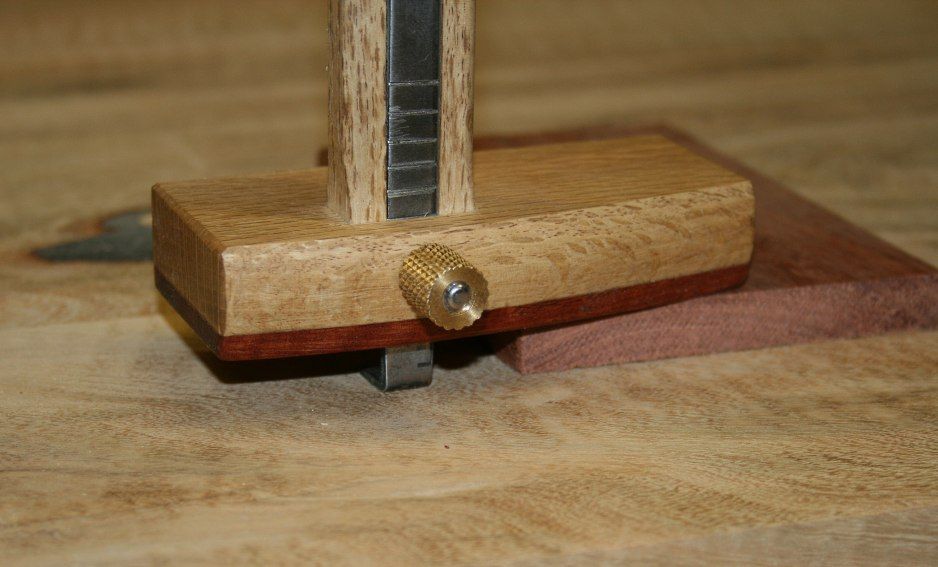
I usually have protruding pins and tails on my dovetail joints; they show up badly if they are recessed below the box sides.
The usual way to trim these pins flat and level with the surface of the box sides is with a block plane or sanding on a large flat sheet of sandpaper glued to a flat surface. My experiences with block planes is that tearout occurs
I found this alternative method using a trimmer router and jig. The trick is to make sure that the bottom of the router bit is dead level with the surface( or preferably a hairs width above it). Best to test it on a flat surface first. The other trick, which is where I came undone, is to make sure that the hand furthest from the router is ALWAYS holding the jig flat on the surface, otherwise the router will gouge in to the surface.
Still needs a final sanding before applying finish to the box
P1370378 (Large).jpg
P1370388 (Large).jpg P1370383 (Large).jpgregards,
Dengy
-
2nd May 2016 07:06 PM # ADSGoogle Adsense Advertisement
- Join Date
- Always
- Location
- Advertising world
- Posts
- Many
-
2nd May 2016, 09:54 PM #2
Member
- Join Date
- Sep 2007
- Location
- Maitland
- Posts
- 66
Hi Dengue, I find that a better way is to use a battery operated router with trimming bit that has a bearing or even two bearings on it. That way no need for a jig and all one has to do is make sure to keep the router base flat on the surface.
The battery operated router is slightly slower than a normal electric router so one gets more control over the job.
Good luck
Router
-
2nd May 2016, 09:54 PM #3
Taking a break

- Join Date
- Aug 2008
- Location
- Melbourne
- Age
- 34
- Posts
- 6,127
I normally use a belt sander, but why not just use a flush cut bit instead of a jig?
-
2nd May 2016, 10:02 PM #4
GOLD MEMBER
- Join Date
- Jun 2014
- Location
- Seattle, Washington, USA
- Posts
- 1,857
"What about a hand plane?" he said, glancing around nervously for incoming backhands.
-
2nd May 2016, 10:04 PM #5
Taking a break
- Join Date
- Aug 2008
- Location
- Melbourne
- Age
- 34
- Posts
- 6,127
Why do the work when the pixies in the power point will do it for you?
-
2nd May 2016, 11:23 PM #6
GOLD MEMBER
- Join Date
- Mar 2008
- Location
- Townsville, Nth Qld
- Posts
- 4,236
It is just that on each corner there are either pins or tails projecting, so there is no flat surface to put the trimmer base on for the flush cut bit to do its workwhy not just use a flush cut bit instead of a jig?regards,
Dengy
-
3rd May 2016, 09:58 AM #7
Member
- Join Date
- Sep 2007
- Location
- Maitland
- Posts
- 66
Just lay a bit of veneer, 3 ply or MDF on the top surface behind the raised pins, just enough to be a tad higher than the long pins and create a flat surface and then run the trimming bit over the now flat surface to trim the pins on the side wall. Once done, turn the box over to the next one and do the same, a lot easier than using a jig. Only need to do this 4 times.
Good luck
Router
-
3rd May 2016, 10:41 AM #8
GOLD MEMBER
- Join Date
- Nov 2012
- Location
- SE Melb
- Age
- 65
- Posts
- 1,278
Nah use a hand router. You ve made a few haven't you. Originally Posted by Luke Maddux

-
3rd May 2016, 02:46 PM #9
GOLD MEMBER
- Join Date
- Feb 2003
- Location
- back in Alberta for a while
- Age
- 68
- Posts
- 12,006
agree Originally Posted by Luke Maddux
it just needs to be a big heavy one with a very sharp bladeregards from Alberta, Canada
ian
-
3rd May 2016, 03:11 PM #10
Be inspired. Be creative. Be bold.
- Join Date
- Apr 2001
- Location
- Perth
- Posts
- 10,866
Hi Dengy
The best solution is that there is no waste to cut off!
To do this one needs to mark well. Actually, this is an important requirement with fitting drawer fronts - you cannot plane away pins as the drawer will no longer fit. And you do not want to plane away a lot of tail thickness, as this makes for extra work. A smidgeon is OK.
To mark exactly, try this technique with a Japanese cutting gauge or a wheel gauge ...
Dropping the blade/wheel to the bench top enables an exact thickness to be made for transferring to the mating board.
Regards from Perth
DerekVisit www.inthewoodshop.com for tutorials on constructing handtools, handtool reviews, and my trials and tribulations with furniture builds.
-
3rd May 2016, 08:30 PM #11
Senior Member
- Join Date
- Mar 2009
- Location
- Brisbane
- Age
- 73
- Posts
- 488
Dengy,
It's a hard concept to appreciate but I think I get it. At first I thought just a flush trim bit would do, but thinking it through I realised that wasn't the solution. I think your jig is a winner.
Will be interesting to see if TT can get a word in edgewise here for "the template guides"
Tony
-
4th May 2016, 05:54 PM #12
GOLD MEMBER
- Join Date
- Nov 2012
- Location
- Brisbane
- Posts
- 1,809
Hi Dengue,
I try to keep the protrusion to a minimum (as detailed above) and then I use a Sand Flee portable surface drum sander to finish the pins flush. I have the smaller 935 model Sand-Flee 935. i use a fine paper so that it is not too aggressive.
David
-
5th May 2016, 10:56 AM #13
GOLD MEMBER
- Join Date
- Mar 2008
- Location
- Townsville, Nth Qld
- Posts
- 4,236
Thanks Xanthoorhoeas, out of interest I watched the DVD on the link. How exhausting was that presenter/ salesman. He made our Aussie " but wait, there's more....." telesales guy sound like a slow talking country bumpkin
regards,
Dengy
-
15th May 2016, 03:04 AM #14
Member
- Join Date
- Nov 2007
- Location
- lara
- Posts
- 79
A table saw with special aux mdf fence is the best for it. No chipouts at all. I've tried router, hand planes, japanese pull saws - nothing comes even close to the table saw.
Very good video how to do that (watch it to the end):
https://www.youtube.com/watch?v=AddH8IgL7wY
good luck

 Reply With Quote


Similar Threads
-
Trimming a dovetail to fit
By Dengue in forum BOX MAKINGReplies: 6Last Post: 23rd January 2013, 02:59 PM -
Best sandpaper for removing dovetail pins
By Dengue in forum WOODWORK - GENERALReplies: 15Last Post: 23rd January 2013, 01:44 PM -
Anyone in here done a dovetail M and T neck joint?
By kiwigeo in forum MUSICAL INSTRUMENTSReplies: 12Last Post: 11th January 2007, 09:16 AM -
Is a Glued Dovetail Joint Stronger Than An Unglued Dovetail
By echnidna in forum WOODWORK - GENERALReplies: 15Last Post: 29th July 2006, 10:03 PM -
Cutting sliding dovetail pins by hand plane.
By JDarvall in forum HOMEMADE TOOLS AND JIGS ETC.Replies: 18Last Post: 9th March 2006, 07:09 PM
