

 Thanks: 0
 Likes: 0
 Needs Pictures: 0
 Picture(s) thanks: 0
Results 31 to 45 of 102
Thread: BluesTone guitars in progress
-
4th December 2008, 09:18 PM #31
 triple platinum umm .... thingo


- Join Date
- Sep 2006
- Location
- Melbourne, 'bushy' Donvale
- Age
- 52
- Posts
- 912

G'day BBM and Sebastiaan. Thanks for comments everyone.
Ray's on the money there.
I got some lighter 1/4 sawn stock last year that I found fairly easy, but there definitely was some heavy stock I had to wade through.
Mind you, it was easier than trying to find decent blackwood stock. !!!!!
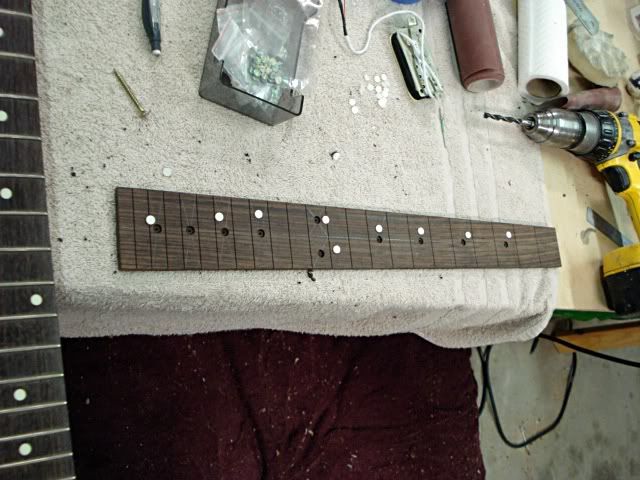
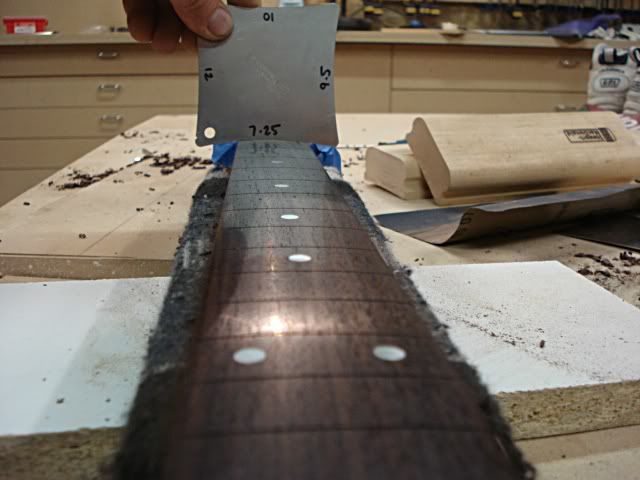
Rosewood fretboard with a 25.5" (648mm) scale and paua dots.
-
4th December 2008 09:18 PM # ADSGoogle Adsense Advertisement
- Join Date
- Always
- Location
- Advertising world
- Age
- 2010
- Posts
- Many
-
5th December 2008, 02:52 PM #32
 Senior Member
- Join Date
- May 2008
- Location
- Melbourne
- Posts
- 133
Stu,
Any chance you could remind us how you do the top-cap join to the neck. I think
you called it like a mortice (se??)
BBM
-
6th December 2008, 06:46 PM #33
triple platinum umm .... thingo
- Join Date
- Sep 2006
- Location
- Melbourne, 'bushy' Donvale
- Age
- 52
- Posts
- 912
Howdy BBM. Originally Posted by bassbuilderman

I remember touching on that subject in the Walnut/ Tassie oak thru neck thread here
https://www.woodworkforums.com/f98/qld-walnut-thru-neck-59480
Look on the second page, post #20 for the pic. with the template.
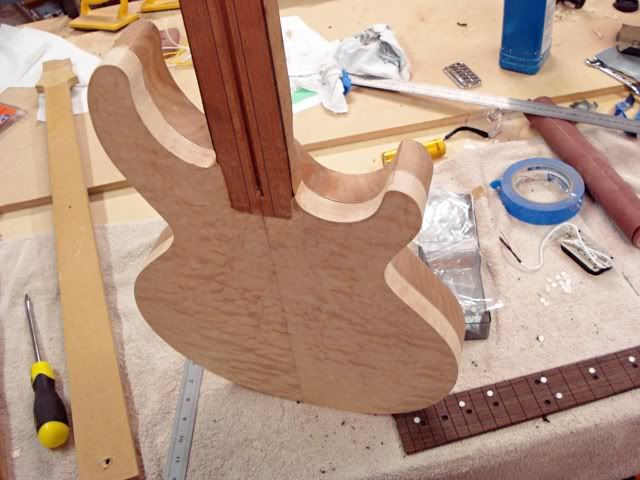
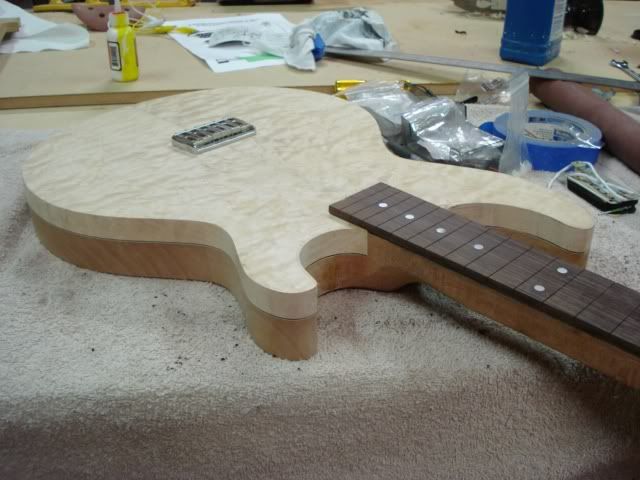
In essence, it is not that different to a neck mortice and tenon join.
Both the makore build and the other have the fingerboard sitting flush on the top cap,
which means it works aesthetically better to have the mortice and tenon hidden
underneath the fingerboard. (allowing for your offset neck angle also)
It's just a matter of narrowing the neck tenon section where the top cap will sit by a feww mm each side and following suit with the top cap too.
The pictures should hopefully explain things better than my twisting words.
Here's a quick photo album of the build here for those that don't want to wade through
the whole 12 pages of pics.
http://s85.photobucket.com/albums/k6...t=a659209d.pbw
-
7th December 2008, 01:36 AM #34
Senior Member
- Join Date
- May 2008
- Location
- Melbourne
- Posts
- 133
Hi OT,
"It's just a matter of narrowing the neck tenon section where the top cap will sit by a few mm each side and following suit with the top cap too."
Stu, I'm a chemist, so terms like mortice tenon etc are not that familiar to me.
My thoughts were, that you traced the shape of the neck-end onto paper or similar, then transferred this to the mdf to cut the template. If you trace the fretboard outline, you'll end up with a rout that will be the thickness of the bit different. If that makes sense?? Maybe a picture with the router and templates will shed some light.
BBM
-
7th December 2008, 01:23 PM #35
triple platinum umm .... thingo
- Join Date
- Sep 2006
- Location
- Melbourne, 'bushy' Donvale
- Age
- 52
- Posts
- 912
I really should do a tutorial on that , then.
Would be better to do one during the whole process, perhaps on the next one.
I'll get back to this a little later and try to explain it more clearly for you.
In the meantime, I'm fretting up the neck. I've Compound radiussed the fretboard 7.25 to 12".
-
7th December 2008, 10:07 PM #36
triple platinum umm .... thingo
- Join Date
- Sep 2006
- Location
- Melbourne, 'bushy' Donvale
- Age
- 52
- Posts
- 912
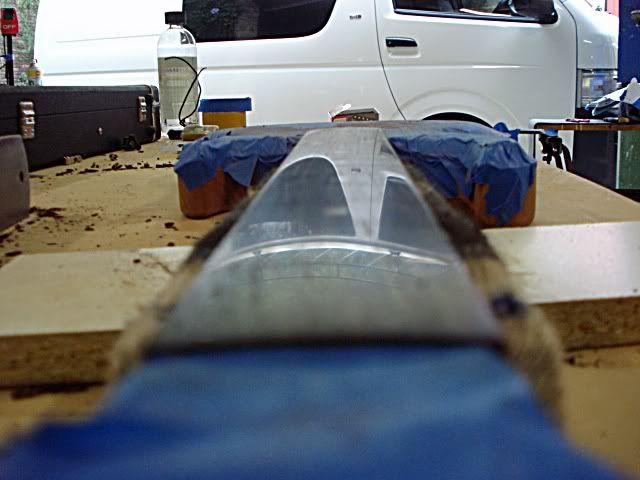
BBM, here the pic.
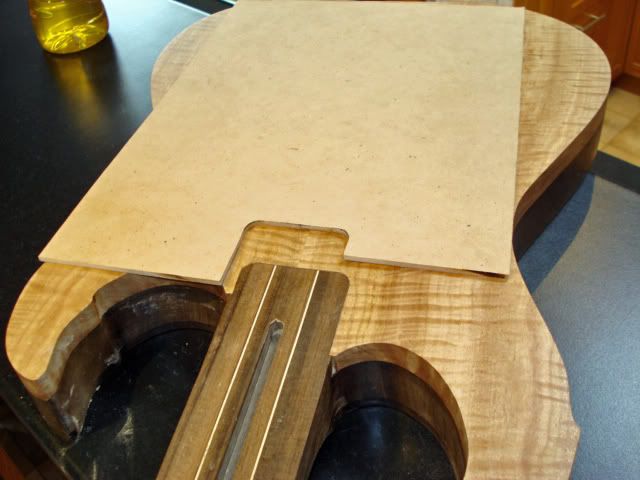
First thing I do is take off around 2 to 3mm from around the modified neck end, where the cap will sit over. (That template is in the pic)
This will make sure the joint is hidden beneath the fingerboard. The pic. shows where I've cut the 2-3mm off the neck end. (make sure your neck end is at a right angle to your body, as this will make a snug fit with your top cap.)
Next I'll make a template of the neck end using 3mm mdf. When I'm happy I'll get a fit tighter than a fishes pucker, I'll convert it to a 16mm mdf template.
All that's left to do then is use this template on your top cap and route using a straight temp. following bit (6mm shank with a bearing above the bit)
I'll clear this up more if you need it.
-
7th December 2008, 10:09 PM #37
Senior Member
- Join Date
- Sep 2007
- Location
- Sydney
- Posts
- 489
Compound radius? That is by no means an easy task. I guess the radius block will sit on the shelf? I've never played a guitar with a compound radius fretboard. Am curious about how it compares in terms of playability.
Look forward to the progress pics,
Cheers,
peter
-
7th December 2008, 10:33 PM #38
triple platinum umm .... thingo
- Join Date
- Sep 2006
- Location
- Melbourne, 'bushy' Donvale
- Age
- 52
- Posts
- 912
O.K Peter.
7.25 radius at the nut end and 12" radius at the body end.
Using the radius gauges, I rough in each end of the fingerboard using a no. 5 plane ( first pic.) Make sure she's extra sharp so you're not chipping out around your fret slots.
Once I've got each end radiussed, I'll then plane the rest of the F/board flat using each end as a datum whilst checking with the straightedge 7.25",12" and a 9.5 " gauge close to centre of board.
When that's good, I'll use 240 grit paper stuck to my steel straightedge and work up and down the fingerboard. This gets it dead level. I then skipped to a 12" radius block to go through from 400 to 2000 grit.
Very quick and really flat.
She's also got frets on but not in these pics.
Hey......nice shoes !!!!!!


-
8th December 2008, 06:24 PM #39
Senior Member
- Join Date
- Sep 2007
- Location
- Sydney
- Posts
- 489
Is that a mirror finish on a rosewood fretboard?.... Smart @r$e
-
8th December 2008, 08:11 PM #40
Senior Member
- Join Date
- Oct 2007
- Location
- Dandenong Ranges
- Age
- 51
- Posts
- 235
Another great build thread happening here Stu. That's some pretty outstanding work with the compound radius........I would suggest the REALLY SHARP PLANE point should be underlined when roughing in over fret slots. To me, the mere fact you would consider such a step is testament to your trade skills and experience. Although I am aware of your sharpening skills also being top notch.....slice a hair on your arm sharp eh?

First class building and first class sharing of knowledge.....kudos to you
-
11th December 2008, 10:32 AM #41
Complete Novice
- Join Date
- Feb 2008
- Location
- Western Australia
- Age
- 46
- Posts
- 110
Mirrored fret board finish, very nice!!!!
Can you use the radius blocks to do a compound as easily as your method Stu?
-
11th December 2008, 12:58 PM #42
QUID PRO QUO
- Join Date
- Dec 2008
- Location
- NEWCASTLE
- Posts
- 52
nice work again oz tradie, i have seen your work on the aggh forum and i gotta say, you turn out some good lookin guitars.
Keep up the xlnt work
G
-
14th December 2008, 12:54 AM #43
triple platinum umm .... thingo
- Join Date
- Sep 2006
- Location
- Melbourne, 'bushy' Donvale
- Age
- 52
- Posts
- 912
Thanks Ethereal, Tim and G for your thoughts. Mucho appreciated !!!
I've posted a link for alternate methods to Compound radiusing here to help fuel the debates.
It's a little slow though.......
http://www.anzlf.com/viewtopic.php?t...=asc&highlight=
-
14th December 2008, 10:02 AM #44
Senior Member
- Join Date
- Nov 2008
- Location
- Darwin
- Posts
- 258
Looks like you make your own radius gauge too, I made mine out of perspex but didn't think to put them all on one piece. Next time I'll do it that way. The fret board looked good at first but to be honest Stu, painting it silver was a silly mistake.

Jim
May your hands glide effortlessly up and down your fret board
-
14th December 2008, 10:30 AM #45
GOLD MEMBER
- Join Date
- Aug 2004
- Location
- Coffs Harbour
- Posts
- 2,018
Very impressive plane work Stu.
You have found some great pieces of quilted maple and fiddleback blackwood. That guitar is going to look amazing.
I am going back to the shed and resharpen all my blades now.....Scally
__________________________________________
The ark was built by an amateur
the titanic was built by professionals

 Cheers, Stu
 Reply With Quote


Similar Threads
-
Daion Guitars?? Familiar with these Jap guitars?
By ale in forum MUSICAL INSTRUMENTSReplies: 2Last Post: 10th April 2008, 05:39 PM
