

 Thanks: 0
 Likes: 0
 Needs Pictures: 0
 Picture(s) thanks: 0
Results 31 to 45 of 45
-
6th September 2009, 11:54 PM #31
 Member


- Join Date
- Sep 2006
- Location
- Brisbane
- Posts
- 73

I used ABM and ETS on a couple of guitars, then moved to having them made locally for Strat, then Wilkinson saddles. Now I'm machining 1 piece bases for Wilkinson saddles myself. The main motivation for individual units was pricing and versatility. You end up ordering a higher quantity (price break) which can be used on different string counts. The downside is that they're trickier to align and a hassle to earth individually. Now I've got CNC capabilities I can make 1 piece bridge bases to suit each instrument.
-
6th September 2009 11:54 PM # ADSGoogle Adsense Advertisement
- Join Date
- Always
- Location
- Advertising world
- Posts
- Many
-
7th September 2009, 02:40 PM #32
Senior Member
- Join Date
- Apr 2008
- Location
- Wollongong, NSW
- Age
- 56
- Posts
- 178
Hi, thanks for the suggestions Dan and Wal - I've messed around a bit more..
Here's some pictures of the winder, I also opened the footswitch to see what was in there ( not a lot )...


That multi-contact switch seems to be the speed control, as the pedal is depressed further, each successive contact touchs and it kicks up a speed. At the top of the footswitch is a little block which makes the contact - If I reduce the size of this, I should be able to lock ut at its lowest speed ( supposedly 600 rpm ).
Dan, so you remember which larger sized pulley you got from smallparts.com.au ? There's a lot to choose from on that website.
Wal, do you think that clipsal light dimmer might still be a possiblilty now you have seen the inside of the footpedal ?
-
8th September 2009, 09:12 PM #33
Senior Member
- Join Date
- Dec 2008
- Location
- Niddrie Melbourne
- Age
- 66
- Posts
- 455
Yep, all you need to do is connect it in series either at the foot switch or the motor although as I said, if there is enough room in the machine or the foot switch to house the dimmer it would be best. Originally Posted by fletch123

I'm heading up to Wombarra for a week or so on the 18th. we may be able to get together and check it out.
regards
Wal<style type="text/css">p { margin-bottom: 0.25cm; line- 120%; }</style> Only two things are infinite, the universe and human stupidity, and I'm not sure about the former. Abert_Einstein.
-
5th October 2009, 05:06 PM #34
Senior Member
- Join Date
- Apr 2008
- Location
- Wollongong, NSW
- Age
- 56
- Posts
- 178
Its about time I updated this - Wally was kind enough to pop in and visit me while he was down this way recently - He bought a light dimmer with him which we hooked up in place of the footswitch - and a couple of larger pullies he machined for me
 . The dimmer worked perfectly as a speed control for the motor anbd I used one of the pullies as the mount for the pickups.


Pickup winding would have to be the most frustrating thing I have ever tried - If you look at the wire the wrong way, it will break on you... I eventualy got the hang of it and managed to wind 3 strat pickups -
Bridge 8040 winds = 6.22k
Middle 7845 winds = 6.04k
Neck 7640 winds = 5.94k

I didnt take any photos of me magnetizing the pickups...
Next step is to load them into one of my guitars and see what they sound like.
Cheers
Dave
-
5th October 2009, 05:07 PM #35
Senior Member
- Join Date
- Apr 2008
- Location
- Wollongong, NSW
- Age
- 56
- Posts
- 178


-
7th October 2009, 12:04 AM #36
Dreamer
- Join Date
- Jul 2009
- Location
- Perth
- Age
- 35
- Posts
- 87
Interested to see how they come up! hope they work good for ya.
Must of felt pretty good sticking your own name to the pup's on the back there!
-
11th October 2009, 07:38 AM #37
Member
- Join Date
- Sep 2006
- Location
- Brisbane
- Posts
- 73
Looking good
-
6th November 2009, 09:52 AM #38
Senior Member
- Join Date
- Sep 2007
- Location
- Sydney
- Posts
- 489
Hi,
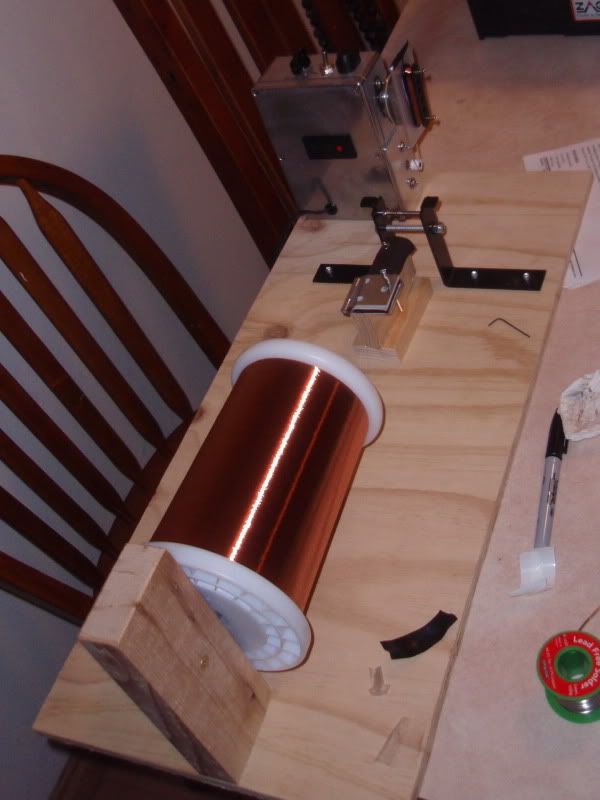
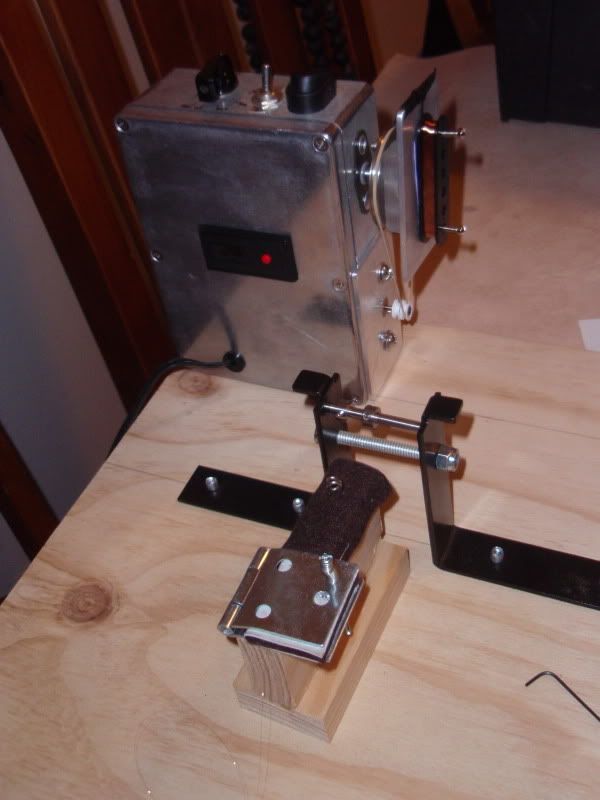
This is my alternative to the schatten winder, which is simply just an over engineered clone of the schatten. Phil Mailloux helped me out ALOT with this one. Thanks Phil.
The components in summary are:
5amp controler
12 volt regulated supply
12volt motor (draws 5amps at stall, so it has serious torque)
Aluminium housing
reed switch with CUB3 counter
Electronic reverse switch.
All mechanical parts are hand precision made from small parts. But my favourite part is the nylon bearings which are silent and glide.
I have been experiementing with a felt pinch tensioner which is working realy well and assists with the spooling off.
It spins from 0 up to 1500 RPM, however the counter is only accurate from 500 to 1200RPM as i have a capaciter across the switch to filter out bouncing. However I have only been using it at 900 RPM. From my preliminary tests anything over 1000-1100 RPM was getting slack in the coils, and you have to up the tension more than I would like. I will make the full component list available to all forum members as a resource. PM me if you want it.
Some pics below
Cheers,
Peter
-
6th November 2009, 10:02 AM #39
Senior Member
- Join Date
- Dec 2008
- Location
- Niddrie Melbourne
- Age
- 66
- Posts
- 455
Now there's a fine bit of work Peter
and I'll bet the biggest expense was the counter. good stuff mate.
Where did you get the nylon bearings?
regards
Wal<style type="text/css">p { margin-bottom: 0.25cm; line- 120%; }</style> Only two things are infinite, the universe and human stupidity, and I'm not sure about the former. Abert_Einstein.
-
6th November 2009, 10:16 AM #40
Senior Member
- Join Date
- Sep 2007
- Location
- Sydney
- Posts
- 489
Hi wal,
I got all mechanical parts from here:
Small Parts Mechanical Components Starting With S - Product Catalogue
The most expensive part has actually the pulley. It is turned harded steel made for the shaft which is precision ground to 4.756mm so there is no slack. I spent up on the mechanical parts, because I wanted to build it once to last the test of time. the CUB 3 counter only cost me US$9.95 on ebay which unded up to be about $17 AU with postage
Cheers,
Peter
Originally Posted by walcen
-
6th November 2009, 02:22 PM #41
SENIOR MEMBER
- Join Date
- Sep 2008
- Location
- sydney
- Posts
- 2,370
thats a bloody great setup peter!
nice work
-
14th November 2009, 01:18 AM #42
triple platinum umm .... thingo
- Join Date
- Sep 2006
- Location
- Melbourne, 'bushy' Donvale
- Age
- 52
- Posts
- 912
Much respect, Dan.
I'm also a big fan of your builds and wish you success in pushing your build style into something of an Aussie force to be reckoned with.
Your gats deserve to be up there with not just our local finest, but global.
-
17th November 2009, 09:45 PM #43
Member
- Join Date
- Sep 2006
- Location
- Brisbane
- Posts
- 73
Thanks Stu! I'm just browsing through your site now... looks great!! I think I'll have to visit when I finally manage to get my #### to Melbourne

Peter, that's a great looking winder! I've bought a few things from smallparts too, great site.
-
17th November 2009, 11:45 PM #44
Member
- Join Date
- Jun 2006
- Location
- Sydney
- Posts
- 96
Hi,
Wonderful work guys and thanks for the tip on the supplier. Peter: I am very impressed with your custom build. - Here is my version of the winder. I decided to try out the larger Chinese Coil winder so I could program different wind quantities. I also added the Dimmer speed control instead of the dodgy footswitch - Thanks for the tip Wal - I used a 300W Dimmer as it was all I had so I am not sure if I have spec'ed that properly. Seems to work fine though.
I considered using a CNC stepper motor and nylon screw thread for the scatter programming (have seen this done on a youtube vid) but I might leave that for another day. If I give it a go I will let you know how I go.
Here is a video of the rough build of this winder. I will now pretty it up and make it a bit more ergonomic too. BTW I was thrilled with the tone of this pickup when I tried it in the neck position of a strat.
cheers, jb
[ame="http://www.youtube.com/watch?v=OZ3ia-BPP1U"]YouTube - jb Guitars - winding a single coil Pickup[/ame]
-
1st January 2010, 10:36 AM #45
SENIOR MEMBER
- Join Date
- Sep 2008
- Location
- sydney
- Posts
- 2,370
i just came across this...
Free information : Pickup winder from Down Under at Stewart-MacDonald

 Reply With Quote


 Cheers, Stu
Similar Threads
-
Winders got me good - help or advice please
By bsrlee in forum COMPUTERSReplies: 8Last Post: 9th October 2008, 07:20 PM -
stewmac and dhl problems
By old_picker in forum MUSICAL INSTRUMENTSReplies: 10Last Post: 13th March 2008, 06:47 PM -
French Polishing of Stewmac Kit
By Strungout in forum MUSICAL INSTRUMENTSReplies: 10Last Post: 28th July 2007, 07:16 PM -
Stewmac Kit
By Strungout in forum MUSICAL INSTRUMENTSReplies: 5Last Post: 25th August 2006, 11:09 PM
