

 Thanks: 0
 Likes: 0
 Needs Pictures: 0
 Picture(s) thanks: 0
Results 1 to 15 of 158
Thread: New Design - Single Cutaway
-
8th September 2008, 08:54 PM #1
 Senior Member


- Join Date
- Sep 2007
- Location
- Sydney
- Posts
- 489
 New Design - Single Cutaway
Hi,
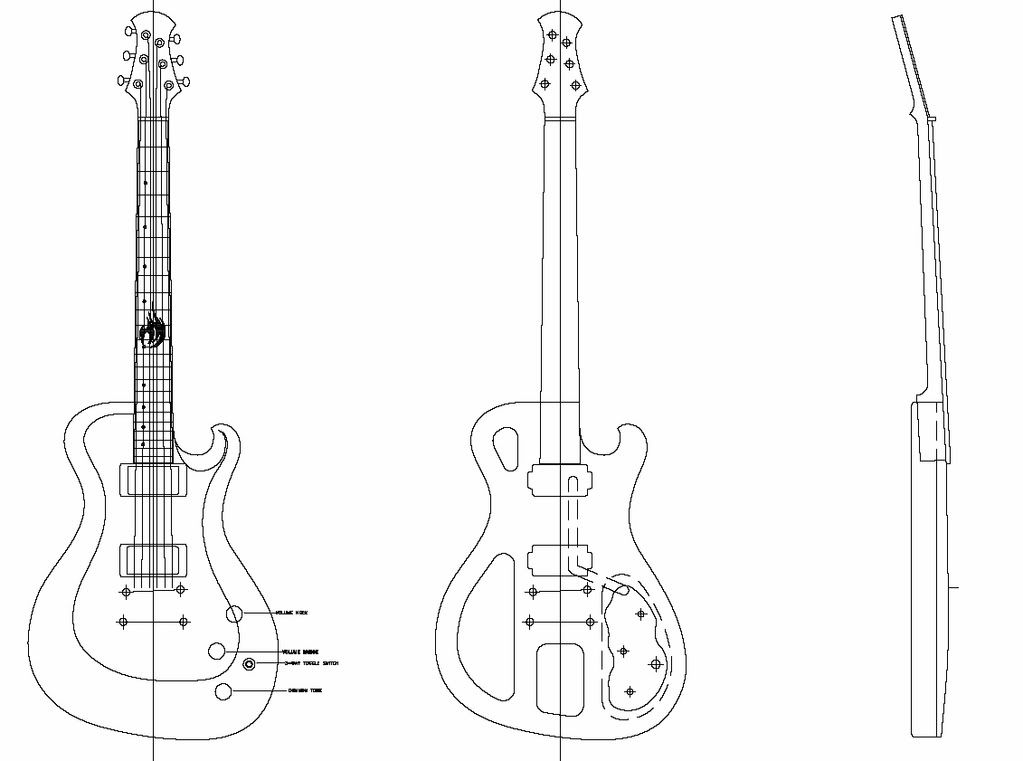
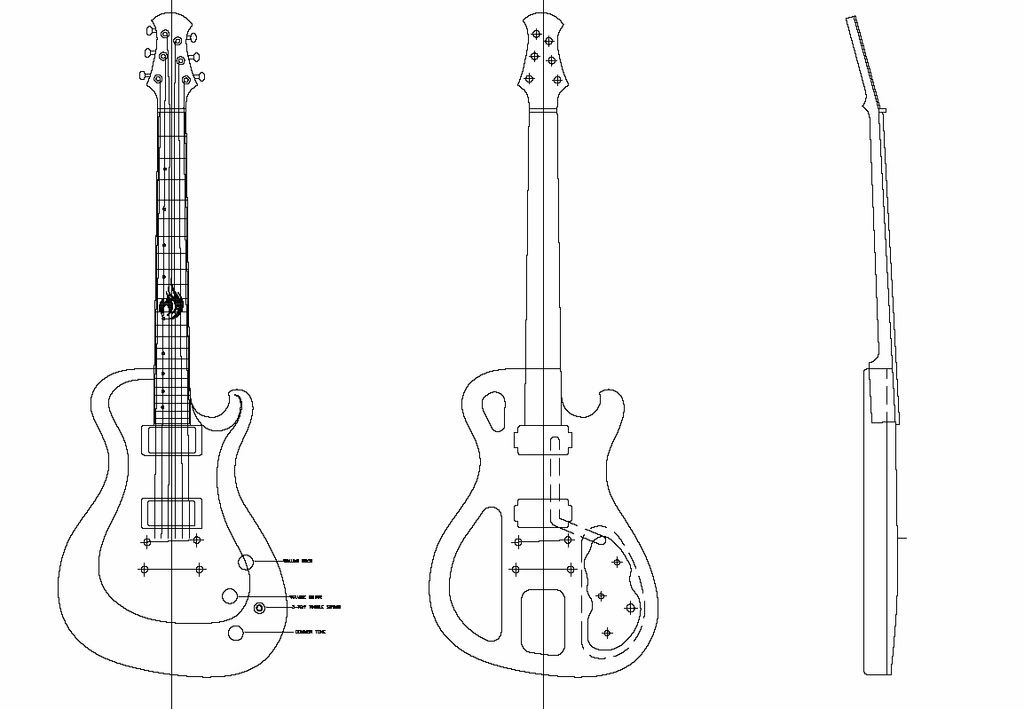
Have been working on a new design for a single cutaway. I thought I'd post the first build of this shape. I've been working through the design in AutoCAD for a while, and I'll post a simplified design below. I like to work in CAD, because it gives you the chance to create a "model" in real world dimensions, which is a handy reference to work off and measure dimensions from. Very good for checking neck angle fboard width and many more. I print templates on A1 which makes the process of making templates alot easier. I'm not 100% on the headstock. I'm going to mock up tuners etc on a piece of MDF before I lock in the headstock design. Anyway, I'll start with the CAD. More picks of the build to follow.
Cheers,
Peter
-
8th September 2008 08:54 PM # ADSGoogle Adsense Advertisement
- Join Date
- Always
- Location
- Advertising world
- Posts
- Many
-
9th September 2008, 08:14 PM #2
Senior Member
- Join Date
- Sep 2007
- Location
- Sydney
- Posts
- 489
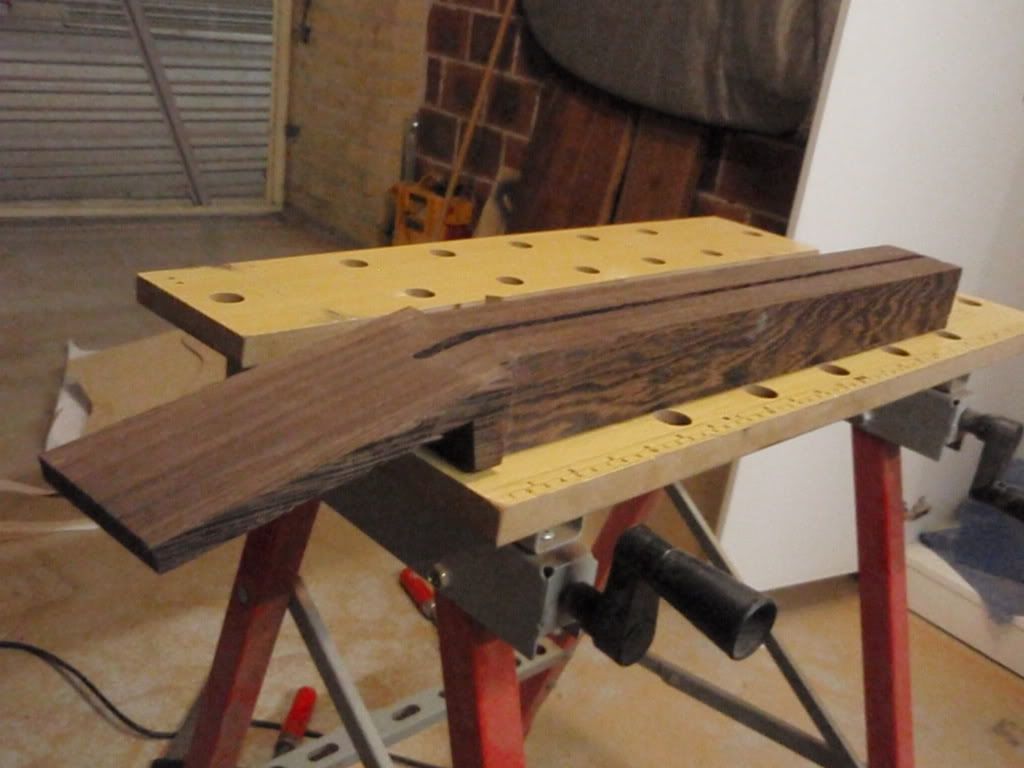
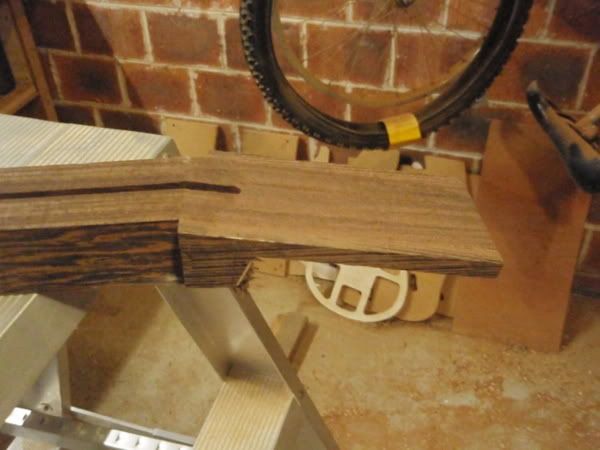
Here is the neck. It's a 1 piece quarter sawn wenge. I spotted a length at trend timbers which was 60x50x1400, and said I gotta make some necks out of that. I have routed the truss rod channel for a hotrod dual action, glued on the extra bits for the headstock. I machined the headstock angle with router and jig and back of the headstock again with a router and jig.
Cheers,
Peter
-
9th September 2008, 08:24 PM #3
triple platinum umm .... thingo
- Join Date
- Sep 2006
- Location
- Melbourne, 'bushy' Donvale
- Age
- 52
- Posts
- 912
I like the design, Peter.
The only thing which would concern me as far as playability would be the extreme curl on the lower cutaway and having enough access without your hand scraping on it. Other than that, it really works for me.
Other than that , I like it.
The offset body shape I really like and I've got a few build templates with a similar shape
around the body.
For some reason they really appeal to me !!!!!!
Looking forward to seeing this one on the bench.
Tell us more about the inlay specs.
-
10th September 2008, 04:30 AM #4
SENIOR MEMBER
- Join Date
- Sep 2008
- Location
- sydney
- Posts
- 2,370
looks cool
bloody nice bit of wood your using for the neck
-
10th September 2008, 08:29 PM #5
Senior Member
- Join Date
- Sep 2007
- Location
- Sydney
- Posts
- 489
Hey Stu,
Very well picked up there with the access. I checked it on the template I made up, and it wasn't bad, however did encroach more than I am used to, and enough to rejig the design. I moved to point down and out a little and it's a slight improvement in looks, but a significant improvement in the accessibility. I am grateful to discover this now and not after I string it up for the first time....
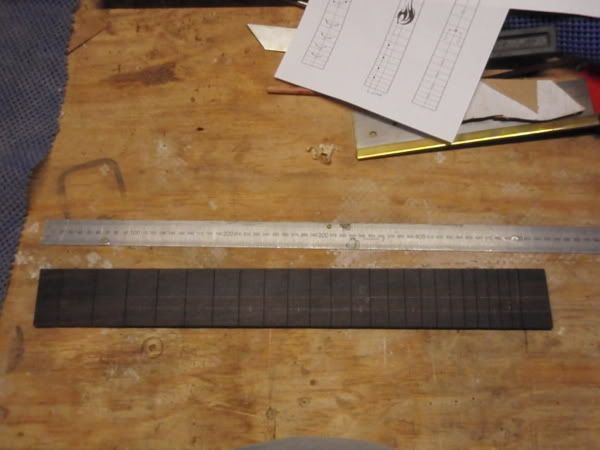
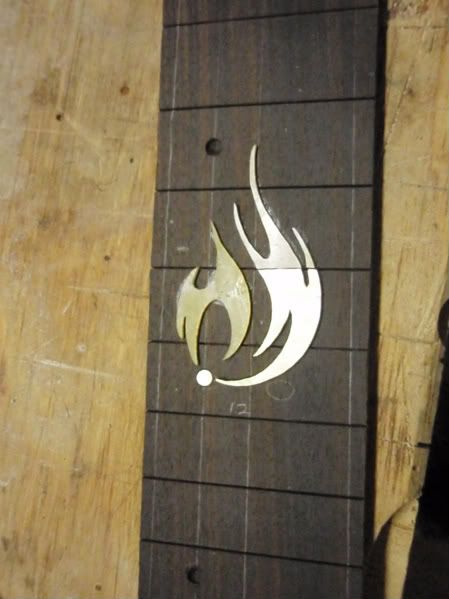
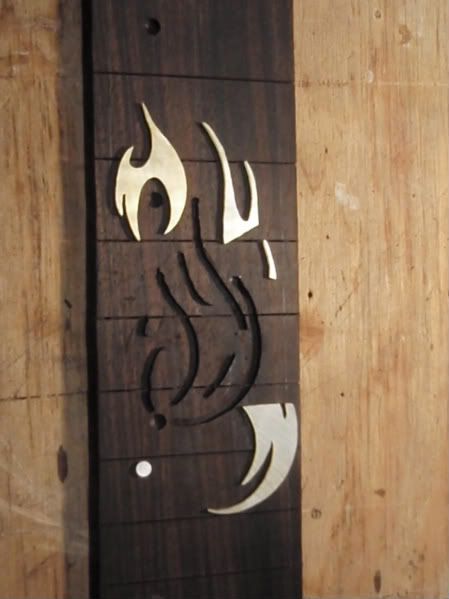
Inlay is gold mother of pearl tribal fireball and 4mm offset dots. Pics of the inlay below.
The slotted fretboard:

To cut the pearl out, I print off the design from cad, and glue the paper on with sprayon contact adhesive. The pearl blanks below.
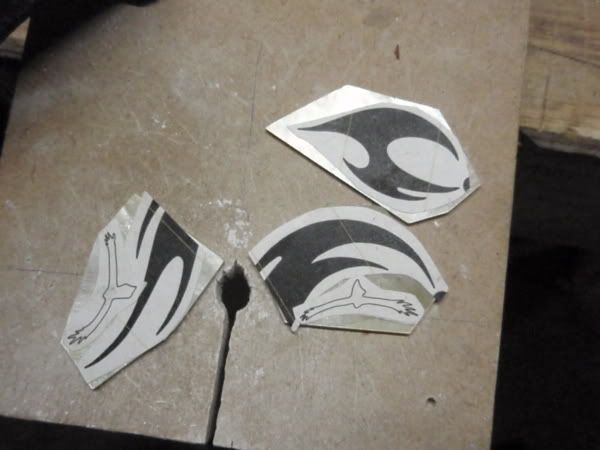
And the cut out pearl ready for inlay.
More of the inlay to come. In the mean time I guess I've got to redo my templates. No big deal.
Thanks again Stu and Andrew for your input.
Cheers,
Peter
-
10th September 2008, 08:31 PM #6
Senior Member
- Join Date
- Sep 2007
- Location
- Sydney
- Posts
- 489
The revised CAD...
Cheers,
Peter
-
10th September 2008, 09:04 PM #7
SENIOR MEMBER
- Join Date
- Sep 2008
- Location
- sydney
- Posts
- 2,370
did you cut the pearl with a coping saw? scroll saw?
im yet to do any inlay... im a bit rough lol
i think the headstock is a little bland... and a bit ovation looking...
needs some spice
but thats just my opinion
-
10th September 2008, 10:00 PM #8
triple platinum umm .... thingo
- Join Date
- Sep 2006
- Location
- Melbourne, 'bushy' Donvale
- Age
- 52
- Posts
- 912
Yep, all opinions are valid, Andrew.

I can see some well thought out Gold pearl purflings on that headstock.
The headstock seems really conducive to that look. The offset tuners do give it a modern feel too.
-
10th September 2008, 10:24 PM #9
Member
- Join Date
- Jun 2006
- Location
- Sydney
- Posts
- 96
Hi Peter,
I really like your design and I look forward to seeing the progress. Just a thought on the cutaway - the little kink near the point might provide some sanding challenges - I only say this because I have been there.
I really like the 12th fret inlay - I am doing something very similiar for my current build. I will post pictures when I get to that point. I also like the "string through" design to the machine heads too.
-
10th September 2008, 11:12 PM #10
Senior Member
- Join Date
- Feb 2005
- Location
- somewhere
- Posts
- 295
Looking good Peter. I really like wenge, expensive though. I have two large pieces that I use for neck lams, recently fingerboards and a few other things. I'd like to make a complete neck out it as you're doing. Originally Posted by peterbrown

The only thing that strikes me about it is that there seems to be a lot of waste under the neck since there is no scarf joint, though lots of luthiers make them this way for various reasons. I've been curious as to how builders reuse that waste. Actually, it's quite good with your neck as it looks like you'll get a few quarter sawn guitar fingerboards out it.
-
10th September 2008, 11:55 PM #11
Senior Member
- Join Date
- Sep 2007
- Location
- Sydney
- Posts
- 489
Thanks for the input again,
Andrew, the headstock design is not set in concrete yet, and I will definitely have some inlay happening there, I just haven't decided yet. But your opinions are welcomed, especially constructive opinions like yours.
Oz, Thanks. Purflings... making work for me now... Good Idea though.
jb, I deninately agree with the challenge of sanding around the point. the carve will be equally challenging. Will be worth it I think. I am not using binding on this one, however binding at the point would be a challenge also. I would love to see some of your inlay work and look forward to your post.
MKat, I have a thing for wenge myself. The look and feel of an oiled finish on wenge does it for me. I am planning to slice a bit of the back of the neck blank once I am sure of the final heel depth.
Thanks again for the input,
Cheers,
Peter
-
14th September 2008, 08:29 PM #12
Senior Member
- Join Date
- Sep 2007
- Location
- Sydney
- Posts
- 489
Hi,
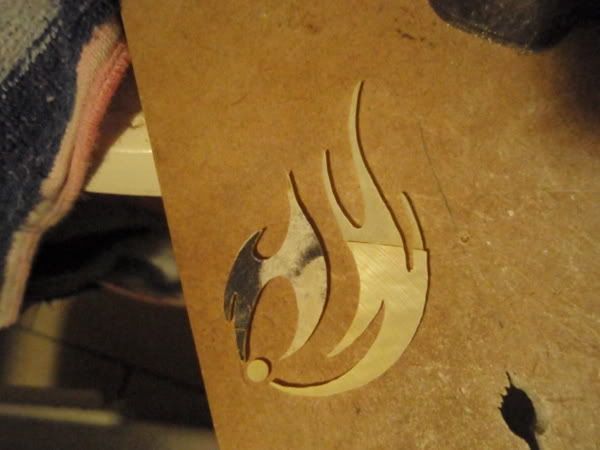
Got some more progress on the inlay,
The inlay pieces are tidied up a little with a needle file to remove any rough bits from cutting the pearl out. I glued the inlay on the fretboard using more spray contact adhesive which makes scribing the inlay much easier (pic below). The inlay is scribed and the inlay pieces picked off. I then sand the scribed area across the grain a bit to remove the glue and it also makes the scribed line easier to see. rubbing chalk apparently is better, but I haven't tried it.
The recess is routed and the pieces are cleaned up with turps to remove the spray adhesive glue, ready to be epoxied in.
I use an epoxy that is almost a paste consistency and mix in some filings of the fretboard piece itself, which I find to be the best match. I fill the recess with excess epoxy so that it squeezes out, and i rub the excess around the perimeter of the piece to remove any bubbles that may have formed. the pic below is of the pieced glued.
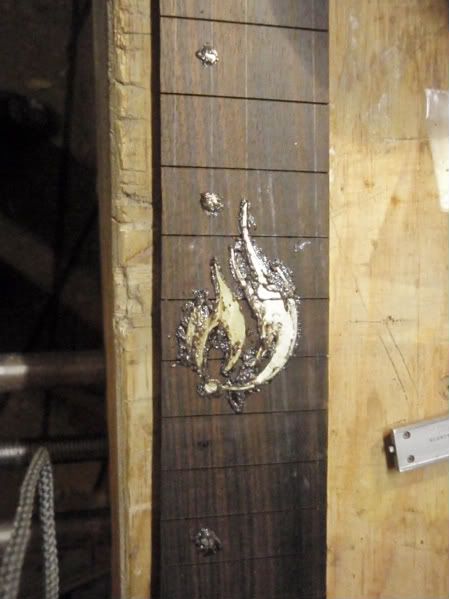
Once the epoxy has set, I rough sand the inlay level (not too much).

Cheers,
Peter
-
14th September 2008, 11:05 PM #13
SENIOR MEMBER
- Join Date
- Sep 2008
- Location
- sydney
- Posts
- 2,370
thats looking great!
keep the pics comming
-
14th September 2008, 11:10 PM #14
triple platinum umm .... thingo
- Join Date
- Sep 2006
- Location
- Melbourne, 'bushy' Donvale
- Age
- 52
- Posts
- 912
-
16th September 2008, 02:14 AM #15
SENIOR MEMBER
- Join Date
- Feb 2007
- Location
- sydney
- Age
- 35
- Posts
- 580
thats looking great. inlay looks great too.
i love wenge, and it should make a great neck. my only concern is that it is quite weak along the grain, and the lack of the scarf joint worries me. will you be glueing some timber to the top/bottom of the headstock for strength?

 Reply With Quote
 Cheers, Stu


Similar Threads
-
Finding Engineering Design Software For Automatic Machine Design
By davidWilliams in forum METALWORK FORUMReplies: 2Last Post: 11th January 2010, 10:41 PM -
PRS double cutaway plans or template.
By asteam in forum MUSICAL INSTRUMENTSReplies: 4Last Post: 26th August 2009, 07:59 PM -
Cutaway Dread
By Different in forum MUSICAL INSTRUMENTSReplies: 18Last Post: 8th September 2008, 11:48 PM -
Single Bed
By barking770 in forum WOODWORK PICSReplies: 2Last Post: 7th July 2008, 12:23 PM -
Guitar plans with cutaway
By thetassiebfg in forum MUSICAL INSTRUMENTSReplies: 10Last Post: 2nd September 2006, 12:03 PM
