

 Thanks: 0
 Likes: 0
 Needs Pictures: 0
 Picture(s) thanks: 0
Results 1 to 14 of 14
-
27th August 2006, 11:32 PM #1
 Senior Member


- Join Date
- Mar 2004
- Location
- Sellicks Beach, S.A.
- Age
- 66
- Posts
- 135
 Scarf joint jigs - cutting and glueing
Hi all
Many of you have probably already worked out ways to make scarf joints, but I thought it would be helpful to those thinking about making scarf-jointed necks to see how I do it. It's not the only way, just my way.
Making a scarf joint for an angled headstock looks a lot scarier than it really is. Some people mark and measure and use planes to cut scarf joints for necks. I found some plans on the Net a while back for a scarf joint jig that's made them a relative pleasure to do. The jig cuts a 15 degree angle and runs in one of the slots in the tablesaw.
Here's the jig. I think the pics are self explanatory.


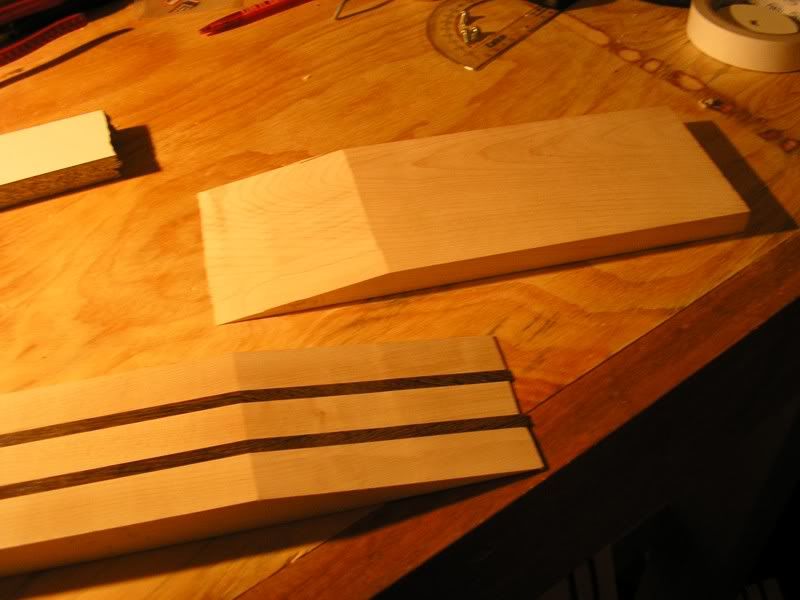
These pics show the neck timber clamped and ready to cut. This one is going to be a neck for an SG shape tenor scale ukulele, so I'm using Queensland maple for the neck. It looks similar to mahogany and is great timber for a neck.


The offcut tends to jam against the sawblade, but it's 99% good.
And then the headstock timber is cut the same way

Which gives us 2 bits of wood cut at 15 degree angles! I then run the cut edge on the belt-sander to make things a bit smoother.

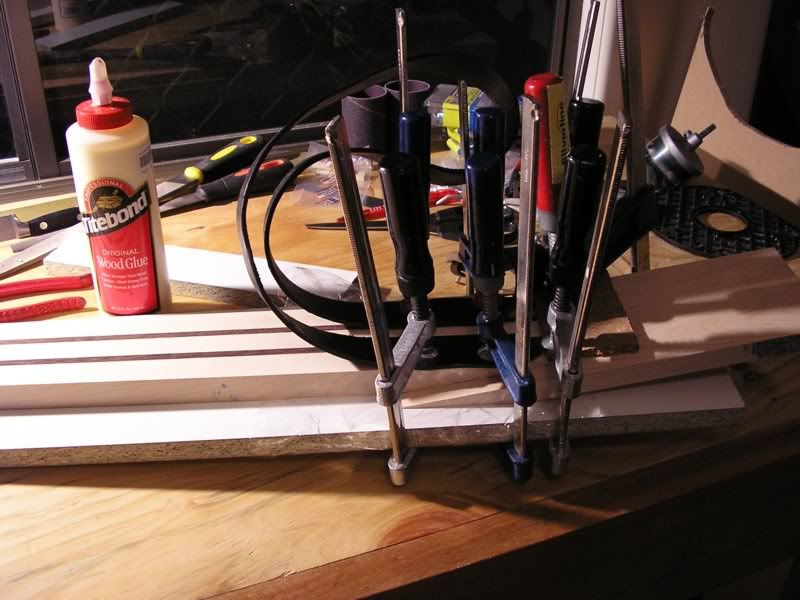
Here's the second jig. It's what the neck and headstock timber clamp to for glueing. The easiest way to make up this jig is to cut the angle on the first jig!

Note the centreline along the top of the jig. It makes lining things up a lot easier!

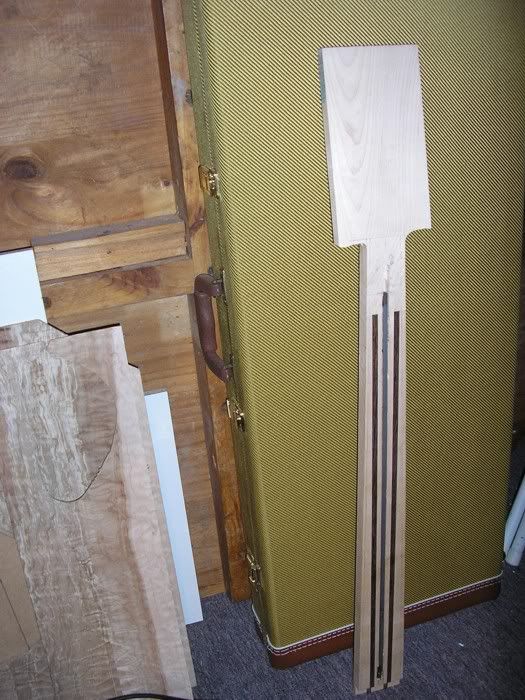
I've laid out the neck. In this case it's for a tenor scale uke, so I've marked the centreline and laid out the neck with a 36mm nut and 44mm heel width. I wanted to make the headstock similar to a SG, so I found a good pic on the Net and resized it to scale based on the 36mm nut width, then printed it up and cut it out. This becomes my template to trace around for the headstock. You can cut the headstock shape out later, but it's a easier to get the shape started before it all gets glued up.

To use the clamping jig clamp the neck timber to the jig first. Use the centreline to get things lined up. Spread some Titebond (or whatever glue you prefer) on the chamfered face of the neck piece. Place the headstock piece with the chamfer uppermost in place, once again using the centreline to line things up, and clamp it to the jig. I set the headstock piece so it's just sitting above the plane of the top of the neck timber. You can run it over your beltsander once the glue has set for a day or so. The middle clamp holds the glue joint tight while the glue sets! This side view shows how it works.

So there you go. Once your jigs are made you can make the two cuts for the scarf joint in seconds, and if you plan ahead with your timber lengths you can get two necks and two headstocks out of each piece of timber because the offcut piece already has a 15 degree chamfer! Clamping takes a minute or two, so you can do two necks in two days!
I use a steel reinforcing rod in my short scale necks and an adjustable trussrod in my longer scale (over 23" scale) neck lengths. In a few days I'll add some info on using the clamping jig to rout the trussrod slot.
I hope this has been helpful.Rob
-
27th August 2006 11:32 PM # ADSGoogle Adsense Advertisement
- Join Date
- Always
- Location
- Advertising world
- Age
- 2010
- Posts
- Many
-
27th August 2006, 11:49 PM #2
 Manager tool buying
- Join Date
- Apr 2005
- Location
- Melbourne Outer East right next to mount dande
- Age
- 73
- Posts
- 1,859
Thanks Rob.
I have been addicted to warmoth necks for a while but feel I am getting closer to making my own. It looks all very complex and time consuming but sometime soon I gotta take the plunge. I started off a year ago and learnt heaps about wood from cutting a few bodies and fitting them up with bought in hardware and necks. By the time you buy in a decent neck and a set of top pickups you have invested a sizable sum before you even start counting the timeray c
dunno what's more fun, buyin' the tools or usin' em'
-
28th August 2006, 12:36 AM #3
Senior Member
- Join Date
- Mar 2004
- Location
- Sellicks Beach, S.A.
- Age
- 66
- Posts
- 135
Hi
I think you're right on the money. When you can buy a well made and serviceable made in Asia Fender style neck for $89 or a Gibson style neck for $139 to $159 retail you have to wonder why you'd bother to make one from scratch. The Warmoth necks are dearer again, but the ones I've seen have been similarly well made and look and work well. Because I make funny little guitars like ukes and emandos and tenor guitars and solidbody bouzoukis I have to make my necks from scratch. For guitars I always buy a good premade one.
Have you ever seen those cheap Strats listed on eBay in Australia? They come in black or sunburst or a horrible yellow colour. I wondered how good they'd be so I bid on one. The total price including shipping was $88.50 and it was actually a nice playable guitar. I was going to strip it for parts but the more I thought about it the more I liked it, so I put in some GFS alnico pickups, a set of DR Parts diecast tuners, a Dimarzio switch, higher quality pots, a Switchcraft jack, blocked off the tremelo (I don't use the trem so I shape a block of wood to sit behind the trem block on Strats), got Craig Sampson at Guitar Works here in Adelaide to level and surface the frets, put on some decent D'Addario strings and did a nice low setup on it. The guitar is gorgeous to play and cost me around $300! The really interesting thing is that there is no name on the headstock so people don't know what to think of it. All they can do is play it. If it had Samick or Legend or La Grange on the headstock, or Fender or Blade or Profile, they'd make a judgement based on the name, but with no name they have to base their judgement on the function and sound of the guitar. Don't get me wrong, I'd still like a nice black Japanese Fender Strat and a well loved old sunburst Gibson Les Paul Junior one day, but for now I'm finding that you can make a lot of guitar for not too much money from remanufacturing guitars or making your own from premade parts.
I think it was Jimmy Page who said it doesn't matter what you play or how you play, what matters is that you play!Rob
-
28th August 2006, 10:16 AM #4
SENIOR MEMBER
- Join Date
- Dec 2005
- Location
- Brisbane
- Age
- 53
- Posts
- 293
I don't own a table saw so I make my scarf joints with my router. It's more wasteful but it does do the job.
I just made two 10 degree rails out of scrap particle board that I attached to another piece of PB. I clamp the neck blank down and start cutting.
It's pretty easy to see the setup from the picture
I really like your scarf gluing jig. I've been thinking of doing something like that for a while but a model with the headstock part going up instead of down (the neck fingerboard area touching the jig instead of the back of the neck) and this way also use it to clamp the neck on it to shape the back of the neck. 2 uses for one jig
-
28th August 2006, 11:01 AM #5
Manager tool buying
- Join Date
- Apr 2005
- Location
- Melbourne Outer East right next to mount dande
- Age
- 73
- Posts
- 1,859
Where from?? Originally Posted by JupiterCreek
Hopefully you arent talking about the AMS Chinese necks which are pretty average.ray c
dunno what's more fun, buyin' the tools or usin' em'
-
28th August 2006, 11:30 AM #6
SENIOR MEMBER
- Join Date
- Dec 2005
- Location
- Brisbane
- Age
- 53
- Posts
- 293
Personally, I love making my necks. There's no more than $30-40 of wood in a neck, frets are about $8 and a truss rod $20. That's less than the cheaper asian ones, quality is better and it's done exactly how I want it.
-
28th August 2006, 12:45 PM #7
 Adelaide Hillbilly
- Join Date
- Jul 2004
- Location
- Adelaide Hills
- Age
- 66
- Posts
- 3,803
Some dandy looking jigs there guys...thanks for the info. Im currently doing my headstock/neck joints by hand but might give these jigs a go.
Whatever note you blow youre never more than a semitone away from the correct one....(Miles Davis)
-
28th August 2006, 01:40 PM #8
Senior Member
- Join Date
- Mar 2004
- Location
- Sellicks Beach, S.A.
- Age
- 66
- Posts
- 135
Phil - that router jig is so simple it's elegant mate! Simpler is always better.
As for the cost of making a neck, I make it $10 - $20 for enough decent timber to do the job (say Queensland maple or Big Leaf maple), $8 for 3 lengths of Stewmac fretwire, $20 for a Gotoh trussrod, 50c for side markers, $2.95 for a nut, a few dollars for the fretboard material, so the cost is around $50. I have to shape the neck which only takes a few minutes, and I've got plans somewhere for a fretboard radiussing jig, and I can borrow a fretting caul from the guitar shop if I need to install radiussed frets, but so far I've always had problems with installing the frets. On flat fretboards I have no problems at all, but with radiussed boards I always end up with several frets sitting high in the middle or at the ends. To me the important stick in the collection of sticks we call a musical instrument is the neck, so if I'm going to sell an instrument to someone I want the neck to be sound. I've only been doing this for 3 years, and my skillset has increased over that time, but I just haven't had the time to get my head around consistent installation of radiussed frets, so for now I'll use premade necks for guitars.
old_picker - I actually think the AMS ones are good value for money, especially the bound Gibson style ones. The main concern most people express is that the timber is so blonde they look like Chinese Squier necks. I'm not a fan of that very white maple, but I don't like the aged Tele look either, so I try for something in between. Jacaranda were selling Japanese made necks that were nicer than the DR Parts ones from AMS. They were about 50% dearer, but I don't know if they're still doing them.Rob
-
28th August 2006, 03:11 PM #9
Adelaide Hillbilly
- Join Date
- Jul 2004
- Location
- Adelaide Hills
- Age
- 66
- Posts
- 3,803
Hi Rob, Originally Posted by JupiterCreek
Two questions:
1. Do you put a curve into your frets before installing them?
2. How are you banging the frets in? ie what parts of the fret do you hit and in what order?
Cheers MartinWhatever note you blow youre never more than a semitone away from the correct one....(Miles Davis)
-
28th August 2006, 03:20 PM #10
Senior Member
- Join Date
- Mar 2004
- Location
- Sellicks Beach, S.A.
- Age
- 66
- Posts
- 135
Hi Martin
>1. Do you put a curve into your frets before installing them?
>
Yep. I made up a block with a slot slightly wider than the tang width and slightly smaller radius than the fretbaord and I pull the fretwire over the block to give it the curve.
>2. How are you banging the frets in? ie what parts of the fret
>do you hit and in what order?
>
I use a press to seat my frets. I borrowed some Stewmac cauls from Craig at GuitarWorks to match the radius of the fretboards. I fret by boards off the neck, which may be part of the problem. If the fretboard was attached to the neck first I think the frets would probably behave.Rob
-
28th August 2006, 04:15 PM #11
Adelaide Hillbilly
- Join Date
- Jul 2004
- Location
- Adelaide Hills
- Age
- 66
- Posts
- 3,803
Rob,
IMO fretting the board off the neck wouldn't help the situation. With the fretboard off the fingerboard its likely to move alot more than if it were glued onto the neck.
All that said, once the frets lift they should be able to be knocked back in with a fret hammer.
Something else you might want to try if youre not already doing it is to run a thin bead of AR glue along the bottom of the fret tang just before you press it in. I also wick a little bit of water into the fret slot just before I fret up to make the wood swell up a bit and grab the fret better.
Cheers MartinWhatever note you blow youre never more than a semitone away from the correct one....(Miles Davis)
-
28th August 2006, 04:52 PM #12
Senior Member
- Join Date
- Mar 2004
- Location
- Sellicks Beach, S.A.
- Age
- 66
- Posts
- 135
I think that's a big part of the problem. The board always gets a positive bow from the tangs, and it's made worse by being a radiussed. Originally Posted by kiwigeo
AR glue? At the moment I use a few tiny dots of Araldite in my fret slots. One in the middle and one about 3mm from the edges. Originally Posted by kiwigeo
Rob
-
28th August 2006, 04:59 PM #13
Senior Member
- Join Date
- Mar 2004
- Location
- Sellicks Beach, S.A.
- Age
- 66
- Posts
- 135
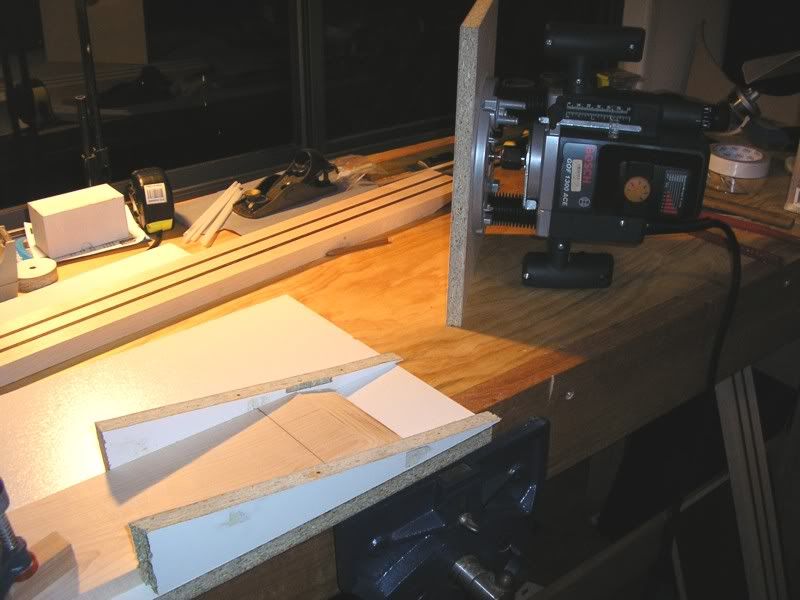
The glue joint has dried enough to move on to the next step, so here are some pics of the clamping jig being used to rout the slot for the reinforcing rod.


Of course after I'd taken those pics I ran the neck through the bandsaw to trim it to size ready to be cleaned up on the beltsander. Broke the bandsaw blade didn't I? Rob
Rob
-
15th November 2006, 09:01 AM #14
New Member
- Join Date
- Sep 2006
- Location
- London, UK
- Posts
- 8
I have given up on gluing jigs ever since I came up with this method:
http://www.setchellguitars.co.uk/ant/blog/?p=121
It's incredibly simple, and foolproof too.
For cutting the scarf I use a handsaw to cut the basic angle, and clean it up with a plane. I used the router jig until very recently, but as I've got more competant with handplanes I find that setting up a jig takes too long, when I can just reach for a plane. The curls instead of chips is nice too.


 Reply With Quote

