

 Thanks: 0
 Likes: 0
 Needs Pictures: 0
 Picture(s) thanks: 0
Results 76 to 90 of 108
-
16th December 2008, 10:08 PM #76
 Senior Member


- Join Date
- Sep 2007
- Location
- Sydney
- Posts
- 489

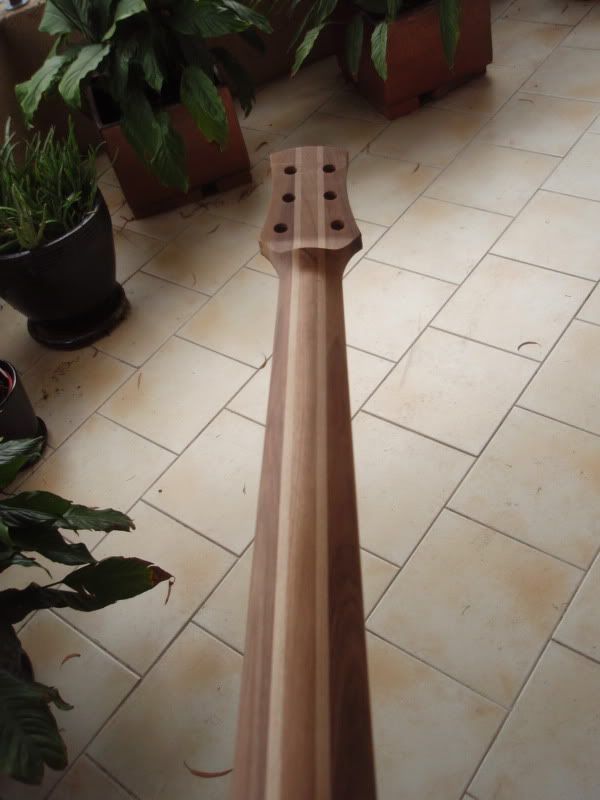
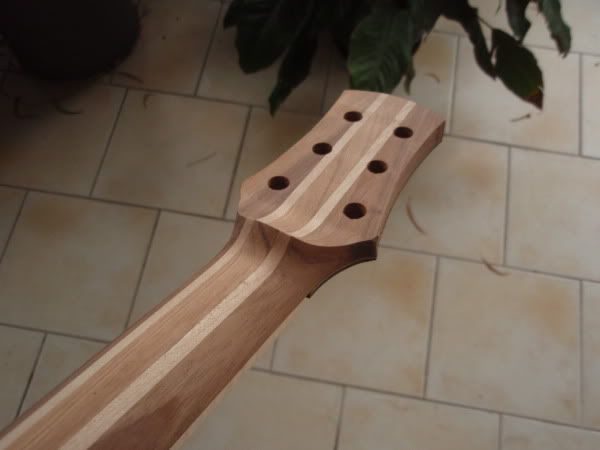
Some pics of the nrck rough sanded...
Cheers,
Peter
-
16th December 2008 10:08 PM # ADSGoogle Adsense Advertisement
- Join Date
- Always
- Location
- Advertising world
- Posts
- Many
-
16th December 2008, 10:49 PM #77
triple platinum umm .... thingo
- Join Date
- Sep 2006
- Location
- Melbourne, 'bushy' Donvale
- Age
- 52
- Posts
- 912
Very nice lines, Pete.
You could poke a guy's eye out with that volute !!!
Would also double as a stubby opener, too. (now that's an idea................)
What's your neck profile dimensions you're shooting for ? wide, fat etc...?
-
17th December 2008, 12:15 AM #78
SENIOR MEMBER
- Join Date
- Feb 2007
- Location
- sydney
- Age
- 35
- Posts
- 580
very nice neck. its NG rosewood with maple at the 2 and 4?
-
17th December 2008, 02:24 AM #79
SENIOR MEMBER
- Join Date
- Sep 2008
- Location
- sydney
- Posts
- 2,370
very nice neck
-
17th December 2008, 11:12 AM #80
Senior Member
- Join Date
- Nov 2008
- Location
- Darwin
- Posts
- 258
Cool, GTHO of the guitar world.
Jim
-
17th December 2008, 01:32 PM #81
Senior Member
- Join Date
- Sep 2007
- Location
- Sydney
- Posts
- 489
Thanks for the kind posts fellas.
The neck is blackwood with maple 4mm strips. The neck profile is deep (23mm at the nut and 25mm at the heel), however the profile is in between a Clapton style V profile and a regular profile. The V is slightly offset. Suits players that hold the thumb in behind the neck alot ( as opposed to cupping the neck). The extra depth provides stability whilst the slight offset with the semi-V profile provides accessibility.
Cheers,
Peter
-
22nd December 2008, 07:38 PM #82
Senior Member
- Join Date
- Sep 2007
- Location
- Sydney
- Posts
- 489
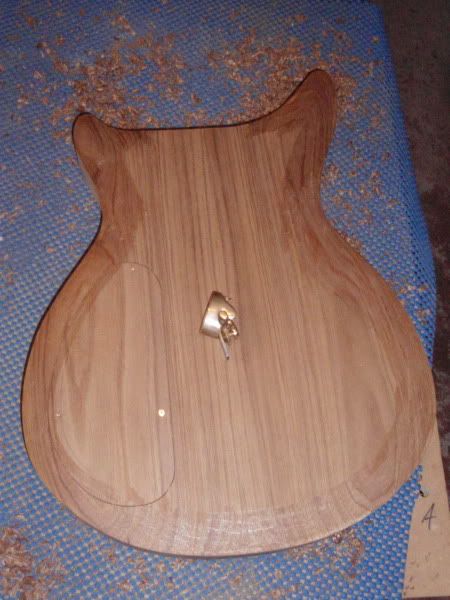
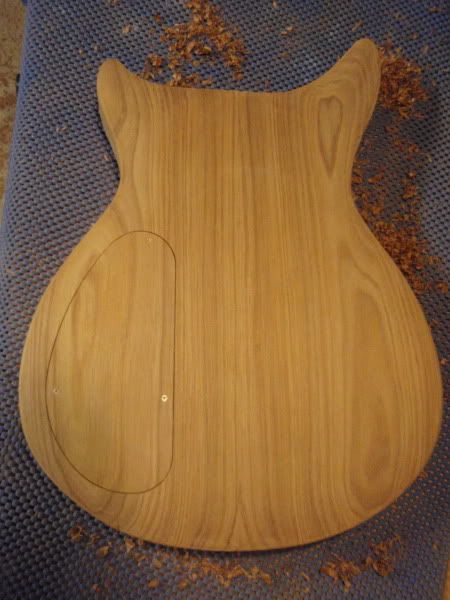
Have been working on the back and cavity cover. I have graduated a slight curve over at the back with the old thumb plane. Gives the flatsawn grain some decoration around the edges. Am pretty happy with the grain match on the cavity cover.
Cheers,
Peter

-
22nd December 2008, 10:10 PM #83
Senior Member
- Join Date
- Nov 2008
- Location
- Darwin
- Posts
- 258
Very tidy Peter. Have you ever used magnets for the control cavity and if so how did it go?
Jim
Life is good when you're amongst the wood
-
22nd December 2008, 11:45 PM #84
SENIOR MEMBER
- Join Date
- Sep 2008
- Location
- sydney
- Posts
- 2,370

haha
how the hell do you guys match the cavity covers up so well?
such inspirational work,
keep the updates coming
i just started shaping one of my necks
hehehe
need to learn how tto sharpen my plane blades, the right way.
-
23rd December 2008, 06:17 AM #85
Necrotreeophile

- Join Date
- May 2007
- Location
- Blue Mountains
- Posts
- 2,613
I picked up a stone and sharpening jig set at Bunnies the other day, on special, $9.99, works a treat Originally Posted by Andrew_B
 "We must never become callous. When we experience the conflicts ever more deeply we are living in truth. The quiet conscience is an invention of the devil." - Albert Schweizer
My blog. http://theupanddownblog.blogspot.com
-
23rd December 2008, 07:53 AM #86
SENIOR MEMBER
- Join Date
- Sep 2008
- Location
- sydney
- Posts
- 2,370
Originally Posted by Sebastiaan56
thank you man, i will go check it out
-
23rd December 2008, 05:42 PM #87
Senior Member
- Join Date
- Sep 2007
- Location
- Sydney
- Posts
- 489
Thanks,
Jim, I have never used magnets. Only scews to hold the rear cavity cover. I don't like the idea of introducing a strong magnetic fields that close to the electronics. i know there is shielding, but what happens if the shielding gets dry joints or becomes faulty over time? I know it looks tidy, and I'm not saying it's a bad idea, it just not something I personally choose to do is all.
Andrew, good luck with the neck. I think you should be posting your progress though (pics that is). I am interested to see it. Sorry I can't be much help in the sharpening department. I must admit that sharpening my blades is something that I neglect a bit. I just work the angle in with the roler jig every so often, and rework the tip slightly as it needs sharpening free hand, and when the tip gets a little "rounded over", then thats the time I reset the right angle again with the roler jig.
More progress to come,
Cheers,
peter
-
23rd December 2008, 05:46 PM #88
Senior Member
- Join Date
- Sep 2007
- Location
- Sydney
- Posts
- 489
There is no secret when it comes to getting tight cavity covers. Stewmac's acrilic templates. They are laser cut and very acurate. I've made copies out of mdf, or cut them into body templates which stops the original from wearing out. Well worth the investment.
Cheers,
Peter
-
23rd December 2008, 06:22 PM #89
SENIOR MEMBER
- Join Date
- Sep 2008
- Location
- sydney
- Posts
- 2,370
wow, i never even thought of magnetics effecting the guitar like that, smart man.. Originally Posted by peterbrown
hmmm i may start a thread sooner or later,
i dont want to start a thread and screw up the neck!!! hahaha
i would have nothing to document except that i faiiled
then again, i guess i wouldnt feel too bad if it didnt turn out great,
atleast i will know what to do on the next one...
we will see how i go and maybe, just maybe i will start a build thread hehe
looks like i need to make me some templates, i would buy a set of the stew mac ones
but 1, i dont have any spare cash and 2, i want my own shaped cavities
might try and get a mate to laser cut me some bits and pieces
looks like i need to grab a roller jig!
iv always sharpened by hand, thats how i was taught,
its not great but its better than nothing...
i also hide my good tools from my father lol
we need to see more progress Peter, my blabbing is taking over your thread lol
-
23rd December 2008, 06:24 PM #90
Senior Member
- Join Date
- Nov 2008
- Location
- Darwin
- Posts
- 258
Sharpening is a bit of a art really Andrew. When it comes to Chisels I keep two sets, my rough set which is sharp enough to shave with and my good set which is sharper. I use a 6000 grit Japanese Water Stone which, once you get a edge on will stay sharper longer than using a rougher stone. I'll post some info later when I have a bit more time which may help you to get a good edge.
Jim
Is it sharp?....OUCH!!!!...I just had to test it didn't I

 Reply With Quote
 Cheers, Stu


Similar Threads
-
A small Box Photo story
By Wood Borer in forum WOODWORK PICSReplies: 52Last Post: 14th October 2005, 08:56 PM -
Can't get a clean cut
By Danster in forum TRITON / GMCReplies: 14Last Post: 1st June 2004, 08:54 PM
