

 Thanks: 0
 Likes: 0
 Needs Pictures: 0
 Picture(s) thanks: 0
Results 91 to 105 of 108
-
23rd December 2008, 06:41 PM #91
 triple platinum umm .... thingo


- Join Date
- Sep 2006
- Location
- Melbourne, 'bushy' Donvale
- Age
- 52
- Posts
- 912

Nice precise work on the cover, Peter.

Try the sharpening Forum, Andrew.
https://www.woodworkforums.com/f127
.
-
23rd December 2008 06:41 PM # ADSGoogle Adsense Advertisement
- Join Date
- Always
- Location
- Advertising world
- Age
- 2010
- Posts
- Many
-
23rd December 2008, 06:53 PM #92
SENIOR MEMBER
- Join Date
- Sep 2008
- Location
- sydney
- Posts
- 2,370
i just found the sharpening section on the forums yesterday

thanks oz
thanks Jim
i also have 2 sets of chisels
chinese made to rough
english made to finish
haha
i had a teacher that used to run the blades across his thumb nail after he finished sharpening it,
to check for burrs?
i tried it a few times but it makes me cringe
-
23rd December 2008, 11:28 PM #93
Senior Member
- Join Date
- Nov 2008
- Location
- Darwin
- Posts
- 258
Hi Andrew
I've written this before i noticed Stu's post so I'll post it anyway ( I looked at it briefly and its very helpfull)
I'm not going to try to explain how to grind a chisel or even how to hone one. I am going to assume the Chisels you have are ground to 25 degrees.
This is just a brief explanation of what you are doing when you hone.
Fig 1, Shows the Angle that your average Chisel is ground and honed to, 25 degrees for the grind and 30 degrees for the hone.
Fig 2 and Fig 3 Are what you would expect to see if you look at the cutting edge of the Chisel under a Microscope looking from above. The difference between the two is that Fig 2 has been honed on a 1200 grit stone and Fig 3 has been honed on say a 3000 grit stone. Every time you hone, the scratches from the grit leave the Chisels edge serated, the finer you hone the smaller the serations. If you hone to 1200 the Chisel will be sharp but those little points are big and brittle and break off easily so the Chisel dulls quickly. The smaller those points are the sharper the chisel is and the longer it stays sharp.
What this amounts to is that if you spend the time to polish the bottom or flat side of your chisel to a mirror finish, then a quick hone on a 6000 grit and a strop on some leather once in a blue moon is all you need to keep them sharp. Also keep them oiled cause that mirror finish will rust and you dont want to waste the time you spent getting it that way.
You don't need to have the complete bottom of the chisel all the way to the handle a mirror finish, just the business end is fine.
Jim
-
24th December 2008, 12:15 AM #94
SENIOR MEMBER
- Join Date
- Sep 2008
- Location
- sydney
- Posts
- 2,370
thanks Jim
very well explained
im going to have to take notice of grits now...
my chisels are indeed all ground to 25 degrees.
i just use an oil stone that came with my expensive chisel kit
one side is brown and one sides black, off the top of my head i think the brown is courser than the black, but i dont remember
then i have another finer stone that i do my finish work with,
i dont however have a strop
i shall make one
but now, im going to stop hijacking Mr Peter's thread before he dislikes me
cheers guys
-
27th December 2008, 10:39 AM #95
Skwair2rownd
- Join Date
- Nov 2007
- Location
- Dundowran Beach
- Age
- 76
- Posts
- 19,922

Peter those are two beuatiful works of art!! you and your soister should be well pleased.
All the more inspiration fo me to have a crack.
-
28th December 2008, 10:00 PM #96
Senior Member
- Join Date
- Sep 2007
- Location
- Sydney
- Posts
- 489
Thanks Artme, my sister has been enjoying her new gat very much.
I have finished carving the top more or less, just need to do the recesses for the controls. Am still tossing up exactly what I'm going to do.
The rough carve. (with the thumb plane of course)
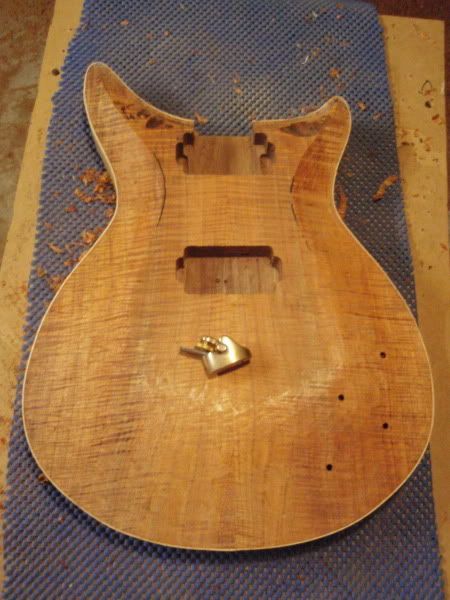
Gave it a wipe of shelac to highlight an blemishes. Plus I was itching to see how the top looks.
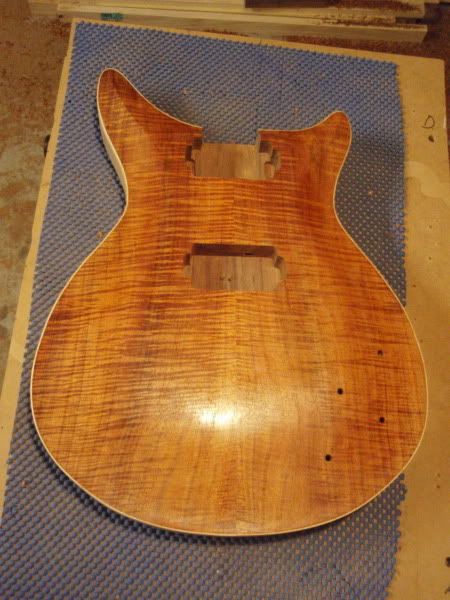
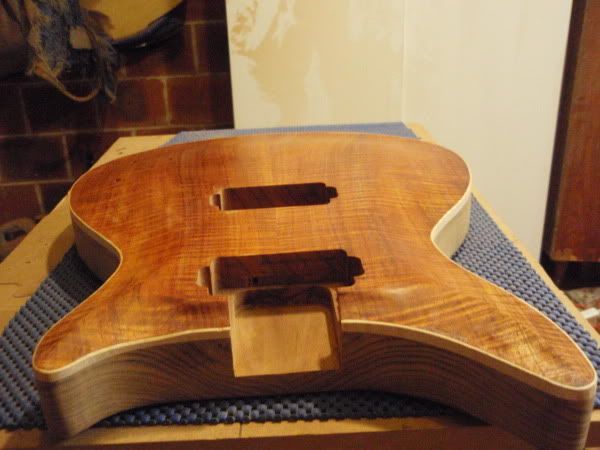
Not 100% happy with the lower horn carve. Am going to take a little more off, but I don't want to carve too far into the binding, so I thought I'd sleep on it and take a look with fresh eyes. Any ideas would be welcomed.
Cheers,
Peter
-
28th December 2008, 10:20 PM #97
Senior Member
- Join Date
- Mar 2008
- Location
- melbourne
- Posts
- 138
Very nice work Peter , looks fantastic , love that top
-
28th December 2008, 10:32 PM #98
Senior Member
- Join Date
- Nov 2008
- Location
- Darwin
- Posts
- 258
Looks great Peter, why are you not happy with the lower horn?
Jim
-
29th December 2008, 12:22 AM #99
SENIOR MEMBER
- Join Date
- Sep 2008
- Location
- sydney
- Posts
- 2,370
i assume he isnt happy with how thin the binding gets towards the inside of the horn?
but i think its just fine,
great guitar, great carving, once the neck goes on it will be like KA - POW
-
29th December 2008, 08:29 AM #100
Senior Member
- Join Date
- Sep 2007
- Location
- Sydney
- Posts
- 489
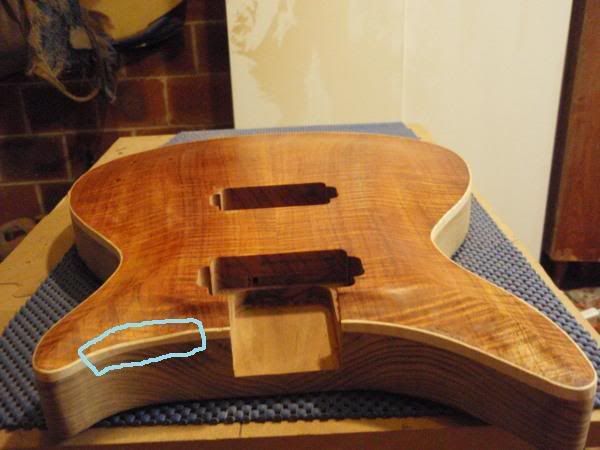
Thanks fellas, just the elaborate on my dilema. I was planning on carving out more into the lower horn as an upper access recess sort of thing (PRS style of thing), however I got started and then wasn't sure how it would go with the binding, so thats where I stopped to think
 . I am thinking I will take it down a few more mm and leave 2-3mm of binding at the lowest point. I was just wondering other peoples thoughts on the matter is all.
Cheers,
Peter
-
2nd January 2009, 07:43 PM #101
Senior Member
- Join Date
- Sep 2007
- Location
- Sydney
- Posts
- 489
Have done the inlay for the headstock. The pictures aren't crash hot. I cannot seem to get good photos in the workshop.
The first is the plain pearl inlaid into the headstock ready for engraving.
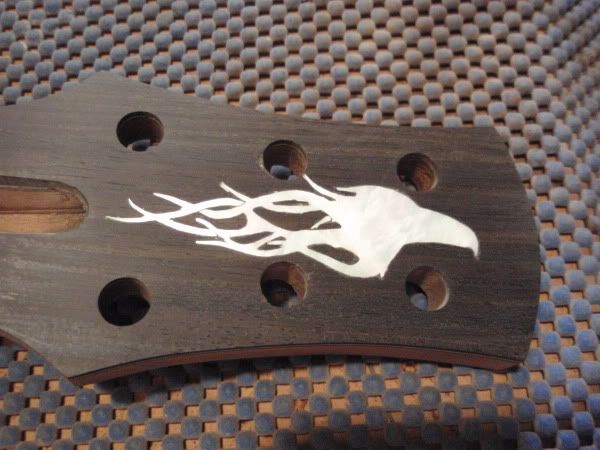
The pencil mark up for the engraving.
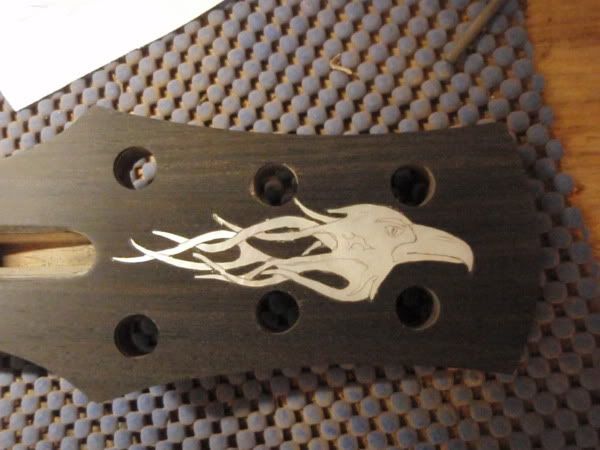
The engraved pearl.

Cheers,
Peter
-
2nd January 2009, 07:50 PM #102
SENIOR MEMBER
- Join Date
- Sep 2008
- Location
- sydney
- Posts
- 2,370
looks cool man
-
2nd January 2009, 11:26 PM #103
triple platinum umm .... thingo
- Join Date
- Sep 2006
- Location
- Melbourne, 'bushy' Donvale
- Age
- 52
- Posts
- 912
I'm sure that I've mentioned this before, that I envy your flare with inlay and especially the engraving side .
From a blank piece of M.O.P. out comes a creature of form.
Something to aspire to and push boundaries with.
-
4th January 2009, 09:26 AM #104
GOLD MEMBER
- Join Date
- Aug 2004
- Location
- Coffs Harbour
- Posts
- 2,018
Nice job on the grain matching.
You are a wizard with the MOP.Scally
__________________________________________
The ark was built by an amateur
the titanic was built by professionals
-
4th January 2009, 11:09 AM #105
Senior Member
- Join Date
- Nov 2008
- Location
- Darwin
- Posts
- 258
Ok I see what you mean now Peter. If say you wanted to take the carve lower than the existing binding all you can really do is go for it then add more binding to suit the carve, that could become a problem depending on the system you use for cutting your binding rebate and also that the new binding will need to slope down from the existing binding plane.
I have seen Les Pauls that have the cap material exposed below the binding in this area but then they are factory made guitars.
After Andrew pointed it out I can see that the binding is a bit wobbley. I guess that is only a problem if it is below your standards. From what I have seen of your work so far I would assume you want something better.
I am sure you will resolve it in the end Peter.
Jim
If you have never made an error you have never made anything.

 Cheers, Stu
 Reply With Quote


Similar Threads
-
A small Box Photo story
By Wood Borer in forum WOODWORK PICSReplies: 52Last Post: 14th October 2005, 08:56 PM -
Can't get a clean cut
By Danster in forum TRITON / GMCReplies: 14Last Post: 1st June 2004, 08:54 PM
