

 Thanks:
  Likes:
  Needs Pictures: 0
 Picture(s) thanks:
Results 61 to 75 of 155
Thread: Apothecary chest
-
25th June 2018, 02:51 PM #61
 Be inspired. Be creative. Be bold.


- Join Date
- Apr 2001
- Location
- Perth
- Posts
- 10,876

 Originally Posted by woodPixel

WP, you have to be careful what you wish for! That could be Pandora's Box, you know!
Well, I did make a not-so-short video this weekend. I do not recommend watching it late at night, unless you are seeking a cure for your insomnia.
This is the first time I have done anything like this - I thought it would be a good challenge.
I do hope that you get something from it. There are a number of techniques that I demonstrate that may be new to you.
Regards from Perth
DerekVisit www.inthewoodshop.com for tutorials on constructing handtools, handtool reviews, and my trials and tribulations with furniture builds.
-
25th June 2018 02:51 PM # ADSGoogle Adsense Advertisement
- Join Date
- Always
- Location
- Advertising world
- Posts
- Many
-
2nd July 2018, 12:51 AM #62
GOLD MEMBER
- Join Date
- Feb 2016
- Location
- Canberra
- Posts
- 5,123
I'm thinking the lads and I are wanting a bit of an update....
-
2nd July 2018, 01:53 AM #63
Be inspired. Be creative. Be bold.
- Join Date
- Apr 2001
- Location
- Perth
- Posts
- 10,876
WP, I dovetailed for 16 hours this weekend! And that was just the "other" side of the drawer side. This completes all but one drawer front ... which I hope to either photo or video (if I do, I will edit it to run shorter), hopefully Monday afternoon.
I did leave a post of a tip on the hand tool forum.
More later.
Regards from Perth
DerekVisit www.inthewoodshop.com for tutorials on constructing handtools, handtool reviews, and my trials and tribulations with furniture builds.
-
3rd July 2018, 05:10 PM #64
Be inspired. Be creative. Be bold.
- Join Date
- Apr 2001
- Location
- Perth
- Posts
- 10,876
All the drawer fronts have been dovetailed. I spent some time preparing the drawer bottoms and drawer backs for next weekend.
Here is a very short video to illustrate the angles involved in the dovetailing ...
Regards from Perth
DerekVisit www.inthewoodshop.com for tutorials on constructing handtools, handtool reviews, and my trials and tribulations with furniture builds.
-
4th July 2018, 03:25 AM #65
Be inspired. Be creative. Be bold.
- Join Date
- Apr 2001
- Location
- Perth
- Posts
- 10,876
Here are a few more videos to illustrate some of the strategies that were used. These precede the video presented earlier:
Rebating the pin board ...
Preparing the sockets ...
Clearing the sockets ...
Regards from Perth
DerekVisit www.inthewoodshop.com for tutorials on constructing handtools, handtool reviews, and my trials and tribulations with furniture builds.
-
10th July 2018, 02:53 AM #66
Be inspired. Be creative. Be bold.
- Join Date
- Apr 2001
- Location
- Perth
- Posts
- 10,876
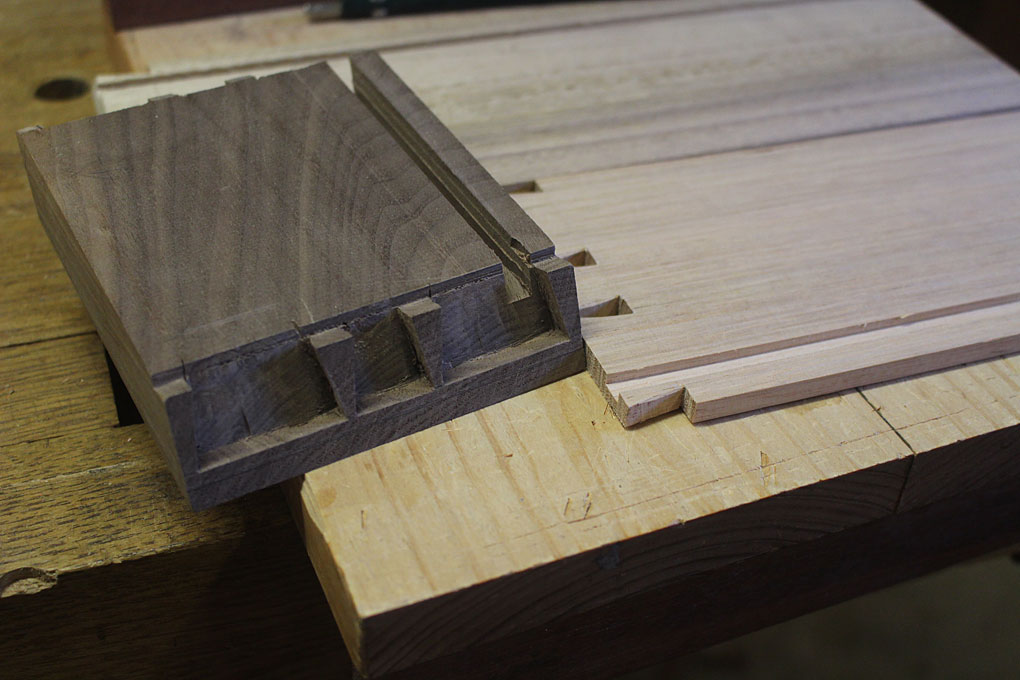
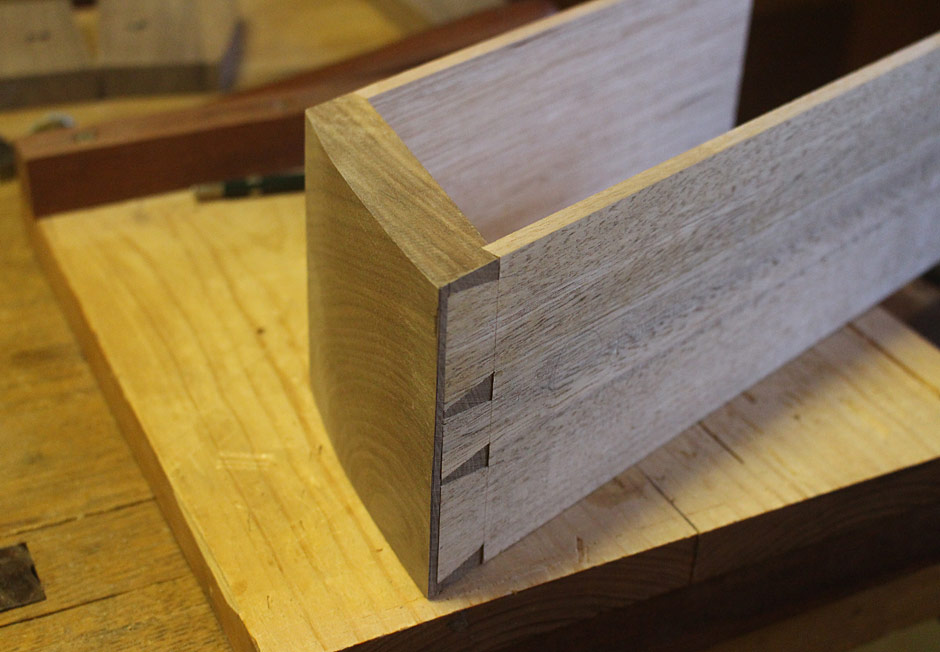
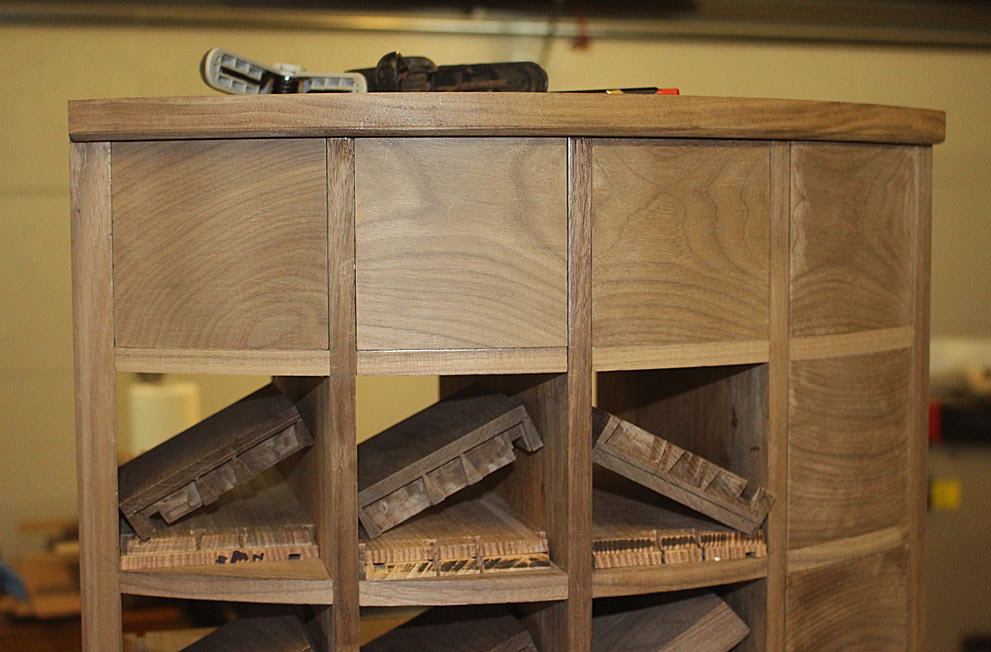
Having completed the dovetailing of the drawer sides into the drawer fronts, the next step is to shape the outside bow to match the chest.
This is the drawer to be demonstrated ...
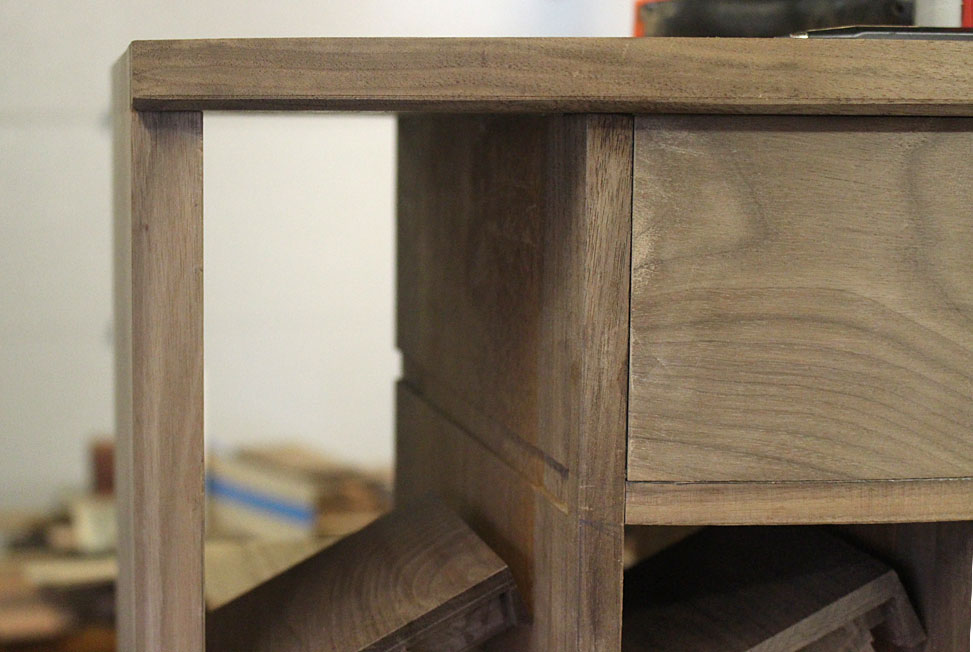
The drawer blade has been removed, and receives a final tweaking to match a template. Every drawer blade receives the same treatment, and there is a template for each vertical row ...
The drawer blade is returned to the chest, the drawer is fitted, and the profile of the drawer front is traced ...
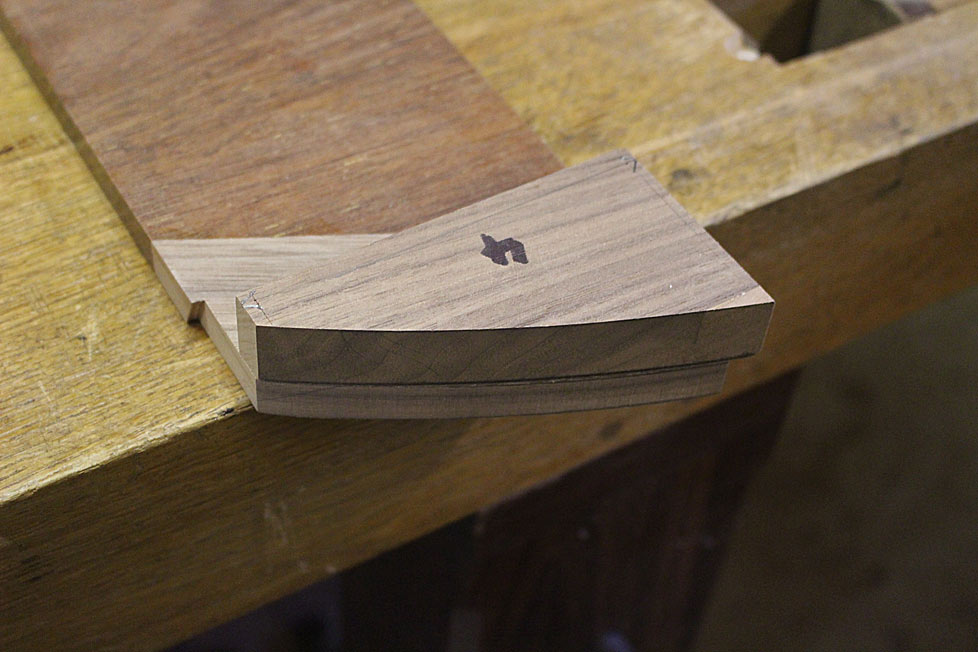
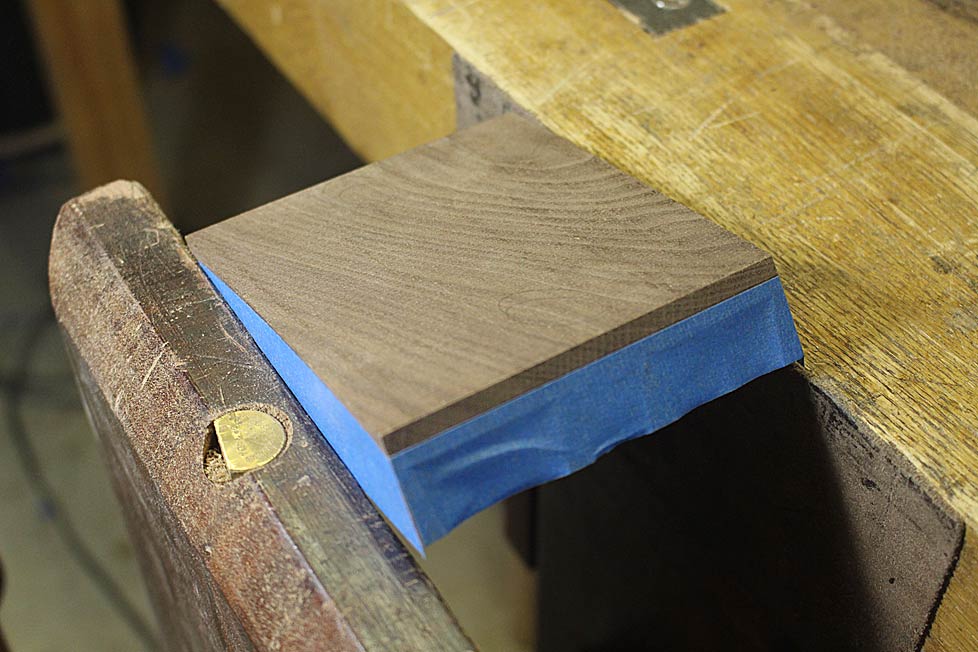
Below, the markings may be seen on the drawer front ...
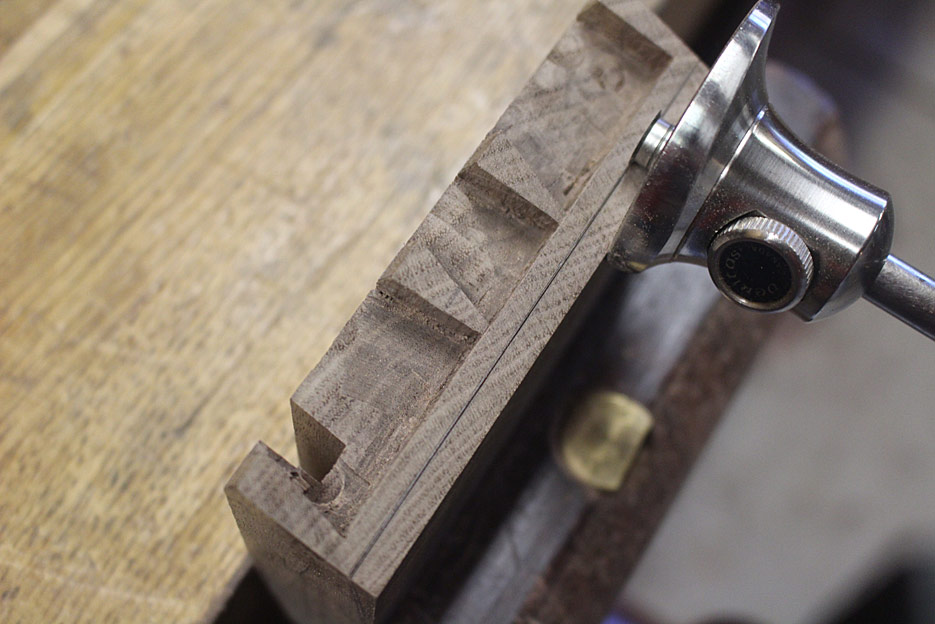
The drawer is pulled apart. The grooves for the drawer bottom have been completed. The drawer sides received a 3mm deep groove, while the groove for the drawer front is about 8-9mm deep. The extra depth here is to allow for the inner curve to be later shaped, and that this will remove approximately 3-4mm at the centre.
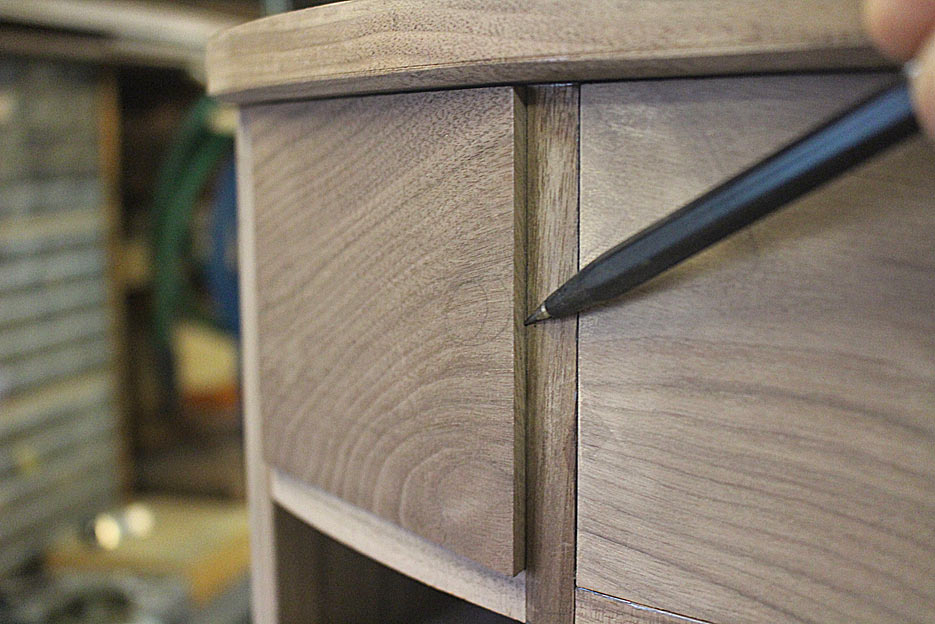
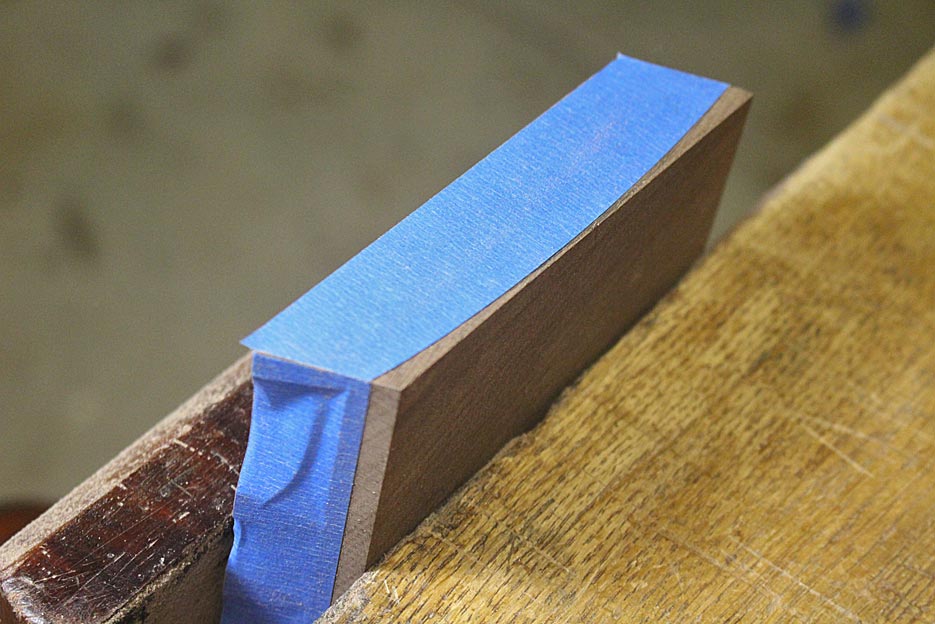
Now the end of the drawer front is marked ...
Blue tape is added, and the excess removed ...
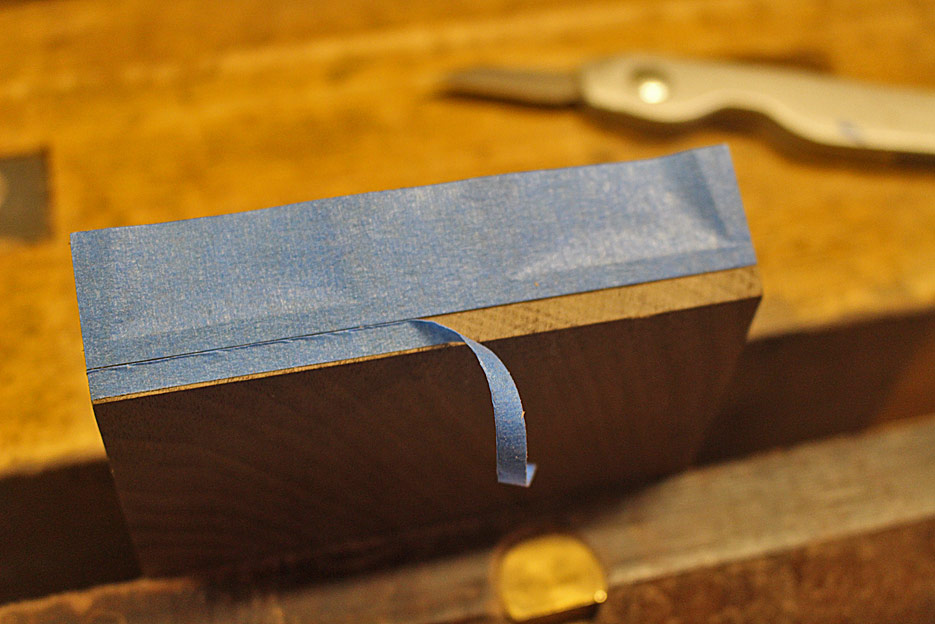
The tape is added to the upper and lower faces, and the template (from the drawer blade) is now used to mark the curve ...
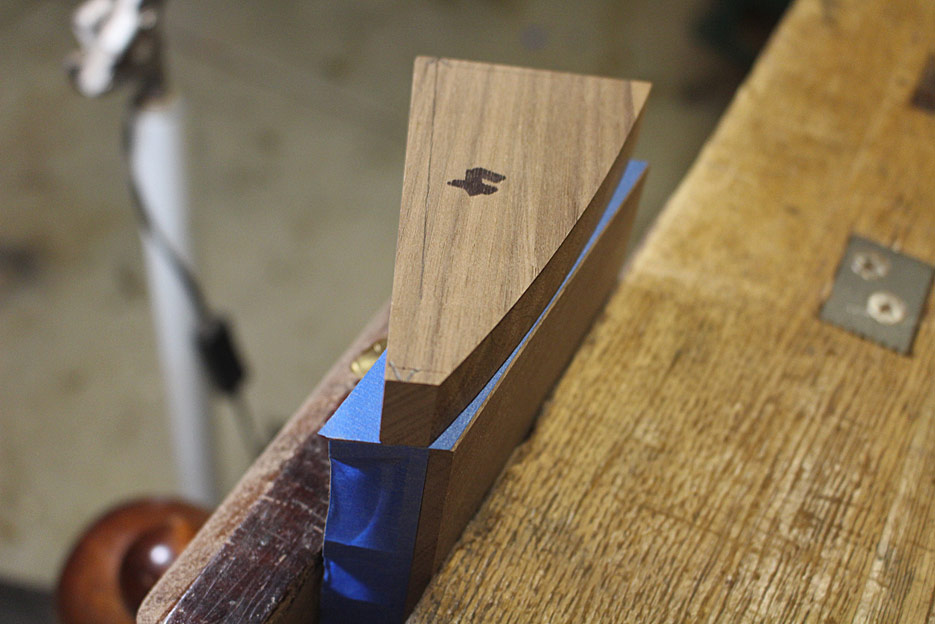
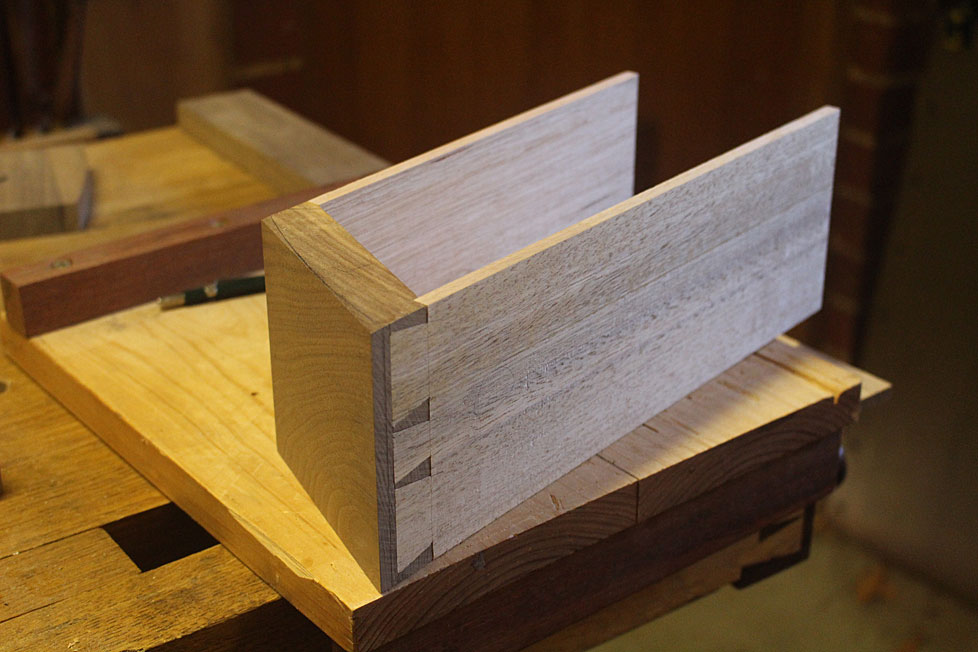
Once removed, the cut lines stand out clearly ...
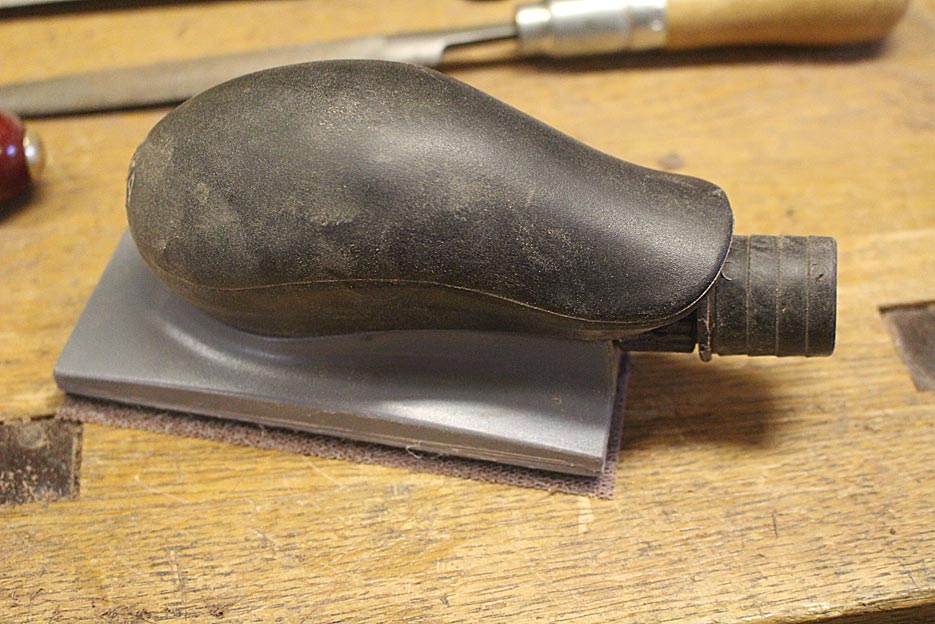
The rasping may begin. A start is made with a Shinto, which has roughly 10 grain on the coarse side (this is a Japanese rasp made from hacksaw blades. The other side is about 14 grain).
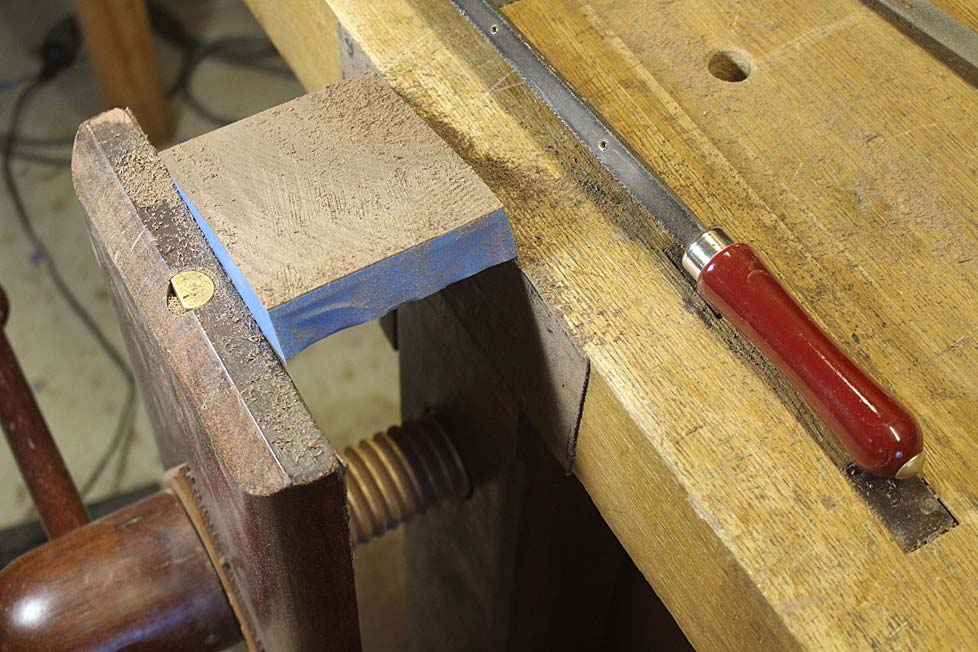
In turn, after the 10 grain comes the fine side of the Shinto, and then a 13 grain Auriou followed by a second cut file.
The surface is refined with a scraper ...
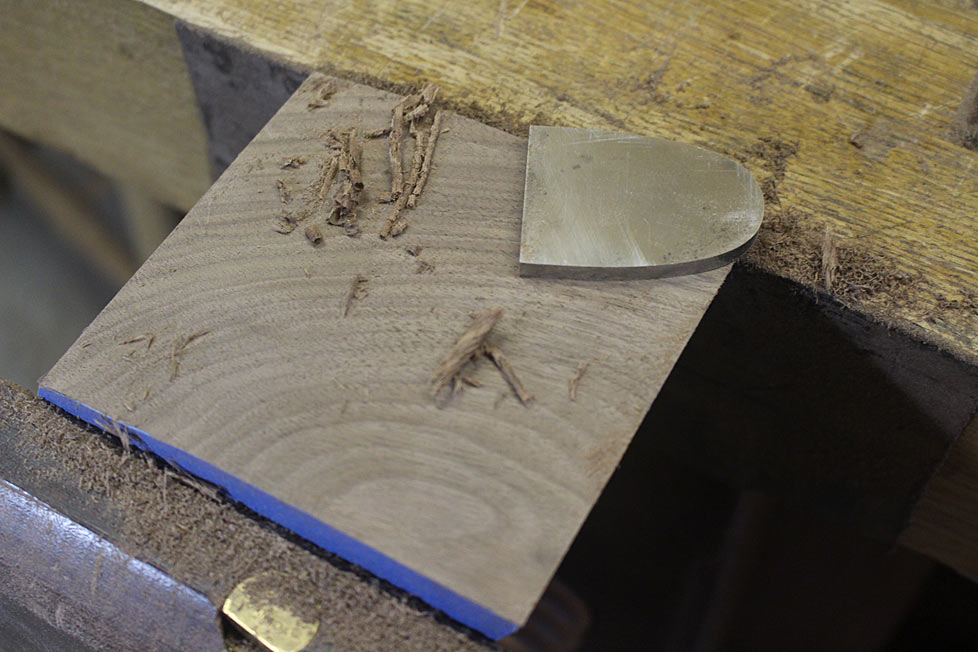
... and 120/22/320 Abranet mesh. You will ask why sand after scraping? The reason is that the sanding removes any scratches left by the rasps and scraper, creating a uniform surface. The final result is fairly polished. It is possible that I may go over this with a cabinet scraper prior to finish ...
This completes the drawer at this stage. The rear of the drawer front will next receive a complimentary curve. I hope to get to this during the week ...
The run out from cutting away the ends of the boards is noticeable (to me at any rate) ...

Regards from Perth
DerekVisit www.inthewoodshop.com for tutorials on constructing handtools, handtool reviews, and my trials and tribulations with furniture builds.
-
10th July 2018, 01:16 PM #67
Dances with splinters
- Join Date
- Jul 2005
- Location
- Oberon, NSW
- Age
- 64
- Posts
- 13,374
Wow. The run out has played havoc with the grain continuity, hasn't it? Especially compared to the pic back in post 47(?). Originally Posted by derekcohen
- Andy Mc
-
10th July 2018, 07:27 PM #68
Be inspired. Be creative. Be bold.
- Join Date
- Apr 2001
- Location
- Perth
- Posts
- 10,876
Hi Skew
The runout does not bother me unduly - the photo is a little bright. It is more subdued in reality.
The only way to avoid run out is to veneer or laminate the fronts. I am not set up for that (I do not have a vacuum press). The method I used in dovetailing the fronts was aimed at angling the boards so as to minimise runout. I reckon that this was the best result possible using solid fronts.
Regards from Perth
DerekVisit www.inthewoodshop.com for tutorials on constructing handtools, handtool reviews, and my trials and tribulations with furniture builds.
-
10th July 2018, 08:38 PM #69
Dances with splinters
- Join Date
- Jul 2005
- Location
- Oberon, NSW
- Age
- 64
- Posts
- 13,374
I was merely a little startled at how much it changed the grain flow. I don't know why; I should've expected it, being a turner and familiar with how grain patterns change over curvature. Originally Posted by derekcohen

I think that what threw me off was the way you angled the boards in the first place.
True. Although rough-cutting the drawer fronts from a board as thick as the bow is deep would minimise the grain disparity between drawer fronts and provide continuity overall.The only way to avoid run out is to veneer or laminate the fronts
However that's rather wasteful, to say the least, and I'm not the slightest surprised that you didn't opt to go that route!
- Andy Mc
-
10th July 2018, 10:47 PM #70
GOLD MEMBER
- Join Date
- Feb 2016
- Location
- Canberra
- Posts
- 5,123
Would it have been possible to steam the board and bend it over a form that matched the cabinet?
This thread is amazing!
-
10th July 2018, 11:48 PM #71
Be inspired. Be creative. Be bold.
- Join Date
- Apr 2001
- Location
- Perth
- Posts
- 10,876
WP, the problem with bending generally is that this is unpredictable as there will be some spring back. The thicker the boards, the more difficult it becomes to bend around a form. It is more predictable to laminate and bend with a rigid glue. However, this is best done with vacuum bagging, and I lack the equipment.
An alternate method is to build in a secondary wood, such as pine, and veneer. However that raises the problem with edges chipping if one attempts to dovetail (I prefer this type of joinery).
The method I have used is typical for furniture such as a bombe, where there are compound curves. I faced the same issues with the bow fronts and compound dovetailing on the Lingerie Chest, which I built a few years ago ...
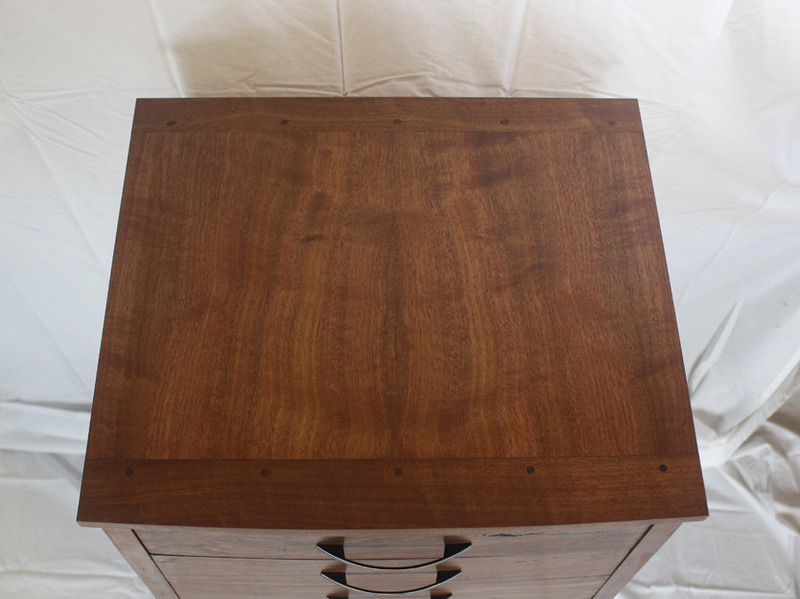

I think that the run out in the apothecary chest drawer fronts produces an interesting figure. There is continuity and it is clearly from the same board.
Regards from Perth
DerekVisit www.inthewoodshop.com for tutorials on constructing handtools, handtool reviews, and my trials and tribulations with furniture builds.
-
11th July 2018, 02:45 AM #72
GOLD MEMBER
- Join Date
- Feb 2016
- Location
- Canberra
- Posts
- 5,123
This thread is my absolute all time favourite. I've learned a great deal.
Went to order a few Blue Spruce Dovetail chisels... Guess I need to save for a bit more!!!
-
11th July 2018, 07:28 AM #73
Franklin Ferrier
- Join Date
- May 2007
- Location
- Gold Coast
- Age
- 70
- Posts
- 2,750
I think the grain runout on the shaped fronts adds interest and emphasizes the curvature. The last thing one would want is to go to all this trouble and find the visual effect to be minimal!
I've seen cabinets made with end grain drawer fronts and veneers cut from end grain rounds and never really liked them. This more subtle revealing of the grain looks good. Franklin
-
11th July 2018, 09:07 AM #74
GOLD MEMBER
- Join Date
- Mar 2004
- Location
- Brisbane (western suburbs)
- Age
- 78
- Posts
- 12,209
Skew, yeah, I cut a lot of rounded chair back rails & am often surprised by the grain patterns I get, even though I sort of know what to expect, too. I try to saw them so the pattern is symmetrical, but it isn't always as predictable as I'd like. I think Derek's cunning plan of pre-orienting the drawer fronts paid dividends and kept the flow as close as possible. Over time, as the colour of the Walnut fades, I think the patterns will become more muted anyway.
Now that the front is revealed in all its glory, I reckon the dividers could have been a little thinner, but perhaps apothecary chests have to be robust, since they'd be opened & closed continuously throughout the day?! ....
Cheers,IW
-
11th July 2018, 10:47 AM #75
Be inspired. Be creative. Be bold.
- Join Date
- Apr 2001
- Location
- Perth
- Posts
- 10,876
Hi Ian
The dividers could not have been thinner ... unless we could come up with a method to defy gravity and let the drawblades float in the air
The dividers are 12mm, and there is a 3mm deep dado on each side. This leaves 6mm "meat" in the sandwich.
Regards from Perth
DerekVisit www.inthewoodshop.com for tutorials on constructing handtools, handtool reviews, and my trials and tribulations with furniture builds.


 Reply With Quote


Similar Threads
-
Sea Chest
By LR09WA in forum WOODWORK - GENERALReplies: 14Last Post: 11th June 2011, 08:00 PM -
Ice Chest
By 2sharp in forum FINISHINGReplies: 6Last Post: 22nd January 2008, 04:30 AM -
Ice Chest
By rod1949 in forum Links to: TIMBER & HARDWARE SUPPPLIERSReplies: 1Last Post: 15th September 2004, 08:13 PM -
Chest
By GRS in forum WOODWORK PICSReplies: 8Last Post: 7th July 2004, 12:26 PM -
Apothecary Chest
By Paul O'H. Ingersoll Canad in forum WOODWORK PICSReplies: 4Last Post: 28th February 2004, 12:16 AM
