

 Thanks:
  Likes:
  Needs Pictures: 0
 Picture(s) thanks:
Results 136 to 150 of 155
Thread: Apothecary chest
-
31st July 2018, 04:08 AM #136
 Be inspired. Be creative. Be bold.


- Join Date
- Apr 2001
- Location
- Perth
- Posts
- 10,826

When I attached the metal knobs (too large and not right ... ugh!), I was swayed by Lynndy, who said to place the knobs square to the drawer front, since she liked the idea of them fanning from the front of the chest and accentuating the curve. In practice, this was not a good idea. Opening the drawers felt wierd - one is used to a drawer opening in the directing of the pull. These drawers did not do so. The opened at an angle to the pull. It felt wierd. Lynndy thought it charming. She is wierd.
Having turned new Black Walnut knobs to match the drawer fronts, against the advice of some who argued for dark, perhaps Ebony knobs, I know had to decide how I would fit them. As before? No, I did not want that. I wanted to set the square to the drawer recess.
There were two issues here: how to drill them the same as each other.? It would look a mess if some varied out of line. And then there was the fact that the drawer fronts curves and angled, which meant that the knobs would go in at an angle. One side would sit in- and the other side proud of the surface.
I designed a couple of jigs to drill accurately. Fortunately I did not waste time making them ( I have no time in the kitty to get this piece ready for the upcoming West Australian Woodshow. It is days away). The simplest solution occurred to me last night. Use the drill press. Duh!
All that was needed was to ensure the drawer was held vertically, and then use progressively larger bits until the size I needed (3/8"), the tenon of the knob.
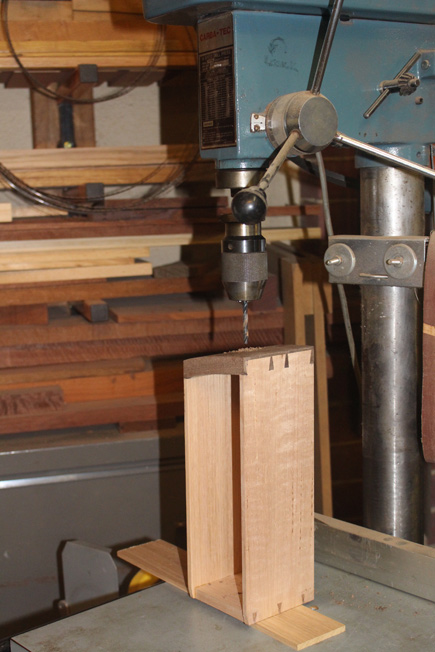
That went smoothly.
The holes were then widened slightly on one side with a step drill bit to allow to seat the knobs evenly.
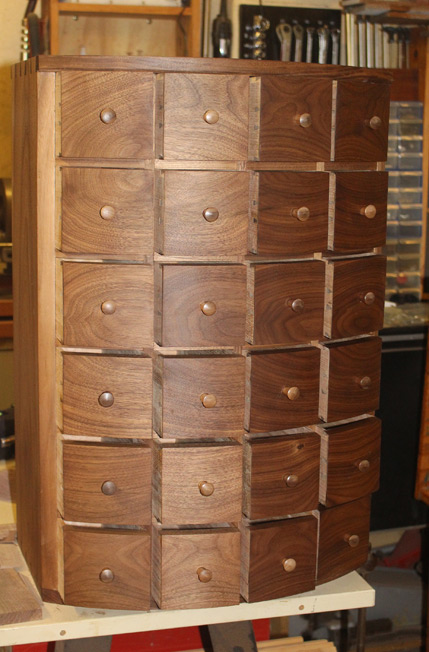
I have begun installing the knobs with wedges. The cabinet and drawer fronts have had a coat of Livos oil, and you can now get an idea of how the knobs blend in (the drawers are proud of the cabinet as the oil is drying)
I completed the base for the chest this afternoon, but I am not thrilled with the design. I'll make a decision tomorrow whether to use it or not.
Regards from Perth
DerekVisit www.inthewoodshop.com for tutorials on constructing handtools, handtool reviews, and my trials and tribulations with furniture builds.
-
31st July 2018 04:08 AM # ADSGoogle Adsense Advertisement
- Join Date
- Always
- Location
- Advertising world
- Posts
- Many
-
31st July 2018, 07:45 AM #137
Franklin Ferrier
- Join Date
- May 2007
- Location
- Gold Coast
- Age
- 70
- Posts
- 2,735
That was a good job of refitting the knob alignment! Now you mention it, I think the direction of pull must have also been a subliminal problem for me looking at the radial arrangement!
I can now sleep at night as well.
Cheers,Franklin
-
31st July 2018, 05:07 PM #138
Novice
- Join Date
- Mar 2009
- Location
- Bellingen 2454
- Posts
- 16
What an amazing job. I feel like I am reading a mystery novel and can't wait to get to the end. Brilliant work and brilliant tools and workshop by the look of it. Look forward to seeing the finished product.
-
31st July 2018, 05:16 PM #139
Novice
- Join Date
- Mar 2009
- Location
- Bellingen 2454
- Posts
- 16
Just brilliant.
-
31st July 2018, 05:20 PM #140
Novice
- Join Date
- Mar 2009
- Location
- Bellingen 2454
- Posts
- 16
So good that I would like to become a chemist/pharmacist just to be able to use one!
-
1st August 2018, 10:57 AM #141
SENIOR MEMBER
- Join Date
- Mar 2004
- Location
- Brisbane
- Age
- 49
- Posts
- 113
Derek,
I always thoroughly enjoy watching your builds!
but... with the clocking of the screws, is it just me, but would they look a little better all being orientated W/E instead of N/S? N/S, they all look disjointed, but having W/E, they could look like they flow with a continous line?
note: not expecting you to change it, but just asking the question...
-
1st August 2018, 10:59 AM #142
The prize lies beneath - hidden in full view
- Join Date
- Oct 2010
- Location
- 1017m up in Katoomba, NSW
- Posts
- 10,662
eez just trying to do yer head in Derek!
-
1st August 2018, 11:35 AM #143
Moderate Moderater
- Join Date
- Feb 2006
- Location
- Lindfield N.S.W.
- Age
- 62
- Posts
- 5,643
That's why I use square drive (Robertson) screws
 Cheers
Jeremy
If it were done when 'tis done, then 'twere well it were done quickly
-
1st August 2018, 11:44 AM #144
The prize lies beneath - hidden in full view
- Join Date
- Oct 2010
- Location
- 1017m up in Katoomba, NSW
- Posts
- 10,662
Yes but do you clock them square or on the diagonal?

-
1st August 2018, 12:56 PM #145

 GOLD MEMBER
- Join Date
- May 2012
- Location
- Woodstock (Cowra)
- Age
- 74
- Posts
- 3,381
The correct terms are either heading or graining that is the slot aligns with the length of the member (direction of grain) regardless of its width.
The person who never made a mistake never made anything
Cheers
Ray
-
1st August 2018, 04:56 PM #146
Be inspired. Be creative. Be bold.
- Join Date
- Apr 2001
- Location
- Perth
- Posts
- 10,826
I was taught by Rob Lee to clock the slots vertical. "That's to let the dust through" Originally Posted by Greg_stewy

(at the back of my mind I hear a song by Leonard Cohen ... "there is a crack in everything ... that how the light gets in").
Regards from Perth
DerekVisit www.inthewoodshop.com for tutorials on constructing handtools, handtool reviews, and my trials and tribulations with furniture builds.
-
1st August 2018, 05:07 PM #147
Senior Member
- Join Date
- Jun 2010
- Location
- Wimmera
- Posts
- 174
Derek has got it right. Vertical slot doesn't catch the dust. Horizontal will. Originally Posted by Greg_stewy
Hooroo.
John
-
2nd August 2018, 02:42 AM #148
Be inspired. Be creative. Be bold.
- Join Date
- Apr 2001
- Location
- Perth
- Posts
- 10,826
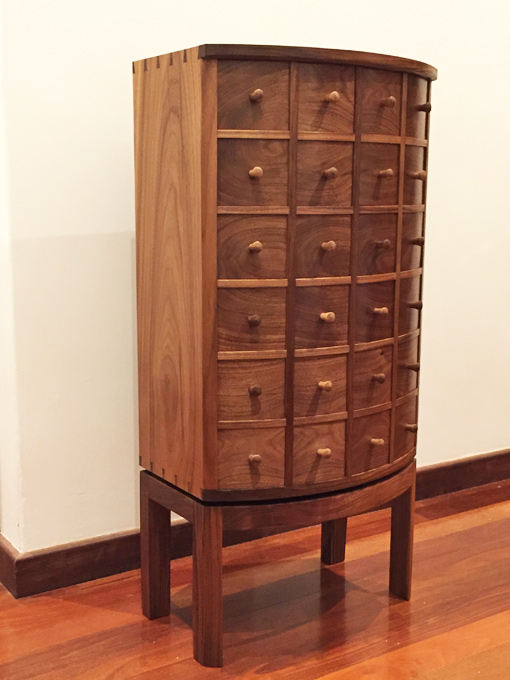
FINAL
Talk about down to the wire. It's 11 p.m. and I've just completed a coat of Howard's wax after the last coat of Livos Universal Wood Oil. The drawers were all finished inside and out with Ubeaut Hard Shellac (dewaxed blond shellac). The inside of the chest (drawer recesses) was given a coat of paste wax. Tomorrow morning I take the chest to the Perth Showground for the annual West Australian Wood Show, where it will take its place among others in the furniture competition. I started this piece 3 months ago.
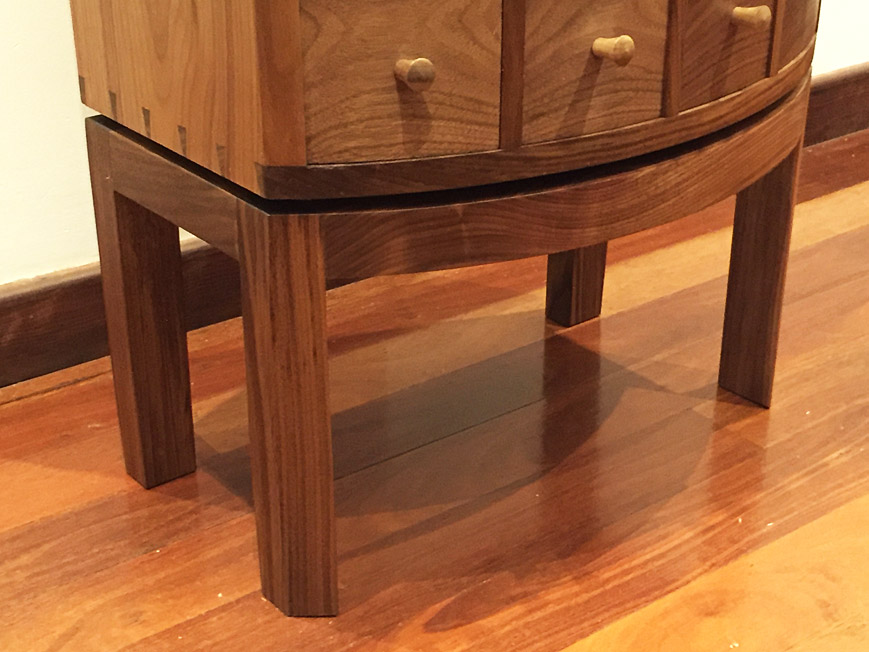
I could tell you how the base gave me fits. It was a difficult task to design a stand for a curved cabinet. Probably why Krenov never built an apothecary chest! Last night I completed the base, and Lynndy loved it. Compound curves forever. Damn sexy. The base, that is.
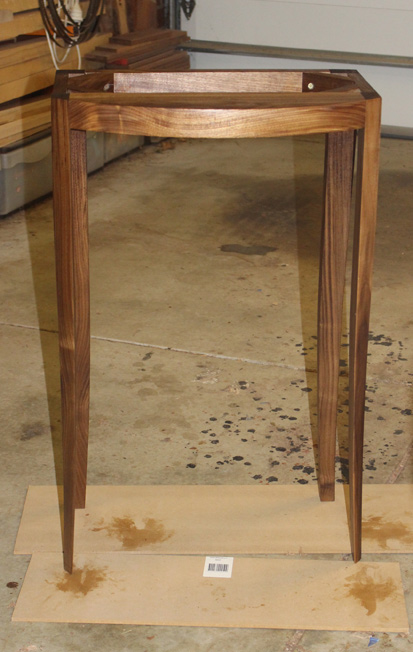
But when I placed the chest on it, the combination looked awful ... top heavy ... ugh! I was out of wood, out of time, and it looked like I was out of the competition.
This morning I woke up and had an inspiration. Cut the legs shorter. This evening, after work, I did just that. And I like the finished piece. I think the balance is right. So does Lynndy, which matters. The dimensions are 1000 high (39") x 460mm (18") across.
Here is the chest, and where it will be positioned in the entrance hall ...
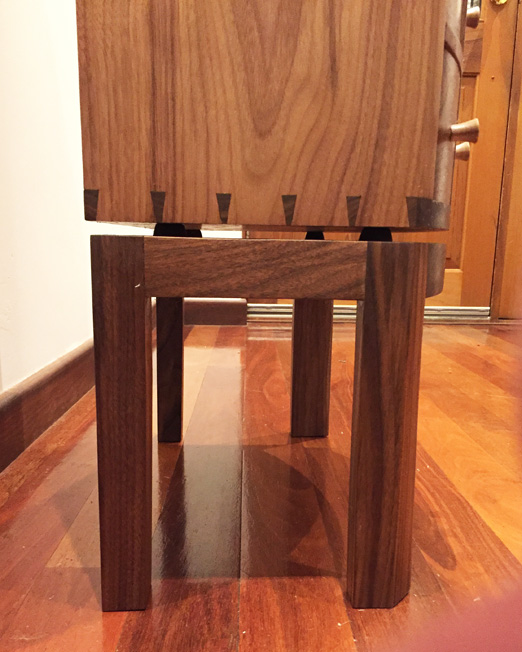
A few pics of the base ...

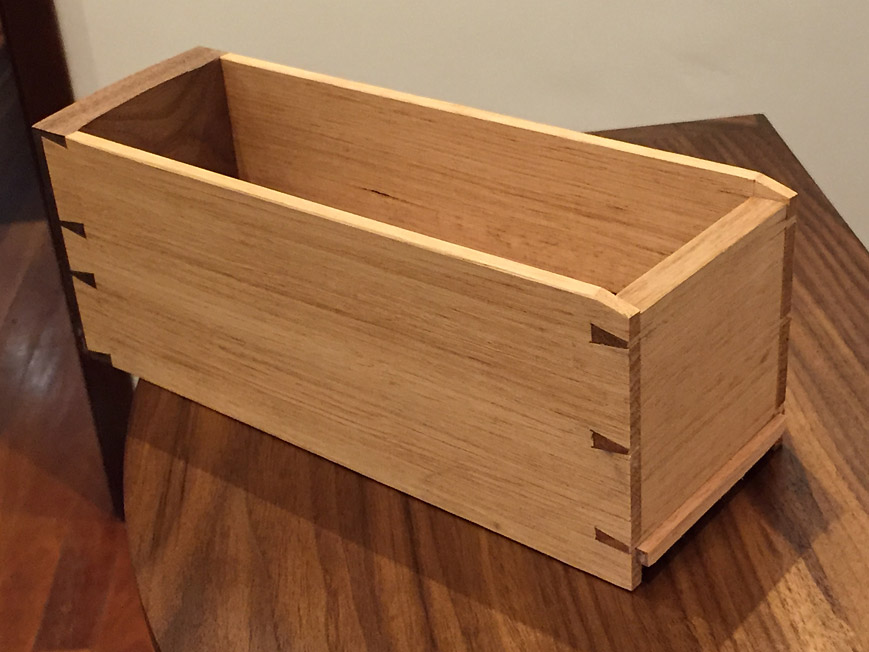
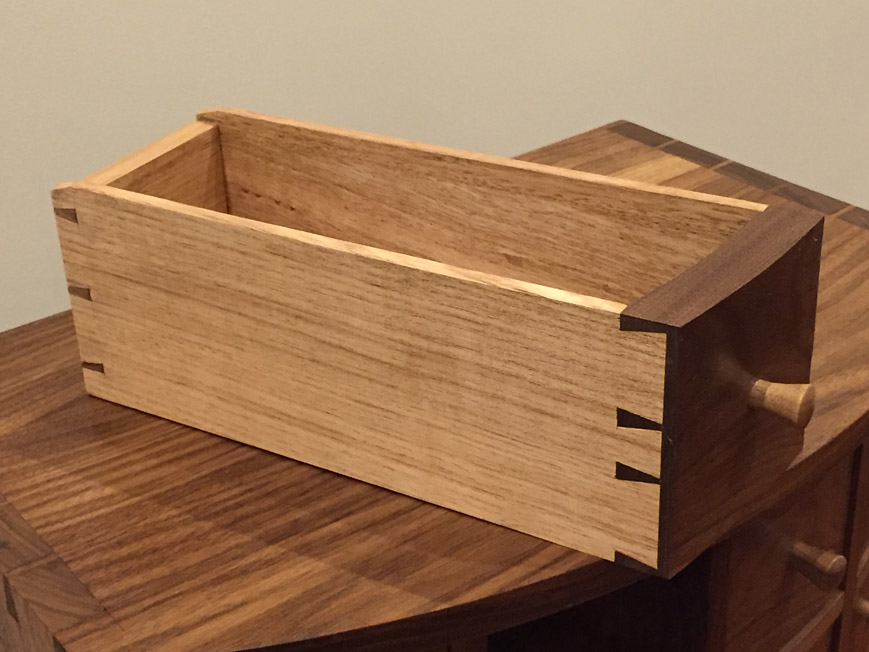
Much time was spent designing and building the drawers, which curve across the fronts ...

Yes, I changed the steel for brass screws (no slotted ones the correct size, however) ...

And made knobs in the same Black Walnut, and fitted coplanar to the drawer recess (that was a headache before finally coming up with the simplest solution, to use the drill press!) ..
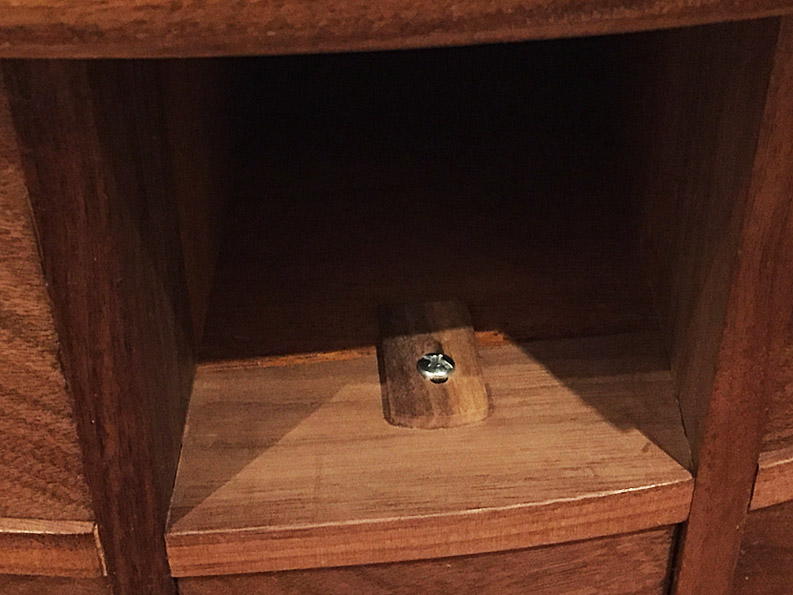
I was very pleased with the drawer stops ...
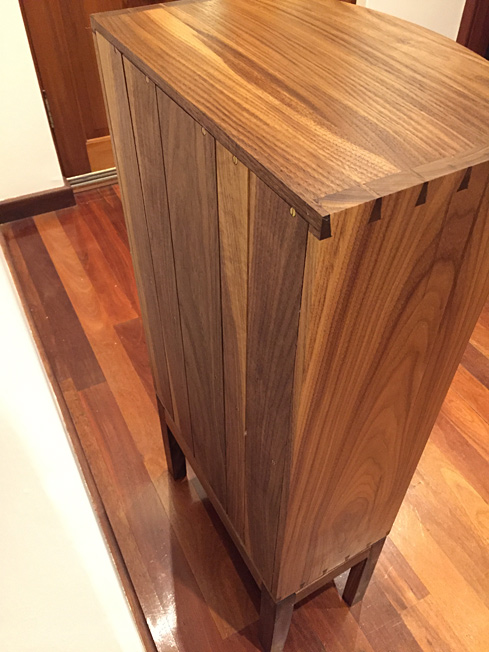
... and you can see the shiplapped back if you peak ...
It has been a long, but exhilarating build. I hope that you got something from it too.
Regards from Perth
DerekVisit www.inthewoodshop.com for tutorials on constructing handtools, handtool reviews, and my trials and tribulations with furniture builds.
-
2nd August 2018, 08:01 AM #149
Franklin Ferrier
- Join Date
- May 2007
- Location
- Gold Coast
- Age
- 70
- Posts
- 2,735

 Franklin
-
2nd August 2018, 08:54 AM #150
The prize lies beneath - hidden in full view
- Join Date
- Oct 2010
- Location
- 1017m up in Katoomba, NSW
- Posts
- 10,662
Bravo Derek, and good luck for the competition!
The ship lapped back is much nicer than a sheet of ply would have been (unless it was really nice ply).
So what will you store in the drawers?

(shoulda started a day earlier to take the pressure off at the end)


 Reply With Quote


Similar Threads
-
Sea Chest
By LR09WA in forum WOODWORK - GENERALReplies: 14Last Post: 11th June 2011, 08:00 PM -
Ice Chest
By 2sharp in forum FINISHINGReplies: 6Last Post: 22nd January 2008, 04:30 AM -
Ice Chest
By rod1949 in forum Links to: TIMBER & HARDWARE SUPPPLIERSReplies: 1Last Post: 15th September 2004, 08:13 PM -
Chest
By GRS in forum WOODWORK PICSReplies: 8Last Post: 7th July 2004, 12:26 PM -
Apothecary Chest
By Paul O'H. Ingersoll Canad in forum WOODWORK PICSReplies: 4Last Post: 28th February 2004, 12:16 AM
