

 Thanks:
  Likes:
  Needs Pictures:
  Picture(s) thanks:
Results 541 to 555 of 667
Thread: Stephenson's Rocket
-
6th January 2019, 11:48 PM #541
 GOLD MEMBER


- Join Date
- Nov 2008
- Location
- Canterbury UK
- Age
- 67
- Posts
- 3,996
-
6th January 2019 11:48 PM # ADSGoogle Adsense Advertisement
- Join Date
- Always
- Location
- Advertising world
- Age
- 2010
- Posts
- Many
-
7th January 2019, 08:53 AM #542
GOLD MEMBER
- Join Date
- Apr 2013
- Location
- Torquay
- Posts
- 4,422
 Really look forward to another of your builds Derek
 Originally Posted by Dalboy


Regards
Keith
-
7th January 2019, 09:07 AM #543
GOLD MEMBER
- Join Date
- Nov 2008
- Location
- Canterbury UK
- Age
- 67
- Posts
- 3,996
-
16th January 2019, 01:42 PM #544
GOLD MEMBER
- Join Date
- Apr 2013
- Location
- Torquay
- Posts
- 4,422
Hi All,
I have now clad both the interior and exterior walls of the carriage. I have done this in 3mm MDF. I have also made up latching mechanisms on the 6 doors so they will stay shut when closed.
I have bought some chenille like beige material from Spotlight out of which I will line the interior of each of the carriage compartments.
The next step will be to paint the windows and frames prior to commencing on the material lining of the carriage.
Regards
Keith
231.jpg
-
18th January 2019, 07:49 AM #545
SENIOR MEMBER
- Join Date
- Dec 2015
- Location
- Alabama usa
- Posts
- 951

I needed to drop back to page 34 and get a look at what it will look like when finished, sorry but I had lost site of the cars finished look.
209.jpg Now I remember and can see where your heading, it will be so NICE!!!
An Index Of My Model making Blogs on Lumber Jocks.
http://lumberjocks.com/htl/blog/116729
-
18th January 2019, 08:16 PM #546
GOLD MEMBER
- Join Date
- Apr 2011
- Location
- se Melbourne
- Age
- 62
- Posts
- 2,567
Liverpool or Manchester!? Originally Posted by htl

Coming along nicely.
-
29th January 2019, 02:27 PM #547
GOLD MEMBER
- Join Date
- Apr 2013
- Location
- Torquay
- Posts
- 4,422
Hi All,
Work continues on the Rocket carriage. I have now given the window frames a coat of paint. The windows are still removable from the carriage framework.
I then started on the door handles. I used aluminium rod as the handle material. The smallest rod stock I could get was 6.3mm diameter. My scale of build required the handles to be 4mm diameter. I used my metal lathe to get down to this diameter. The horizontal section of the handle was drilled to 1.5mm and then I used 1.5mm nails as my dowels to join the vertical handle and horizontal sections. The nails are also my securing method to connect to the door.
232.jpg
The next components I needed to make were the steps into the carriage. I was not sure how to connect the vertical rod section to the stepping plate. I then remembered something that Repliconics told me - that if you take care - you can use bodyfiller as an adhesive. I used aluminium angle as my stepping plate and drilled the back of the aluminium and then inserted 4mm mild steel wire that I had bent to the correct configuration. I secured the 2 parts in the vyce and then applied the bodyfiller. You must wait 24 hours for total curing before filing and sanding the bodyfiller. After this I painted with spray primer.
233.jpg 234.jpg
I then drilled and inserted the stepping plates into position at the doorways.
The steps look pretty high, but have been working off prototype photos and calculate stepping height at 400mm which seems pretty high but I suppose there wasn't any UBR or Codes back in the early 1800's ?
Here are the photos of what I am up to on the carriage.
Regards
Keith
235.jpg 236.jpg
-
29th January 2019, 08:33 PM #548
GOLD MEMBER
- Join Date
- Apr 2011
- Location
- se Melbourne
- Age
- 62
- Posts
- 2,567
While the steps might seem high, as you may have hinted to there was no precedent for railway coaches. There were of coarse coaches and horses, and if you were not fit you probably did not travel.
One small step for Keith, One big step for his model.
-
29th January 2019, 09:31 PM #549
GOLD MEMBER
- Join Date
- Feb 2003
- Location
- back in Alberta for a while
- Age
- 68
- Posts
- 12,006
Originally Posted by Keith_1
Prior to the widespread expansion of steam railways, people traveled by coach. Originally Posted by Handyjack
Some coaches had fold down steps to assist passengers getting in and out of them, but more commonly they would use a mounting block -- which might be carried by a footman or the coach driver's off-sider. When the coach stopped, the footman / off-sider would jump down and position the mounting block so that people could get in and out of the carriage or coach.
If you watch one of the BBC's more detailed period dramas -- like the 6 hour version of Pride and Prejudice -- I'm pretty sure you will see a servant placing and removing a mounting block for people getting in and out of a coach.
So Keith has it right, all he needs to do is add some mounting blocks to his static display.
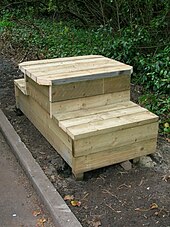
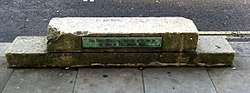
(Left) Mounting block in a Country Park, Eglinton, Ayrshire
(Right) The Duke of Wellington's mounting block, Athenaeum Club, London
(pictures and captions from Wikipedia)regards from Alberta, Canada
ian
-
30th January 2019, 08:16 AM #550
SENIOR MEMBER
- Join Date
- Dec 2015
- Location
- Alabama usa
- Posts
- 951
 Train History Channel
Originally Posted by ian
Train History Channel
Originally Posted by ian
We have now entered the Train History Channel and love every minute of it.
It's so much fun learning all about our projects as we build them!!!
It's so funny how the minute something was said about the mounting blocks everything fell in place as we had seen them many times in movies but took no note of them being placed.
And great work there Keith!!!An Index Of My Model making Blogs on Lumber Jocks.
http://lumberjocks.com/htl/blog/116729
-
30th January 2019, 09:28 AM #551
GOLD MEMBER
- Join Date
- Apr 2013
- Location
- Torquay
- Posts
- 4,422
Thanks guys for your knowledge and expertise. Makes me a bit more confident on the carriage now. (thought I had mucked up)
Regards
Keith
-
31st January 2019, 05:24 AM #552
SENIOR MEMBER
- Join Date
- Dec 2015
- Location
- Alabama usa
- Posts
- 951
I really had to dig to find any good step stool pictures, finally found some under Porter train stool.
The second picture has no stool but is an interesting picture as to how the cars were used.
step stool1.jpgstep stool3.jpgstep1.jpgstep2.jpgstep3.jpgstep4.jpgstep5.jpgAn Index Of My Model making Blogs on Lumber Jocks.
http://lumberjocks.com/htl/blog/116729
-
31st January 2019, 08:47 AM #553
GOLD MEMBER
- Join Date
- Apr 2013
- Location
- Torquay
- Posts
- 4,422
Thanks Bruce
Excellent work - great photos
Regards
Keith
-
11th February 2019, 03:06 PM #554
GOLD MEMBER
- Join Date
- Apr 2013
- Location
- Torquay
- Posts
- 4,422
Hi All,
It has been slow going on the carriage. The windows have all been given a number of coats of paint as well as the internal and external sills and wall surrounds (finicky work). Painting is definitely NOT one of my favourite pastimes. (Paint colour is "Mission Brown". The bottom section of the carriage will be painted in Taubmans "Tyson" which is a pale yellow / cream colour)
With the internal windows and frames being painted - I can now get onto the internal lining of the carriage. As stated a few posts ago - I will be using beige colour chenille material as the internal wall lining. I will then make up the curtains and curtain supports for the windows.
The seating will be made once I have internally lined the carriage and securely fitted the compartment dividing walls. They will be made last once I have the exact internal compartment dimensions.
Regards
Keith
237.jpg IMG_6785.jpg
-
12th February 2019, 12:00 AM #555
GOLD MEMBER
- Join Date
- Nov 2008
- Location
- Canterbury UK
- Age
- 67
- Posts
- 3,996


 Reply With Quote


Similar Threads
-
Stephenson's Rocket, 1:24 OcCre Kit
By gjdale in forum SCALE MODELLINGReplies: 49Last Post: 10th November 2015, 08:05 AM -
Occre Stephenson's Rocket 1/24 My second build
By paulv1958 in forum SCALE MODELLINGReplies: 5Last Post: 6th April 2015, 02:19 PM -
Stephenson's Rocket
By Keith_1 in forum TOY MAKINGReplies: 19Last Post: 17th February 2015, 07:47 AM -
Stephenson's Rockets
By Anorak Bob in forum METALWORK FORUMReplies: 1Last Post: 23rd February 2012, 05:35 PM -
HartleyST16 vs Stephenson WEEKENDER
By Marconi in forum MISC BOAT RELATED STUFFReplies: 5Last Post: 17th August 2009, 03:52 PM
