

 Thanks:
  Likes:
  Needs Pictures: 0
 Picture(s) thanks: 0
Results 31 to 45 of 52
-
16th September 2021, 12:48 AM #31
 GOLD MEMBER


- Join Date
- Mar 2010
- Location
- US
- Posts
- 3,136

I find it odd that you suspect brian will have repetitive stress - warren planes the same way, and is still able to do it and he's in his 70s. While he's evasive about how much hand tool woodworking he's done vs. repair, he's clear that he's on iron 2 or 3 in his try plane and the third in his smoother.
I have planed for several hours a day several times a week in the middle of furniture projects, and when it's over, I resent it. It feels good. It would feel horrible if I were rigid. A round of golf leaves me much more sore, and the part of the body that takes a beating if you're going at it too hard planing is your elbows.
The suggestions you're making are due to a lack of experience. Not experience making furniture, experience doing significant amounts of planing rather than just truing edges, planing little bits off of joints and smoothing.
A lot of the hand tool advice given to beginners isn't that great (paul sellers comes to mind) because it's being given by people who pass themselves off as gurus, but who have done little making of things from start to finish with planes. When paul tries to demonstrate dimensioning, he does it in a relaxed position, but his ability to set the plane and use it smoothly in any heavy use is painful to watch.
Brian's in a comfortable position - one that you can get in day after day, as he did for probably a year or two. I'd bet he had sore elbows at some point (maybe not), but never said anything about his shoulders. They'd get hammered if you hunched down and tried to make up for slow pace by increasing shaving thickness, anyway (I do remember that from early on - trying to find the laziest way to work entirely by hand and increasing amounts fed through the plane on each stroke rather than focusing instead of the volume of work done over time rather than per stroke).
I don't think it would be possible for anyone to work full time planing wood for 3 or four decades and not have some kind of physical problems, but I would be willing to bet that a lot of things they did 225 years ago were responses to shortened careers (like making handles slightly small to force a looser grip, and designing chisels with longer handles to be held at the handle instead of the point).
But the fact that you believe your picture of posture is more comfortable than Brian's is very puzzling.
-
16th September 2021 12:48 AM # ADSGoogle Adsense Advertisement
- Join Date
- Always
- Location
- Advertising world
- Posts
- Many
-
16th September 2021, 12:52 AM #32
GOLD MEMBER
- Join Date
- Mar 2010
- Location
- US
- Posts
- 3,136
(Cosman is the last person I didn't mention - i'm not in champ physical strength for sure, but lay rough lumber in front of both of us and I'd be leaning on his bench and talking to him while he was finishing his allotment).
I suggested Rob should point people to wooden planes if they think they want to dimension wood and he responded something like it not making that much of a difference. I don't think he's done much of it, either. It's one thing to demonstrate a panel, and something else entirely to work on your own and do 6 in a row. You figure things out very quickly so that you can do number 4 without waiting until tomorrow. The first things to go are wood that's pointless to work by hand, and then long or heavy metal planes.
I think learning that part of woodworking and then not being able to suggest a WR set of metal planes to do the work is probably also not in Rob's interest.
-
16th September 2021, 01:06 AM #33
Be inspired. Be creative. Be bold.
- Join Date
- Apr 2001
- Location
- Perth
- Posts
- 10,828
David, I think that I will bow out of this thread. We have different views, and the issue of planing style has taken the topic way off on a tangent. Others should have their say.
Regards from Perth
DerekVisit www.inthewoodshop.com for tutorials on constructing handtools, handtool reviews, and my trials and tribulations with furniture builds.
-
16th September 2021, 01:10 AM #34
GOLD MEMBER
- Join Date
- Mar 2010
- Location
- US
- Posts
- 3,136
I agree - we've both said the same things we typically do. I don't expect to change your mind, but it's not a big deal - we're talking about hobbies and shouldn't lose sight that it's ultimately not that important.
-
16th September 2021, 01:23 AM #35
GOLD MEMBER
- Join Date
- Mar 2010
- Location
- US
- Posts
- 3,136
As a follow-up post about the rotten silica laden rosewood - no iron survives it. The hardest good iron that I have (chinese HSS iron that's 65 hardness or a little above by versitron test), same result as 1084.
20210915_100556.jpg
What shows up in the microscope is similar depth (But I figured this would be the case as silica in maple didn't treat very different irons much differently). What's interesting, that I don't know the answer to, is this same piece of wood can be planed along the long grain without such instant damage. No clue why other than stiffness maybe of the "straws" holding the silica tighter and who knows what else.
hss.jpg
I buffed this iron heavily, so it's about as strong as the edge could possibly be for planing without just making it 90 degrees and scraping with it.
But for the first few shavings, it planes just fine with a stanley plane - it's iron damage that's limiting (and that may have been the case in the hard purpleheart iron that destroyed my shooter and LV's V11 skew shooter).
What I've found through the scope over the years calls a lot of the suggested methods of dealing with silica-filled woods into question (usually the suggestion is to get a more abrasion resistant iron, but it's not abrasion that's a problem - the long grain on my cocobolo blank that's filled with silica can be planed well with the cheapest of irons if they get the buffer treatment - and the edge will last longer than you care to plane in a row. I'll try the end grain on it later today.
But for anyone who is just starting out, geometric modification is far better than buying something more expensive. I suspect that the happiness to go to HSS irons and see slightly improved performance on wood like this is based on the difference in hardness between the two irons. But it takes a lot of honing to remove all of this - even if you grind - 4 or 5 thousandths is a lot and you have to do it over and over.
I have built guitar necks with these and I do most of the initial sizing work with a draw knife and spokeshave and in thicker shavings to get around it. Another neck like this actually caused the unicorn method unintentionally, as I got fed up with how fast a gouge would get dull in it cutting across the grain, and resolved to sharpen the gouge with a grinder, deburring wheel and buff just to do it as fast as possible. It turned out to be the sharpest and most damage resistant gouge edge I'd ever used - I guess you can get away with more buffer rounding on the gouge because there's no clearance issue. It never nicked (But it was also a different billet than this - but one that also destroyed smoother plane irons without modification).
The scope is expensive, but it does keep you from second guessing what you're seeing when you can view an entire undamaged edge and then come back and see this quickly. without it, you question whether you maybe neglected to get all of the nicks out and whether or not you're really seeing new ones that fast.
-
17th September 2021, 07:08 PM #36
GOLD MEMBER
- Join Date
- May 2009
- Location
- melb
- Posts
- 1,125
So I have polished the back of my chip breaker to up 0.5microns and put a 1mm 50 degree micro bevel on it using the veritas honing guide (does anyone else find the veritas honing guide unreliable in setting the blade at 90%).
I put a fresh unicorn bevel on the blade and set the chip breaker to 0.4mm away from the edge using a feeler gauge to confirm. I adjusted the mouth so that the opening is about 0.5-0.6mm with the blade at cutting depth - the shavings were about 0.1mm on straight grained vic ash.
When I planed against the grain on the vic ash - it looked as good as it did when planed with the grain. However, to touch you could tell it wasn't as smooth but visually essentially the same.
Then I planed some fiddleback redgum and there was noticeable tear-out in the parts planed against the grain. I dont really have anything else that has wavy grain but even in vic ash when planing against the grain I could tell not as smooth.
Am I asking for too much here?
Also, using the chip breaker like this - is this for jack plane use? and then final pass on smoother with see through shavings for the super smooth finish?
-
17th September 2021, 07:26 PM #37
Be inspired. Be creative. Be bold.
- Join Date
- Apr 2001
- Location
- Perth
- Posts
- 10,828
The chipbreaker is working optimally when the shavings are straight and even. Wrinkly is an indication of the chipbreaker being too close. Curly means too far away for the effect to occur.
When set up correctly, I can plane both into and against the grain without tearout. No doubt there are some timbers which are less obliging, but I have not encountered them.
Remember that 0.3 - 0.4mm is a rough approximation.
Regards from Perth
DerekVisit www.inthewoodshop.com for tutorials on constructing handtools, handtool reviews, and my trials and tribulations with furniture builds.
-
17th September 2021, 07:57 PM #38
GOLD MEMBER
- Join Date
- May 2009
- Location
- melb
- Posts
- 1,125
Straight and even - as in it just sort of shoots straight up/out and doesnt curl at all?
The vic ash shavings were curly (straight grained timber)
The redgum was kind of wrinkly? I might have to take a photo of it tomorrow. It was really broken up but I suppose thats cause it was tearing out every 5-10mm from the fiddleback
edit: also, how thick of a shaving can one take with a properly set chipbreaker without encountering tear out? like 0.15mm?
-
17th September 2021, 08:29 PM #39
Be inspired. Be creative. Be bold.
- Join Date
- Apr 2001
- Location
- Perth
- Posts
- 10,828
I do not measure shavings. I would pull it back to fine when taking final passes.
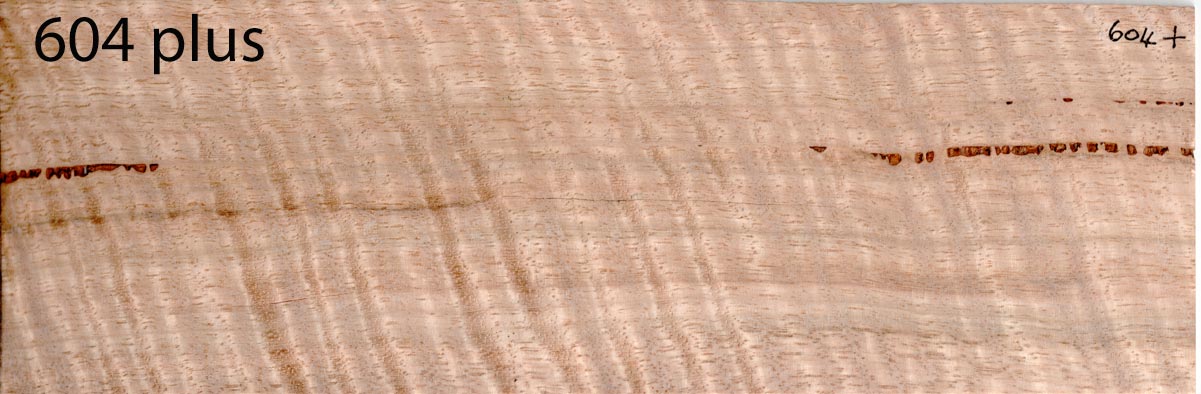
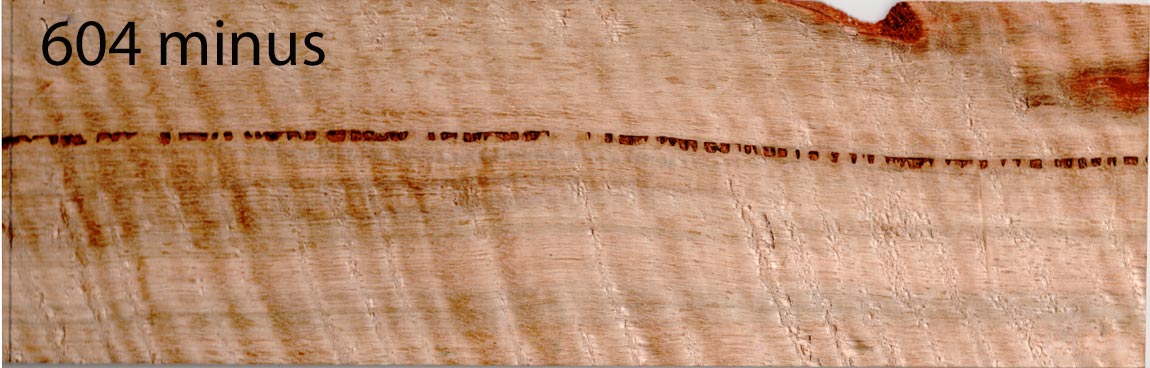
Here is an example of a Stanley Bedrock #604 with closed chipbreaker planing curly marri into the grain ...
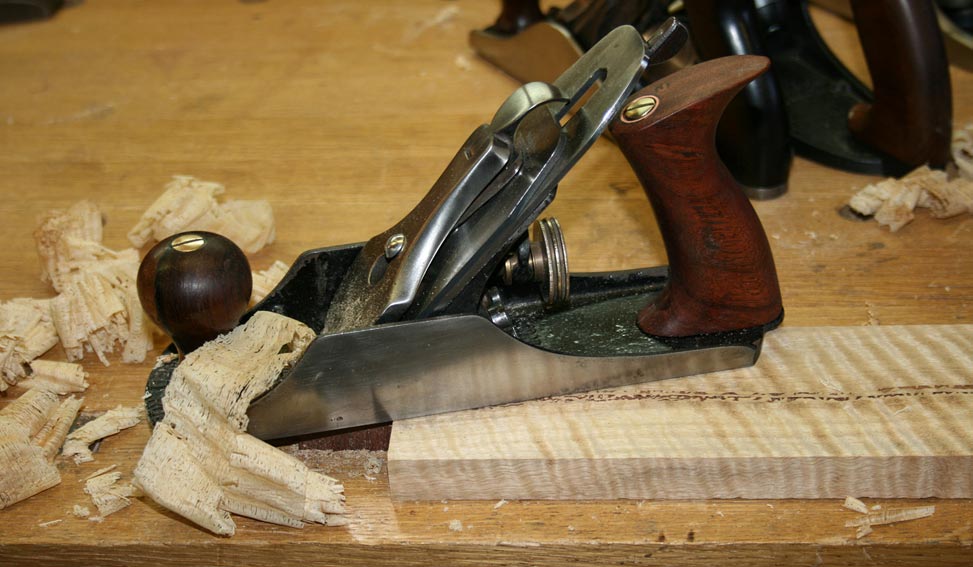
Here is the same board, same plane, but backed off chipbreaker ...

Here is the result ...
Regards from Perth
DerekVisit www.inthewoodshop.com for tutorials on constructing handtools, handtool reviews, and my trials and tribulations with furniture builds.
-
17th September 2021, 08:35 PM #40
Senior Member
- Join Date
- Apr 2017
- Location
- �ire
- Age
- 39
- Posts
- 300
Just to try and add to what has been said already.
There's a few things that are kinda one rule here, but they all can go into one digestible mug of knowledge.
First off, make sure the mouth is as open as it can be, frog all the way back flush with the casting,
the K&K video mentions that the area in front of the mouth is absent.
I've never measured the openings on my planes, but that sounds tight to me.
Hopefully there might not be something else at play, like a thick iron?
If you're doing that unicorn sharpening, make sure the heel of the bevel isn't riding on the wood,
I personally would forget about that, as the cap iron will work with even a dull iron!!!!!!
Say shaving skin rather than cutting hair sharpness.
Well for the densest iroko I've came across anyway's, this timer is tough, interlocked reversing grain, figured, knots, minerals and whatever else...
It used to really beat up my iron in 20 shavings, it would be struggling to cut, even though it was razor sharp beforehand.
I was getting reactions from the dust, and sweating it into me using a scraper plane, torture it twas.
Thanks to David, I can plane away for ages now before going back to the hones.
If you're getting tearout when it's getting dull then it's not "set" for enough influence for the timber at hand.
Now with that said, the rule in my book is as follows...
If you're getting tearout then the iron isn't close enough.
Depending on your use, as in timbers you have, you might choose to have your cap iron steeper,
or set it closer.
That's about it for the rule.
I wouldn't be too concerned about polishing anything just yet, not necessary at this minute to get going.
I WOULD be spending that time working on the evenness of the cutting iron, and depending on you're cap geometry
you might choose to keep reducing the camber and snugging the cap iron closer,
or increasing the steepness of the cap iron.
As I've said already, if you can get you're cutting iron camber bang on...
Then the only difficult thing to "learn" about discovering this truly valued technique is letting go of what you've seen already regarding planing, as Derek says see the shavings.
Don't listen to anyone who doesn't produce the goods.
Yes a tight mouth works to some extent... but it's not a silver bullet, and you will get bit eventually.
Forget about that altogether, it is the single biggest obstacle in your way, really!
If you've been following that, investigated further, and it still won't work...
The clearance for the bevel with the unicorn job,
The cap iron might have a wire edge,
Possibly a non stock iron, or a plane with too small of a mouth.
That's nearly all I can think of, well I suppose their could be some things at play yet.
Did you get tearout whilst having a good surface beforehand, as deep tearout isn't supported
so you might have to get down a wee bitteen deeper.
Straight waxy shavings, crinkly shiny, leaves a brilliant polished surface on a close setting.
Hope that helps
Tom
-
17th September 2021, 11:18 PM #41
GOLD MEMBER
- Join Date
- Mar 2010
- Location
- US
- Posts
- 3,136
You're off to a good start - but yes on some of the texture things - if you have wood that is running out in different directions, some is going to face straight back into the chipreaker, and some will be vertical to the side of the wood and that will be rougher one way or another. If you're facing straight into rising grain, it's not going to be as smooth, but in some woods, it will get close. Your objective is to be able to plane it without tearout and: Originally Posted by qwertyu

1) if possible, plane last passes with the grain (even if you're going to scrape or sand, far better to plane as well as possible and literally be able to sand with one grit quickly and not have any nits that don't come out).
2) if you have panels or joints with opposing grain, you get to the near finish quickly with the cap iron and then if boards are running opposite direction, do what seems best. On really wide panels with two boards, this means you can plane right up to the joint in opposite directions without fear of going over and creating tearout. but the best answer may be to plane one direction on one side of the joint and the other
At any rate, you're getting a taste for things. In any cut where you could experience significant tearout, straightening the shaving is going to get rid of most or all of it.
There's a chance that if you plane the worst of the worst you can find, if you want even texture, you're still going to need to sand. For a hand tool woodworker, there's an abbreviated method of french polishing (or even just sealing for covering lacquer) that negates differences in texture. It's very pleasant to do and leads to a wonderful finish tone. If you're going to apply polyurethane thinly, then it's not going to be helpful, but everything kind of goes together in terms of your method.
I don't measure shavings or chipbreaker settings, but have measured some after the fact upon request. My smoother set is about .008" (thanks to taking a microscope picture or four - setting by what "looks right" doesn't generally miss by more than a thousandth or two (and the plane still works fine either way). It would be hard to measure that precisely, and you'd rather learn this by feel and general look at the cap because you can do it in about 10 seconds vs. having something else that is not intuitive (the more in the shop that's not intuitive, the less satisfying it is to work - checklists and specs are for work to communicate and document things that someone else might have to do, and for us in the shop, only when intuitive isn't possible).
Long story short, you're off to a good start. Challenge yourself to use the plane with the cap for all that you do and see if you can get continued improvement. Eventually, you'll want the profile on the front of the cap to look more like the shape of a stanley cap iron with the very tip rolled a bit steep. That allows when it's set very close for it to be working at a steeper angle than when it's set off a little.
-
22nd September 2021, 07:14 PM #42
GOLD MEMBER
- Join Date
- May 2009
- Location
- melb
- Posts
- 1,125
So I think I got to a point where I am fairly happy with it.
I ended up making the chip breaker microbevel bigger, DW said 1mm and originally I had maybe 0.2mm and just got lazy hehe
Its now prob 0.9mm
It seems like I need that chipbreaker really close - eyeballing it looks like 0.2mm. I can still push the plane through the timber though
Going against the grain on straight grain timber (vic ash) with a fairly think shaving (not see through) the finish is pretty smooth/shiny. Still not as SUPER smooth and glassy/shiny as taking see through shavings with the grain though. I probably shouldve tried taking a few see through savings against the grain to see what the finish is like but its dark now outside.
On the fiddleback redgum there were some areas where its basically endgrain that isnt super shiny but you cant really see tear out. It feels a little rough but overall its pretty damn smooth.
On the question of reading shavings - if the shaving shoots out to the right, does that mean that it is cutting heavy on the right?
edit:
also, I Derek mentioned somewhere (cant find it now) that properly set cap iron the shavings should be straight and that if they are curly it means X and if they are wrinkly it means Y. What is X and Y?
edit 2:
What do you guys think of this set up:
Having a 5 with a good chip breaker setup and open mouth to do much of the work
Having a 4 with a good chip beaker setup and a tiny mouth for final smoothing
-
22nd September 2021, 09:21 PM #43
SENIOR MEMBER
- Join Date
- Oct 2009
- Location
- South Africa
- Posts
- 950
Here�s what Derek said in post 37. Originally Posted by derekcohen
-
23rd September 2021, 12:18 AM #44
Senior Member
- Join Date
- Apr 2020
- Location
- USA
- Posts
- 122
The mouth opening is not important on a smoother with the cb set up. It also would be an impediment if you need to take thicker shavings for whatever reason. Originally Posted by qwertyu
-
23rd September 2021, 07:57 AM #45
Senior Member
- Join Date
- Apr 2017
- Location
- �ire
- Age
- 39
- Posts
- 300
A tight mouth will stop the plane from working, even with a fine shaving.
It will chatter and judder about, and the only excuse for a cut you'll get is a compressed accordion shaving.
If you set you're cap iron further away it'll cut, but won't really be an answer for tearout, for anything difficult
and will be mega difficult to push.
(with cap honed at 50 somethin, and a 1/32" away from the edge)
As I've said, folks are still convinced of the tight mouth, (I was for some time)
Very difficult to let go of your beliefs!
It's the single biggest obstacle that stands in the way of learning how to use your close set cap iron correctly.
Have at it and be free from tearout forever more.
Tom

 Reply With Quote
Similar Threads
-
bevel up planes replacement blade 38 or 50 deg bevel
By justonething in forum HAND TOOLS - UNPOWEREDReplies: 11Last Post: 25th April 2020, 07:15 PM -
N.S.W. Veritas Bevel up Smoothing Plane - Free Postage
By D-Type in forum WOODWORK - Tools & MachineryReplies: 3Last Post: 16th December 2017, 12:30 PM -
Bevel Down Chariot smoothing planes did they exsit
By Kate84TS in forum WOODWORK - GENERALReplies: 0Last Post: 28th June 2017, 05:37 PM -
The Veritas Bevel Up Smoothing Plane
By chook in forum HAND TOOLS - UNPOWEREDReplies: 18Last Post: 24th June 2012, 12:40 AM -
Bevel Up Planes With Back Bevel
By Termite in forum HAND TOOLS - UNPOWEREDReplies: 21Last Post: 17th August 2005, 08:46 AM
