

 Thanks:
  Likes:
  Needs Pictures: 0
 Picture(s) thanks:
Results 46 to 60 of 69
Thread: Suggestions for blade use please
-
8th February 2022, 07:28 PM #46
 GOLD MEMBER

- Join Date
- Oct 2018
- Location
- Dandenong Ranges
- Posts
- 1,893

Great work P. Finished up beautifully. I'm sure you have already said but what timber have you used?
-
8th February 2022 07:28 PM # ADSGoogle Adsense Advertisement
- Join Date
- Always
- Location
- Advertising world
- Posts
- Many
-
8th February 2022, 08:47 PM #47
 SENIOR MEMBER


- Join Date
- Oct 2010
- Location
- NSW
- Posts
- 652
Thanks Ck. Yes it does take a shaving but there is room for improvement, which I'll work on. Sorry about the crappy phone shot.
Thanks Paul. I, like you, was awestruck when I first saw dovetails in metal (I'm not good at them in wood and I'm a 52nd year apprentice chippy) but I've always wanted to have a go at them.
Thanks Matt. It does feel very good in the hand, although a little heavier than what I'm used to in a block plane.
Thanks MA. No I haven't said what the timber is because I'm unsure. I'm calling it FBR (Found By the Roadside) as that's where it came from. I would be happy for anyone to try and ID it. I'll get a photo of the remaining piece for any punters that are interested. My guess would be one of the acacias.
Thanks again all, much appreciated.
Pic_0208_697.jpg
Oh, that photo's really bad.
-
9th February 2022, 01:08 PM #48
GOLD MEMBER
- Join Date
- Apr 2006
- Location
- near Mackay
- Age
- 59
- Posts
- 4,635
That�s a fantastic result Picko.
 Brad.
Brad.
-
9th February 2022, 03:37 PM #49
SENIOR MEMBER
- Join Date
- Oct 2010
- Location
- NSW
- Posts
- 652
OK, I've got some pics of the wood. If anyone wants to have a crack at an ID I'd appreciate your thoughts.
P1010068.jpg P1010069.jpg
P1010070.jpg P1010071.jpg
-
19th March 2022, 07:32 PM #50
GOLD MEMBER
- Join Date
- Mar 2004
- Location
- Brisbane (western suburbs)
- Age
- 77
- Posts
- 12,132
Hi Picko - I've been a bit slack & hadn't seen your plane 'til you alerted me, sorry about that!
Ok so it was a low-angle bevel-up plane you were working on - you don't let yourself off easy, do you? I reckon these split-sole, LA jobbies are a good step-up in difficulty from a standard-pitch BD plane. You have to be more meticulous with the long bevel on the sole, and it's a lot harder to get a fine mouth 'cos you really only get one go at it. With a BD mouth, you can usually leave them a bit tight & file them out during the final fitting stage, but a BU mouth is usually too fine to get anything other than a flat needle file through, which makes altering the mouth on a 6mm thick sole quite the chore!
Anyway, it looks like you've done an extremely nice job, & hopefully, you'll be able to iron out the teething problems & get it working to full soecs. One of my better smoothers was not up to expectations when I first finished it, but a bit of fiddling & fettling got it working very well & I would say it's one of my better creations, now.
I'm actually working on a tiny BU plane myself, atm (in between other jobs) and I've ended up with a crooked mouth, which I'm not sure I can fix without opening it far more than I wanted. My success rate with fine mouths on the 6 BU planes I've made so far has been two that are really fine, a couple that are way too wide, and the others so-so. Maybe others find them easy, but BU, LA planes test my abilities to the max.
No idea what that wood is, but one of the dry-country Acacias would be a good bet. When you say "FBR", was it a fallen tree/branch or a billet of firewood that fell off someone's trailer on the way home? What Acacias grow around your neck of the woods? Whatever it is, it looks perfect for infill, lovely tight grain & some nice figure too - looks like you have enough left over for a little rear-bun smoother like this maybe?
Bull oak 170mm.jpg
This is a plane made on a whim & to try out some SS Bushmiller gave me as potential sole material. It was a bear to work with, but the result was worth it (now I've forgotten the pain!). I made the blade from 1084 steel (from Artisan Supplies) & more by sheer fluke than good management, I'm sure, I got the hardening & tempering spot-on, it's the best home-made blade I've ever managed to make. The sole is 170mm long, and the blade is 38mm wide, so it's a little bit smaller than a #2, but I've really become attached to this one, & find it far more useful than I expected, though that's may be because I've been making so much small stuff lately....

Cheers,IW
-
19th March 2022, 09:27 PM #51
Be inspired. Be creative. Be bold.
- Join Date
- Apr 2001
- Location
- Perth
- Posts
- 10,826
Ian, my chance to give a little back with a suggestion ...I'm actually working on a tiny BU plane myself, atm (in between other jobs) and I've ended up with a crooked mouth, which I'm not sure I can fix without opening it far more than I wanted. My success rate with fine mouths on the 6 BU planes I've made so far has been two that are really fine, a couple that are way too wide, and the others so-so. Maybe others find them easy, but BU, LA planes test my abilities to the max.
With BU planes, open the mouth if you have to, but get it square.
Then add shim stock to the bed to raise the blade slightly. Then the raised blade can close the mouth down.
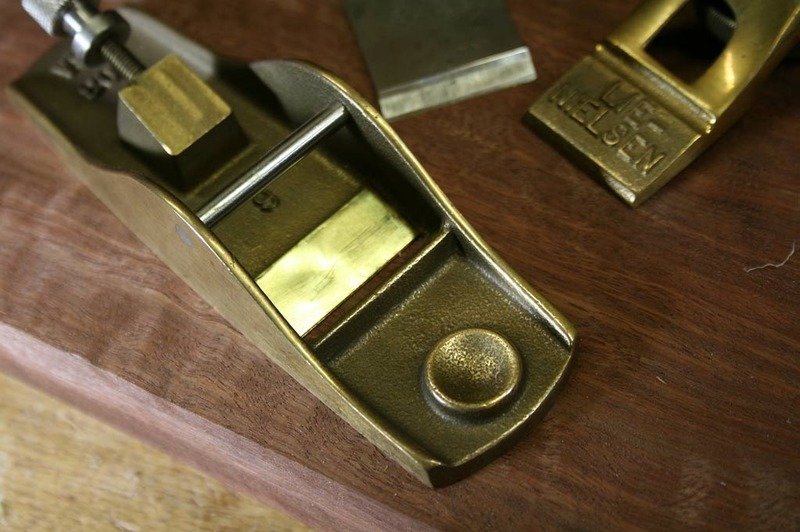
You can see brass shim stock on the bed of the LN #103 ...
Regards from Perth
DerekVisit www.inthewoodshop.com for tutorials on constructing handtools, handtool reviews, and my trials and tribulations with furniture builds.
-
20th March 2022, 10:21 AM #52
SENIOR MEMBER
- Join Date
- Oct 2010
- Location
- NSW
- Posts
- 652
Thanks Ian. I suspect the FBR was escaped firewood, as it had been sawn both ends. It's been under my bench for the best part of 20 years. I remember stopping on the way home from an out of town job to check the quality of a burl and spotted the billet covered in mud on the roadside. There are a lot of acacias around here and I only know common names like Cootamundra Wattle, Black Wattle, Silver Wattle, Prickly Acacia, Currawang. I'm happy to keep calling FBR.
I like that little smoother!
Derek, that looks like a good tip for closing a mouth. Do you glue the shim with Loctite or similar?
-
20th March 2022, 10:28 AM #53
Be inspired. Be creative. Be bold.
- Join Date
- Apr 2001
- Location
- Perth
- Posts
- 10,826
Picko, just a little 15-minute two-part epoxy. Roll the shim stock smooth. Wipe away the excess with meths.
I have done a few like this over the years. Works a treat.
The blade angle will change a smidgeon. The #103 comes with a 20 degree bed. Raising the blade, it ended with a 19 degree bed.
Regards from Perth
DerekVisit www.inthewoodshop.com for tutorials on constructing handtools, handtool reviews, and my trials and tribulations with furniture builds.
-
20th March 2022, 10:59 AM #54
Timber recyclist
- Join Date
- Feb 2009
- Location
- Adelaide - outer south
- Age
- 67
- Posts
- 937
Derek, is the shim stock tapered or does it just work as is? I ask because it seems to me that adding flat shims would cause the blade to be supported at the top of the shim rather than down close to the cutting edge.
Cheers, Bob the labrat
Measure once and.... the phone rings!
-
20th March 2022, 11:19 AM #55
Be inspired. Be creative. Be bold.
- Join Date
- Apr 2001
- Location
- Perth
- Posts
- 10,826
Bob, the shim stock is flat ... foil like. It is fine that the blade will rest on the end of the bed. This provides a secure support across the front of the blade. The rest is just cosmetic.
Regards from Perth
DerekVisit www.inthewoodshop.com for tutorials on constructing handtools, handtool reviews, and my trials and tribulations with furniture builds.
-
20th March 2022, 12:02 PM #56
SENIOR MEMBER
- Join Date
- Oct 2010
- Location
- NSW
- Posts
- 652
Yeah, my thought too r@t. If I ever needed to do it I would also shim the top support, otherwise you are taking away support at the mouth. It still looks like a good solution to the problem. Originally Posted by labr@

-
20th March 2022, 12:34 PM #57
Be inspired. Be creative. Be bold.
- Join Date
- Apr 2001
- Location
- Perth
- Posts
- 10,826
Block plane blades do not experience a high degree of clamping force. If the blade is stiff enough, support along the front edge is all that is necessary. I have used this technique for 20+ years.
Regards from Perth
DerekVisit www.inthewoodshop.com for tutorials on constructing handtools, handtool reviews, and my trials and tribulations with furniture builds.
-
20th March 2022, 02:02 PM #58
SENIOR MEMBER
- Join Date
- Oct 2010
- Location
- NSW
- Posts
- 652
Yeahbut
Yeahbut teknikally
 , there will no longer be support at the front edge. It'll be minute but minute things seem to matter with blade support. A lot will depend on how 'long' the blade support is of course. If it's only the thickness of the sole, at the angle, then of course it will make a lot less difference than if there is some form of thickening there. Saying that though, and looking at your photo again, it's not insignificant when it's a low angle.
Shim.jpg
-
20th March 2022, 02:46 PM #59
GOLD MEMBER
- Join Date
- Mar 2004
- Location
- Brisbane (western suburbs)
- Age
- 77
- Posts
- 12,132
Picko, I think the reason Derek's shims work is because the shim is thin, and unless it is tempered brass, it will be soft enough to compress a little. That, plus the blade will flex slightly under clamping pressure, and the two together are probably enough to close any gaps. Dunno, I haven't tried it, & if I did, I'd be inclined to shim both contact areas, as you suggest, just to keep everything in line, but what works, works.
With these very LA jobbies, I try to get a good strip from about 2mm back from the edge of the bed bevel perfectly flat & aligned with the blade bed or rear rest if it doesn't have an infill style bed. I don't try for perfect contact all the way to the edge of the blade bed because I fear it will flex under clamping pressure on the blade. There is definitely some flexing of the sole at that point, which gets lapped off during the finishing stages. It's only the tiniest amount with a steel sole, but a bit more with the brass-soled shoulder planes I made. Once the completed plane is lapped with the blade under pressure (but pulled back ~1mm from exposure), all seems to remain fine and so long as no big strong fella twitches up the wedge-clamp excessively, it remains stable in use.
Anyway, it's all moot in my case. I looked long & hard at my little plane body this morning & decided it was a write-off. I could have shimmed it, for sure, & maybe one day when I am bored & looking for something to do I will have a crack at raising the bed & straightening that mouth, but you can see in the pic that my fiddling about has created a huge gob that will need a shim about the size of a doorstep to fill. You can also see the gap between the sole & toe pieces: Mouths.jpg
It's a pity 'cos it hammered up pretty well and came off the peening block with the sides as close to square to the sole as I've ever managed. This is just the rough clean-up, but it shows the joints are all nice & tight: body 1.jpg
I fear things are likely to go from bad to worse if I keep trying to 'fix' it. I've only got about a day's work & maybe $4-5 worth of material invested in it so far, so I decided the best course of action at this point is to start over. As it happened, I had just enough 2.5mm brass left to make the two sides (& heaps of Paul's freebie SS for the sole!), so it's not the end of the earth.
As of lunchtime, this is the state of play: Start over.jpg

I've rough-cut the sole pieces & I'll get them squared up & set out for the T&G shortly, but we have to go out early this arvo, so I probably won't get much further than that. One thing I am determined not to do is rush anything. This is the first time I've aborted a plane at this stage, I've had near-disasters aplenty, but always managed to dodge my way through previously, so I'm not exactly ecstatic about having to start again, but what the heck, I've gained a bit more experience......

Cheers,IW
-
20th March 2022, 03:56 PM #60
SENIOR MEMBER
- Join Date
- Oct 2010
- Location
- NSW
- Posts
- 652
Yeah, I know
. It must work fine if Derek says it has for 20+ years, (that's about 10 times my plane building experience) but I'm working today so had my detailers hat on.
If you send me that "write off" I promise I'll send it back to you IF I manage to save it. To save postage I'll bin it for you if I can't save it.

 Reply With Quote


Similar Threads
-
Need suggestions for bunnings melamine blade for small project of 7 drawers
By barrysumpter in forum WOODWORK - GENERALReplies: 8Last Post: 8th August 2019, 09:04 AM -
VICTORIA Saw blade 300x3mm 80t (30mm arbor) possibly Freud + bonus free blade
By Wynterplace in forum WOODWORK - Tools & MachineryReplies: 2Last Post: 17th August 2017, 09:46 AM -
suggestions for removing saw blade
By daninjt in forum TABLE SAWS & COMBINATIONSReplies: 13Last Post: 2nd June 2008, 04:53 PM -
Re-saw blade suggestions
By bloggs1968 in forum BANDSAWSReplies: 10Last Post: 2nd August 2007, 09:14 PM -
Bandsaw Blade Suggestions???
By Manix77 in forum BANDSAWSReplies: 6Last Post: 22nd March 2007, 06:03 PM
