

 Thanks: 0
 Likes: 0
 Needs Pictures: 0
 Picture(s) thanks: 0
Results 1 to 11 of 11
Thread: Jointing with a router
-
24th August 2008, 04:37 PM #1
 New Member


- Join Date
- Aug 2008
- Location
- Australia
- Posts
- 4
 Jointing with a router
Hi,
I am a new woodworker and am current trying to make a table (with a workshop and tool set that are VERY basic beginner level) . After having a few problems trying to get the edges of the planks for the top to match perfectly, a TAFE teacher told me that I can use a router.
He said to clamp the planks about 12mm apart and run a straight cutter down between them using a straight edge as a guide. However my problem is now that the router cutter does not plunge (it has 50mm depth) all the way through the 27mm planks (only about 2/3 the way). Is there any way I can use this method still? Please keep in mind that I have thought about doing it once then turning them over but am not sure whether this is the right way and unless I get them perfectly aligned after turning them over, then the problem of matching the edges will still be a problem.
It may be a naive question - but are there routers that plunge deeper?
Any help would be appreciated - thanks
rhys
-
24th August 2008 04:37 PM # ADSGoogle Adsense Advertisement
- Join Date
- Always
- Location
- Advertising world
- Posts
- Many
-
24th August 2008, 04:59 PM #2
Senior Member
- Join Date
- Nov 2007
- Location
- Perth
- Posts
- 158

Rhys you may have too much of the router bit shank inserted into the chuck of your router therefore reducing your available plunge depth despite the plunge travel of your router. You need only insert 30mm of bit shank into the chuck, however it is usually possible to insert quite a bit more.
If this is not the problem, and you only have a straight cutter with a short blade length, you can still use the router as planned, providing you have a flush trim bit.
Make your pass between the two boards as deep as you can, then you can separate and flip the boards.
Set up your router with your flush trim bit.
Set the depth so that the bearing on the end of the flush trim bit will run along the freshly cut edge.
Run your router along the edge of your board to remove the remaining material left by the first cut.
-
24th August 2008, 05:29 PM #3
New Member
- Join Date
- Aug 2008
- Location
- Australia
- Posts
- 4
thanks Marginata - very much appreciated. I just tried to do what you suggested and realised that the problem is not the plunging depth but the length of the cutter, so I will do your second suggestion and flip the board. Just out of interest - is it possible to get longer cutters or are they this length for a reason?
thanks
Rhys
-
24th August 2008, 05:57 PM #4
 GOLD MEMBER
- Join Date
- Jun 2003
- Location
- Sunbury, Vic
- Age
- 84
- Posts
- 2,727
Triton used to make a longer 1/2in straight cutter but don't know if still available.
Tom
"It's good enough" is low aim
-
24th August 2008, 07:12 PM #5
Dehydrated Hydrographer
- Join Date
- Jun 1999
- Location
- Westleigh, Sydney
- Age
- 77
- Posts
- 9,561
CMT 806.630.11 is a 1/2" 2" long bearing guided straight cutter that is one of the most useful around.
Marginata's point about not putting the cutter too deep in the router makes a good point. You shouldn't ever put a cutter all the way into the chuck, as the vibration can cause it to come loose.
-
24th August 2008, 08:25 PM #6
Member
- Join Date
- Jun 2007
- Location
- Sydney
- Posts
- 57
Mcjing have a 2 1/2" (62mm) straight bit. I just bought one to do some 60mm deep mortises.
-
24th August 2008, 11:34 PM #7
Be inspired. Be creative. Be bold.
- Join Date
- Apr 2001
- Location
- Perth
- Posts
- 10,853
Hi Rhys
Make a guide like the one below. I used steel for the straight edge but a new piece of MDF should be fine. Just clamp it across the board and use a straight bit to square the edge to the line you choose.
With this a plunge router is not necessary.
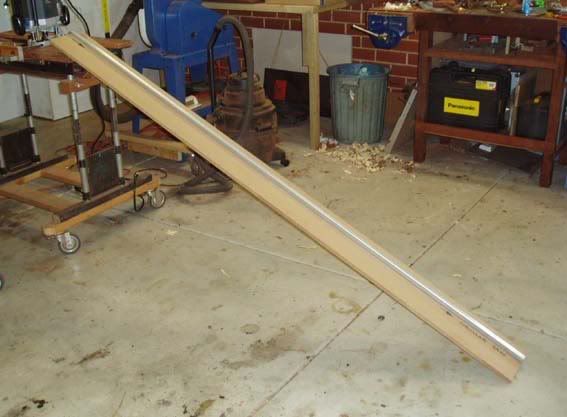
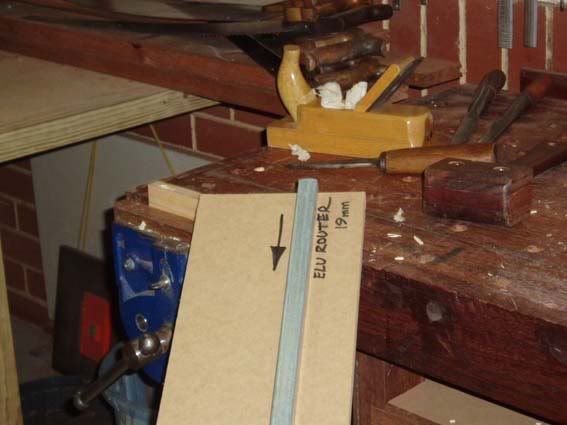
I use one side for a router and the other for a circular saw.
Of course, you may wish to invest in a jointer plane for the future - cheaper and cleaner.
Regards from Perth
Derek
-
25th August 2008, 09:30 AM #8
COO - Sawdust
- Join Date
- Nov 2007
- Location
- Mt Crosby, Brisbane
- Posts
- 2,548
super carbide tools on ebay have straight bit's over 3" long both with and without bearings. About $23 including shipping as I recall.
I'm just a startled bunny in the headlights of life. L.J. Young.
We live in a free country. We have freedom of choice. You can choose to agree with me, or you can choose to be wrong.
Wait! No one told you your government was a sitcom?
-
13th September 2008, 10:50 AM #9
New Member
- Join Date
- Aug 2008
- Location
- Australia
- Posts
- 4
thanks for the responses guys - I really appreciate the efforts. One day I want to have a workshop like the one in the picture that shows the template - I can only dream of being so organised ;-)
-
13th September 2008, 10:46 PM #10
Sum ergo cogito (Cogito)
- Join Date
- Oct 2006
- Location
- Tallahassee FL USA
- Age
- 82
- Posts
- 4,650
The techniques cited by your TAFE instructor and other members here can be made to work. But for the mission at hand, a circular saw is more effective:
1. Set the planks to be jointed close together. Place unique match marks on each joint, for future accurate mating.
2. Attach a straightedge parallel to the boundary of the imperfect edges, at a distance equal to the saw's footplate offset.
3. Run the saw along the straightedge, so that the kerf engages both pieces. If the original plank dimensions are severely imperfect, repeat as necessary.
The advantage of this procedure derives from the saw's greater projection, usually on the order of about 60mm. Any inaccuracy of the saw's bevel angle is of no consequence, because the newly cut surfaces must be parallel anyway.
The router technique may nonetheless be employed, freehand (without straightedge), if a wavy joint is desired.
For either of these methods, allow enough total material to exceed the final required width of the assembly, and cut one or both outside edges to achieve the final width; it's usually better to cut both for a symmetric appearance.
JoeOf course truth is stranger than fiction.
Fiction has to make sense. - Mark Twain
-
14th September 2008, 02:20 PM #11
COO - Sawdust
- Join Date
- Nov 2007
- Location
- Mt Crosby, Brisbane
- Posts
- 2,548
Yeah but only if your saw blade gives a good enough edge to glue.
I joint all the time on my table saw, and my new saw with 305 mm blade gives a 90 mm depth of cut. I faced the nil clearance throat plate the other day in bluegum and got maximum 5 thou variation across the whole face of 18" by 3 1/2", but that was with a good table saw and a good blade. Using a circular saw with whatever's in it won't garantee the joint your chasing. A decent router bit, even a 3 1/2" one will give a much better result.I'm just a startled bunny in the headlights of life. L.J. Young.
We live in a free country. We have freedom of choice. You can choose to agree with me, or you can choose to be wrong.
Wait! No one told you your government was a sitcom?

 Reply With Quote


Similar Threads
-
Jointing on router table - version II
By niki in forum HOMEMADE TOOLS AND JIGS ETC.Replies: 1Last Post: 21st April 2007, 08:43 AM -
Jointing??
By WoodNoob in forum WOODWORK - GENERALReplies: 11Last Post: 5th April 2007, 10:29 AM -
Jointing on router table
By niki in forum HOMEMADE TOOLS AND JIGS ETC.Replies: 15Last Post: 15th March 2007, 08:17 PM -
Jointing with router (glue line)
By niki in forum HOMEMADE TOOLS AND JIGS ETC.Replies: 4Last Post: 7th March 2007, 04:30 AM -
MDF jointing
By TOMARTOM in forum WOODWORK - GENERALReplies: 14Last Post: 25th June 2002, 08:00 PM
