

 Thanks: 0
 Likes: 0
 Needs Pictures: 0
 Picture(s) thanks: 0
Results 61 to 75 of 124
Thread: Nick's Eureka 155
-
10th May 2008, 09:19 AM #61
 Grumpy old Bugga


- Join Date
- May 2003
- Location
- South Oz, the big smokey bit in the middle
- Age
- 67
- Posts
- 4,377

Lookit it the delicate little clamps he uses. You canoe builders have it easy. I don't even use those Quick Clamps anymore because I've broken too many. It's nice, strong F clamps for me

Richard
-
10th May 2008 09:19 AM # ADSGoogle Adsense Advertisement
- Join Date
- Always
- Location
- Advertising world
- Age
- 2010
- Posts
- Many
-
10th May 2008, 12:04 PM #62
Happily receives emails.
- Join Date
- Jul 2005
- Location
- 'Delaide, Australia
- Age
- 65
- Posts
- 8,138
Howdy Richard, Originally Posted by Daddles

Don't you use them? They are the single most useful clamp in the universe.
Cheap (but get the ones that are a bit of an effort to squeeze - some are a bit (lot) light on.
I use them for any situation where they have enough width to grab what you need to hold.
Often you need a third hand when building ... now you have seen it (and the fourth, fifth, sixth and 25th hand.
My preferred building toolkit would have a dozen of these and then a some G or bar clamps - maybe for a canoe or dinghy you would only need 2 or a half dozen (if you had money to buy 'em)
The other thing about the more boisterous spring clamps is for simple glue up jobs their clamping pressure is about right for using epoxy which you don't want to overclamp.
MIK
-
10th May 2008, 12:23 PM #63
AJ
- Join Date
- Jun 2007
- Location
- Aberfoyle Park SA
- Age
- 63
- Posts
- 1,787
Strewth Keith ! Originally Posted by coogzilla
That's a complicated sanding block.
It'd be a heavy mongrel of a thing to push to and fro. Have arm muscles like tree trunks after a hull or two.
Can't see how you'd wrap the sanding sheet securely around it either.
Reckon I'll stick to me cork block for the moment.
AJ
-
12th May 2008, 01:43 PM #64
Senior Member
- Join Date
- Mar 2008
- Location
- Rockhampton, Australia
- Posts
- 227
Hi Mik.
Just wondering, What would the maximum carrying capacity be for the Eureka? Built from 4mm with glass cloth on the bottom, and taped on the inside.
Thanks.
-
13th May 2008, 12:46 AM #65
Happily receives emails.
- Join Date
- Jul 2005
- Location
- 'Delaide, Australia
- Age
- 65
- Posts
- 8,138
Howdy Nick - maximum carrying capacity would not vary with the materials.
I'd like to think of it as canoe for two people plus gear.
For taller frames it can be worth moving the seats around a bit to give enough leg room at the front.
Michael.
-
20th May 2008, 10:02 AM #66
Member
- Join Date
- Mar 2008
- Location
- Ca, USA
- Age
- 67
- Posts
- 73
Not a Eureka
PirogueLast edited by Boatmik; 20th May 2008 at 09:00 PM. Reason: spelling "PeeRow"
-
20th May 2008, 05:06 PM #67
Happily receives emails.
- Join Date
- Jul 2005
- Location
- 'Delaide, Australia
- Age
- 65
- Posts
- 8,138
Howdy,
Keep all the three spreaders in place until the bulkheads are fully bonded in place.
MIK
-
20th May 2008, 05:54 PM #68
Member
- Join Date
- Mar 2008
- Location
- Ca, USA
- Age
- 67
- Posts
- 73
Thank's Mik. I will. Whadda ya think of my little boat? It's a practise
lesson for me. I've botched it a little here and there, but all told it's
coming toghether ok. Coogs
-
20th May 2008, 06:31 PM #69
Member
- Join Date
- Mar 2008
- Location
- Ca, USA
- Age
- 67
- Posts
- 73
Mick, is 6mm sapele ok for ureaka?
Coogs
-
20th May 2008, 08:57 PM #70
Happily receives emails.
- Join Date
- Jul 2005
- Location
- 'Delaide, Australia
- Age
- 65
- Posts
- 8,138
Howdy Coogs!
I don't know much about Sapele, but most plywoods will be OK. The weight of the final boat depends mostly on the ply chosen and how little glass you use.
MIK
-
23rd May 2008, 02:29 PM #71
Senior Member
- Join Date
- Mar 2008
- Location
- Rockhampton, Australia
- Posts
- 227
HI.
I have the bulkheads in place and the Gunwhales glued in. Will finish the end tanks this weekend and then get onto the inwhales.
Does it matter much what order you construct in? that is doing the end tanks before the inwhales?
-
30th May 2008, 09:41 PM #72
Senior Member
- Join Date
- Mar 2008
- Location
- Rockhampton, Australia
- Posts
- 227
Hi all
Just wondering what to do about putting rope holes in the stems? any ideas?
thanks?
-
30th May 2008, 11:53 PM #73
Happily receives emails.
- Join Date
- Jul 2005
- Location
- 'Delaide, Australia
- Age
- 65
- Posts
- 8,138
Howdy Nick,
Did you notice how a whole bunch of people have been keeping your building thread quite active!!!! Excellent!
The bulkheads can go in any time. But what you do with the inwales depends on what you do with the decks.
Method A
If you make the back of the deck line up exactly with the bulkhead then the inwale will not have any relationship with the end deck. So you can do it in any order.
Method B
However if you want to extend the deck so it goes past the bulkhead so you can cut the back edge of the deck in a curve (which looks nice) - then you have to provide a rebate in the inwale for the deck to sit down into.
This means that it makes a lot of sense to glue in the inwale as per the plans so it sticks up above the plywood a small amount.
Then when the glue sets up you can trim down the gunwale and inwale so they are all flush with the ply top edge of the hull. It is probably only worth doing this for the length of the inwale as the gunwale also has to meet the edge of the sidedeck so you don't want to remove too much here. In fact be a little conservative and leave the gunwale and inwale just a shade above the side ply.
The side cleats and centreline support that support the underside of the deck need to be in place inside the buoyancy tanks and trimmed down to their final heights.
Then you trim the decks down to their final shape but don't glue them in. You need to cut the rebate in the inwale for the deck to sit down into. The rebate needs to bring the top of the deck down to the same height as the top edge of the ply. A mm too low is fine, but a mm too high will mean you are likely to go through the top ply veneer when you do the final shaping on the gunwale and inwale.
The rebate in the inwale is a bit of a fiddly job, but remember the deck will hide everything except the back of the rebate in the inwale - so that line needs to be the only truly correct bit of shaping - a few hollows in the top of the inwale - a slightly bumpy rebate doesn't matter as it will be hidden.
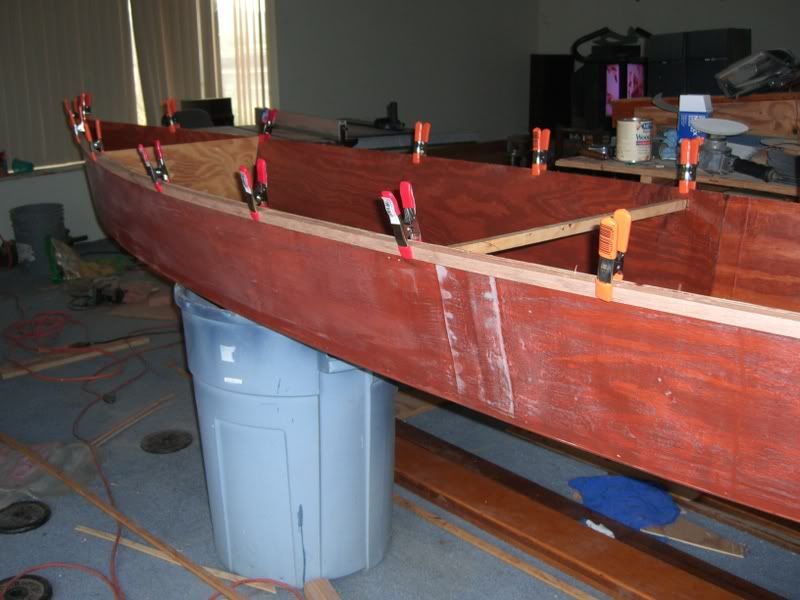
When the deck goes on it is important to work out how to hold it down BEFORE you use the glue. You can see some of the methods we used here

Note the ply pieces wrapped in brown packaging tape that are used to provide pressure where it is needed. We only used three screws in this deck and by putting them through ply blocks (wrapped in brown plastic packaging tape so they won't stick) the holes can be minimised.

Does that explain it Nick? In reality there are many ways - and it is important for each person to work out what they feel comfortable with. The most important part is getting the clamping method right when you are gluing - because if you do a neat job of that then the whole thing will look great.
And without glue you can take time to get it all right beforeheading to the epoxy pumps.
MIK
-
31st May 2008, 12:17 AM #74
Happily receives emails.
- Join Date
- Jul 2005
- Location
- 'Delaide, Australia
- Age
- 65
- Posts
- 8,138
Whew!
Now the holes in the stem for a rope is easy!
Before the deck goes on you have to glue in a block.
So usually I measure and mark a location for the hole on each side of the hull at each end. Don't drill it too far back from the end of the boat - maybe about 35mm back from the outside of the stem.
Make sure all square. Then drill a smallish hole - say 6mm in each of those 4 locations.
Then make up a wooden block of some lightish density wood - it doesn't need to be hard or heavy it needs to be around 45mm thick. Shape it so it will fit inside the tank at the right height - you will have to round the front of it to fit up against the bow fillet or glass tape. The fit doesn't need to be perfect because you can trust the 'pox. Draw an arrow on the back so you know which way is up.
Hold it in place and put a screw through each of the holes to hold it in place - they don't need to be tight. Then pull them out.
Make up a nice thick epoxy mix - peanut paste - and make enough to fill the gaps around the sides and front - jam in place and put the screws back in the holes.
When epoxy cures remove the screws and drill with a 6mm bit toward the hole in the other side - take some pains with looking from the front and the top to make sure you are heading in the right direction.
It won't quite be accurate but with a bit of going backwards and forwards you will find the hole coming from the other side. Use the drill to straighten the two hole directions so there is now a straight hole from side to side.
Now get a big drill bit - maybe 15 or 20mm and run through following your pilot hole carefully - the bigger bit will want to rush right through - so REALLY easy on the throttle and pull back to prevent it from rushing too much. Just go halfway from each side.
Make up another thick gluing epoxy mix and fill the hole you have drilled.
At the end put some packaging tape or paper over the holes on both sides and put a little hole in the tape in the middle of the holet with a sharp nail or pin or screw.
now comes the cool bit. Put a skewer or thin bit of wood or bit of twig (straight please) into the middle of the hole on one side and feed it through to the other piece of tape.
leave the epoxy to cure. When cured get rid of the tape or paper - get your 6mm drill bit and follow the stick through - it will want to follow as the gluing mix is so hard.
Then change to an 8mm bit (around there) and run it through the same hole. Go halfway from each side. Now you have the hole.
To prevent the rope from chafing you need to round the corners of the hole with sandpaper.
This is one of those things that takes longer to explain than to do. The block doesn't really need to fit very well - providing you mix up enough epoxy. And it is OK to have to feel your way and use many attempts to get the angle of the original pilot holes right. As ... it all comes out in the wash!
Best wishes
MIK
-
31st May 2008, 06:36 PM #75
 Senior Member
- Join Date
- Apr 2003
- Location
- Coffs Harbour
- Age
- 61
- Posts
- 132
Hi
Just the other day I was driving along the Murray River near Wentworth talking to my coworker about getting a Kayak so I can do some fishing, having just chatted about the things I have built, he says "why don't you build one" Why didn't I think of that.
So with my imagination fired up I started looking on this site and lo what did I find, the Eureka canoe, and having read this thread and looked at ALL the pics I have sent away for the plans.
I have read the thread from start to finish and will be following in Nicks footsteps and trying to avoid the pitfalls and to make it easy for me. I like the idea of the fishing rod holes, might pinch that one.
Damn I wish I bought all the timber I left at my other house, mostly long lengths of Oregon, might have to make a 3000 round trip to collect it.
So in advance I thank you guys for your advice to nick and others and hope to have a Canoe to be proud off.
Grahamwhale oil beef hooked


 Reply With Quote


Similar Threads
-
Eureka Canoe
By bitingmidge in forum Michael Storer Wooden Boat PlansReplies: 723Last Post: 14th October 2013, 10:41 AM -
The Moose builds a Eureka Canoe.
By Boatmik in forum KAYAK & CANOE BUILDINGReplies: 6Last Post: 8th June 2008, 12:09 PM -
Eureka - Deck Choice
By imafigureskater in forum Michael Storer Wooden Boat PlansReplies: 6Last Post: 7th March 2008, 05:13 AM -
Eureka - Stupid question
By imafigureskater in forum Michael Storer Wooden Boat PlansReplies: 4Last Post: 27th February 2008, 12:47 PM -
Eureka V's PDRacer?
By Walesey in forum BOAT BUILDING / REPAIRINGReplies: 3Last Post: 2nd April 2007, 12:36 PM
