

 Thanks:
  Likes:
  Needs Pictures: 0
 Picture(s) thanks:
Results 2,611 to 2,625 of 3347
-
1st May 2011, 08:09 PM #2611
 GOLD MEMBER


- Join Date
- Jan 2009
- Location
- Blaxland, Australia
- Age
- 65
- Posts
- 2,551

 Originally Posted by AlexN

Actually, it's both ;).
This morning I made a hybrid sort of sanding block by using one of the sanding sponges as a block for the "Arizona" paper, this idea having occurred to me last night while falling asleep. It works quite well, and I'm getting the surface nice and flat. The sponge has enough flex in it to follow the curve of the deck - thus maximising the area of sandpaper coming in contact with it - while being stiff enough (hopefully) to plane the surface flat. The edges of a piece of scrap P. radiata are useful for periodically de-clogging the sand-paper, and a microfibre cloth is great for removing fine dust from the paper - and the surface being sanded as well.
This approach has somewhat sped up my progress on account of the greater area of sandpaper actually doing useful work at any given moment, but it is still slow going. Areas which are narrower than the block need to be done with cork to prevent the edges from getting gouged too much. Even so, the cork block doesn't prevent this, so I have to be really careful. As a result, I'm not making definite plans as to when the next coat will go on - and I still have the boom to sand and the yard to set up.
-
1st May 2011 08:09 PM # ADSGoogle Adsense Advertisement
- Join Date
- Always
- Location
- Advertising world
- Age
- 2010
- Posts
- Many
-
14th May 2011, 03:34 AM #2612
Senior Member
- Join Date
- Dec 2008
- Location
- McAllen, Texas, USA
- Age
- 64
- Posts
- 154
Hey Alex, you sanding it all off again or just busy sailing?

-
14th May 2011, 10:35 AM #2613
GOLD MEMBER
- Join Date
- Jan 2009
- Location
- Blaxland, Australia
- Age
- 65
- Posts
- 2,551
Hi David,
Neither - I have been having a little holiday from sanding ;). I've been letting it harden up a little further so that it doesn't clog the paper as much - feeble excuse, the "holiday" is the more accurate and honest reason :).
I will probably get started again this weekend.
Cheers,
Alex.
-
15th May 2011, 06:45 PM #2614
GOLD MEMBER
- Join Date
- Jan 2009
- Location
- Blaxland, Australia
- Age
- 65
- Posts
- 2,551
Well, I did get started sanding again - yesterday, albeit it a bit bumpily. The batteries went flat on my headlight (the boat is on her side) and I had to stop, as the area I was sanding was more-or-less in the dark. Then the home-made wire catch for the battery compartment broke (like the one on the battery compartment itsef :( ), so I have been fiddling about making a new one. And you all know how much I like fiddling ;).
The varnish is a lot easier to sand as it is harder and dusting better - and not clogging the paper as much. I'd better get back to working on that catch...
-
15th May 2011, 07:08 PM #2615
GOLD MEMBER
- Join Date
- Jan 2009
- Location
- Blaxland, Australia
- Age
- 65
- Posts
- 2,551
That was quick ;). Here's some snaps:
1. Headlamp, broken jury-rigged "catch", and replacement wire. I got fed up with a. the catches on every headlight (of the same make and model) that I bought, breaking; and b. got fed up with having to by a new headlight each time a battery-compartment catch broke, so I now use some fine fencing wire to hold the thing shut. Works a treat :). Until the wire breaks :( ... Note the nice new AAA Sanyo Eneloop(R) batteries poking out of the battery compartment

2. Old and new fencing-wire catches: old in background, newly-minted version at the fore, ready for work. The "handle" on the old catch wore out at the loop and broke

3. New battery compartment catch installed; electrical tape handle added to cover the sharp wire-ends, and to make it look a little bit nicer ;)

Follow this link to my Flickr account, where there be catch upon catch...
Well, there you are. And now I don't have any excuse to go back and get sanding again. I can always think one up, though...
-
22nd May 2011, 08:07 PM #2616
GOLD MEMBER
- Join Date
- Jan 2009
- Location
- Blaxland, Australia
- Age
- 65
- Posts
- 2,551
So, what's going on, apart from nuffin'? A lot of slow, slow, slow sanding. Slow, because that boat appears to have several square miles/kilometres of nooks and crannies, all of which are dust magnets. It's all very dispiriting and depressing, given that the project is apparently almost finished. Except, that it isn't, because of the sanding (my painting is, as I have said before, rather less than perfect, and there are runs and drips all over the place, despite my best attempts to avoid them. <sigh>
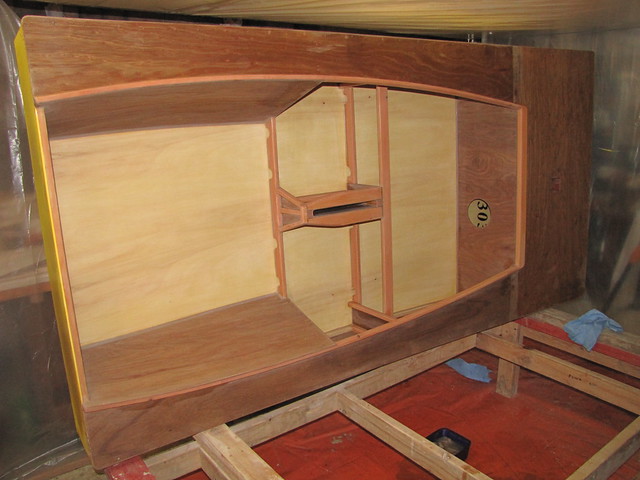
Since I haven't posted anything for a while - let alone photos - here's some snaps of the current status of the boat, just in case you'd all forgotten what my boat actually looked like (I had):
1. What Wood Duck currently looks like: overview

2. Wood Duck slightly closer up, with specific reference to the aft cockpit floor and air-tank sides. I've managed to avoid the inside of the stern transom (aaaaaarrrrghhhhhhhh!)

3. Starboard mid-cockpit floor. Not quite complete, but I'll do that when I turn the boat onto her starboard side: that will make various bits and pieces less arduous to sand...

4. Cockpit, amidships: starboard side of centrecase plus port side of cockpit more or less complete

5. Starboard side of centrecase. I am going to have an enormous amount of dust-removal to do once I've finished the sanding

6. Close-up of amidships port-side cockpit side, etc. I've got most of this area, too - except for F1 and the port side of the centrecase <grumble>

7. Slightly closer view of port air-tank side. This one has been sanded flat (and I mean flat)

http://<font color="Blue"><i>Photos ...ckr</i></font>, of course...
I am finding that breaking the task up into lots of tiny sections and (desperately) trying not to look further ahead than the one that I'm working on, is helping somewhat. Not much, though... On the bright side, however, le Tonk is continuing to sand off very nicely indeed: minimal sandpaper clogging, and dusting away nicely :). This means that it is hardening up well - and quickly.
If you're wondering what I'm doing to avoid the sanding, there is this, and learning to fly r/c planes - or was, until I burnt out the electric motor on my own plane, then proceeded to break my instructor's plane into more than six distinct pieces (plus small bits). I'm so ashamed that I won't be showing my face at the flying field until I've saved up enough to replace his plane.
Note 23.15.11: Actually, the instructor rang me this morning, and when I offered to buy him a new plane he said "no", but when I offered to get him a new bottle of CA, he said "yes" :). Too windy for flying lightweight foamies with large wing area today, so I'm home anyway. Just think of all that sanding that I can do :)...
-
23rd May 2011, 06:57 PM #2617
GOLD MEMBER
- Join Date
- Mar 2007
- Location
- Adelaide
- Posts
- 2,139
Sorry to hear about the plane Alex I reckon total loss is an occupational hazard of R/C....well based on my very limited experience anyway.

Keep at it BTW what do think of the LeTonk now some time has passed.
Mike who should be sanding but finding many other things to do instead. Mike
Mike
"Working to a rigidly defined method of doubt and uncertainty"
-
23rd May 2011, 10:11 PM #2618
GOLD MEMBER
- Join Date
- Jan 2009
- Location
- Blaxland, Australia
- Age
- 65
- Posts
- 2,551
Hi Mike,
Yes indeed - the week before last it was everyone else's turn - lost planes, smashed planes: general carnage. It was my turn last week ;). Still, I'm not in the situation of some of the top scale guys who spend huge amounts of time, if not money on their aircraft - and go home with their (expensive) former planes in several garbage bags...
Le Tonk is excellent: high gloss (a matting agent can be used to dull it if desired - I don't), dries and sets up quickly, is easy to apply (good flow-out), excellent retention of the wet edge and hardens up quickly and well. Plus it looks very nice.
The only problem that I've had with it - aside from dust, which is not the varnish's fault - was contaminated surfaces: which wasn't the fault of the varnish, either.
Thoroughly recommended. I hope you've taken note of this, dkirtley: and once again many thanks for alerting me/us to it.
And I managed to avoid doing any sanding at all today ;). Maybe tomorrow.
Cheers,
Alex.
-
24th May 2011, 10:26 PM #2619
GOLD MEMBER
- Join Date
- Jan 2009
- Location
- Blaxland, Australia
- Age
- 65
- Posts
- 2,551
Well, inch by painful inch I'm slowly getting the jolly thing done. I managed to do the forward cockpit floor, the cockpit bulkhead and most of the underside of the forward side deck. The latter was actually a bit of a mess, so I haven't finished it yet. On the other hand, it won't be seen, so I don't have to fuss as much there (hence in part, of course, the aforesaid mess...). This is all a good warning about the perils of building (or, to be more precise, finishing), say, an Oughtred "Gannet", which I had in mind for a future project. I think I'd go completely and finally around the twist.
That leaves the midships port cockpit floor, the port centrecase side, the starboard sides and the underside of the starboard side decks, the forward face(s) of F1 (aaarrrrgh!), the stern transom and a multitude of other nooks and crannies. then two more coats of varnish - after cleaning - and I promise not to do another one after that! And I don't have my fingers crossed, either.
Of course, I will then have the boom, the yard, the mast, the rudderbox/tiller and tiller extension (these latter two items need to be thoroughly cleaned up before varnishing) and the foils to complete. Hmm.
Still, I've made a wee bit more progress today.
-
25th May 2011, 10:28 PM #2620
GOLD MEMBER
- Join Date
- Jan 2009
- Location
- Blaxland, Australia
- Age
- 65
- Posts
- 2,551
I am going to try to do at least some sanding every day, no matter how little. Today's was particularly miniscule: the piece of port chinelog in the forward cockpit. At least it's something that's done and won't (necessarily) have to be done again. Or not until next time, anyway.
-
26th May 2011, 11:19 PM #2621
GOLD MEMBER
- Join Date
- Jan 2009
- Location
- Blaxland, Australia
- Age
- 65
- Posts
- 2,551
I'm not going to insult people by posting bout how little I've done - I'll wait until I can say that I've actually got the sanding complete. Having said that, I did around a third of the port forward-cockpit side this evening - and the sanding and my headlight revealed some of the original bad fish-eye that I was getting early on with the BoteCote epoxy. So the fish-eye wasn't of recent origin - it was there almost from the beginning. More when I've finished the sanding!
-
1st June 2011, 07:04 PM #2622
GOLD MEMBER
- Join Date
- Jan 2009
- Location
- Blaxland, Australia
- Age
- 65
- Posts
- 2,551
OK. That's the sanding finished. Done. Complete. I nearly got driven mad by all the crooks and nannies. If I have to do any more sanding on the inside of that hull (I know I have to do the outside again...), it will be time for the blowtorch. Or the axe. Or both. Cor blimey. Arrrrk!
Snaps:
1. Fully-sanded cockpit, decks and other bits and pieces. Just the gunwales to do and it will all be done...

2. Corners, corners and more corners. I am heartily sick of sanding corners. Each 2-plane corner has two sides to sand: but each 3-plane corner effectively has six - 3 x 2 - sides. And where there's a step, there's twelve... This photo appears to show the boat upside down, but in reality she is on her side: the camera was being held at a weird angle (I was almost cross-eyed by that stage, so you're lucky to get any snaps at all!)

3. Overview of sanded hull: I'd also done the gunwales by the time I took this photo

Images lurk somewhere in my Flickr account...
Well, that's a milestone of sorts. Now comes the dread task of cleaning up the mess - dust, bits of sand-paper, etc. Given that the sanding has taken so long, I'm not going to rush the clean-up, either: I'll be making absolutely sure that I've got Clean Room conditions by the time that I've finished.
-
11th June 2011, 07:51 PM #2623
GOLD MEMBER
- Join Date
- Jan 2009
- Location
- Blaxland, Australia
- Age
- 65
- Posts
- 2,551
Some more photos:
1. First swipe with the microfibre cloths and warmish water- but not the cloths seen here (they are or have been on the floor and are therefore dirty)
2. Another view of the water-wipe

Follow this link to my Flickr account
It has been a bit cold of late with clear night skies and almost frosty mornings (here at any rate), and I've been staying upstairs in the relative warm, thus avoiding the bitter-ish cold of the workswamp. Over the last 24 hours or so, however, the temperature has picked up a bit with the onset of some rain. Well, it feels warmer, anyway ;). Consequently, I have been getting stuck into removing the dust from the boat. Next attempt will be with the MFCs and white spirit. I also need to vacuum around the place again to get rid of a large amount of sanding dust, of course. If the "warmer" weather keeps up, I may even get out the paint brush...
-
12th June 2011, 07:22 AM #2624
Happily receives emails.
- Join Date
- Jul 2005
- Location
- 'Delaide, Australia
- Age
- 65
- Posts
- 8,138
-
21st June 2011, 09:54 PM #2625
GOLD MEMBER
- Join Date
- Jan 2009
- Location
- Blaxland, Australia
- Age
- 65
- Posts
- 2,551
Painful, isn't it? <sigh> Originally Posted by Boatmik
Well, still lots of nuffin' going on here - I have become well and truly scared off the painting. I'm going to great lengths to avoid it, as I don't want to end up with what happened last time - there being no guarantee whatsoever that the next coat will be any different. The little electric flyable distraction is providing an excellent, well, distraction, in this regard.
As might be inferred, I am still having difficulty with my obsessiveness and even smallish amounts of dust in the varnish. I know that as soon as it gets pressed into service this will become irrelevant, but there is that mental hump to get over that I haven't got over.
I have at least cleaned up the Heavy duty Snout Protector and got some headlamp batteries charged up, so I may in fact get onto the white-spiriting of the topsides Really Soon Now.
And I mean that most sincerely, I really do...


 Reply With Quote

 )
)
Similar Threads
-
New Queensland PDRacer Build
By duncang in forum Michael Storer Wooden Boat PlansReplies: 71Last Post: 26th April 2012, 08:30 AM -
Oz PDR build in Adelaide - sexy black PDRacer
By m2c1Iw in forum Michael Storer Wooden Boat PlansReplies: 39Last Post: 27th April 2009, 06:30 PM -
OZ PDRacer - Dylan's build in the Philippines
By Boatmik in forum Michael Storer Wooden Boat PlansReplies: 16Last Post: 23rd February 2009, 05:50 PM -
Brisbane Timber and Working with Wood. Boatmik/PDRacer
By Boatmik in forum Michael Storer Wooden Boat PlansReplies: 1Last Post: 11th April 2007, 08:06 PM -
Flawed wood on the TS --DUCK!
By Robert WA in forum WOODWORK - GENERALReplies: 7Last Post: 19th February 2004, 11:42 AM
Tags for this Thread
balanced lug,
boatmik,
build,
dacron(tm),
douglas fir,
duck,
enamel,
epoxy resin,
fibreglass,
hoop pine,
interminable,
lug,
machinery,
materials,
michael,
oregon,
oz racer mk 2,
ozracer,
paint,
paulownia,
paulownia/glass mast,
pdracer,
plywood,
polytarp,
primers,
really simple sails,
sail-making,
sailmakers thread,
sanding,
storer,
sydney,
timber,
tools,
varnish,
verbose,
western red cedar,
wood,
wood duck,
wrc
