

 Thanks: 0
 Likes: 0
 Needs Pictures: 0
 Picture(s) thanks: 0
Results 31 to 45 of 53
Thread: Model railways
-
1st July 2009, 07:18 PM #31
 Intermediate Member


- Join Date
- Sep 2007
- Location
- Gold Coast
- Posts
- 37
 T-Track Info
I should have done a Google first.
The link below will take anyone to some good info on HO T-Trak module.
http://users.picknowl.com.au/~austns...usttrak-ho.htm
-
1st July 2009 07:18 PM # ADSGoogle Adsense Advertisement
- Join Date
- Always
- Location
- Advertising world
- Posts
- Many
-
25th September 2009, 05:56 PM #32
Apprentice
- Join Date
- Aug 2009
- Location
- Victoria
- Age
- 31
- Posts
- 108
Hi every one i have a ho scale lay out but have pulled it apart to start again(had no senery anyway). now the chipboard i was using seems too small now and dont have the room for a permament set up. sugestions would be apreciated.
Any one whant some ideas for a layout or just want to look at what i call a great Australian suburban lay out i suggest going to this blokes website http://www.summerfieldrailway.com/ he has a great layout.
i am also interested in purchasing a set of melbounes Hitachi EMU's. These are my favorite trains after the Harris series. dose any one know were to get them from.
Suggetions apreceated.
Harrison
-
18th November 2009, 11:25 PM #33
Intermediate Member
- Join Date
- Sep 2007
- Location
- Gold Coast
- Posts
- 37
OK folks, I’ve just about sorted out what I want to make and have some spare time coming up at Christmas.
Just need to track down some specific nuts.
I don’t know what their correct name would be but they are used in things like DIY cupboards and office furniture.
These are the type that you drill a hole and then push a bolt through the hole to the nut and tighten the bolt up. As the bolt tightened up, the nut is pulled into the hole and fixed in place. You can then remove the bolt and replace the bolt as many times as you need.
Any suggestions where I might be able to get something like this.
Cheers
BTW, Harrison, that's a great layout.
-
19th November 2009, 12:25 AM #34
GOLD MEMBER
- Join Date
- Jul 2006
- Location
- Port Huon
- Posts
- 2,685
-
19th November 2009, 01:35 AM #35
Intermediate Member
- Join Date
- Sep 2007
- Location
- Gold Coast
- Posts
- 37
Thank you very much, the TEE NUTs are the exact nuts Im looking for.
Thanks again Geoff.
-
17th December 2009, 05:56 PM #36
Intermediate Member
- Join Date
- Sep 2007
- Location
- Gold Coast
- Posts
- 37
Hi folks, I’ve made the first TEST module and all seems well so I am about to start making a few modules at a time to see what works and so on.
I’ll post up some pics when I start the production run and details of the module sizes, note though, these sizes are to meet my own needs and will probably not suit other but may lead you to other ideas.
Anyway thanks for the help so far and keep it coming.
Below is a link to a Melbourne based Ntrak club that I found in the latest Model Railroader mag ( USA ) and there are some good shots of the modules including a set of modules that, where the first and last modules conform to the N module standard but the interim modules make up their own non conforming lay out.
Well worth the look.
MelbNTrak Melbourne Australia
-
26th January 2010, 09:34 PM #37
Intermediate Member
- Join Date
- Sep 2007
- Location
- Gold Coast
- Posts
- 37
Hi folks and my apologies but my model railway ambitions are well and truly on hold.
I am so snow under with orders that Ill have to leave the layout construction on hold for the next few months.
If anyone else is making up a layout, please feel free to post up details in the thread, to keep everybody's interest going.
-
23rd February 2010, 02:29 PM #38
Senior Member
- Join Date
- Dec 2008
- Location
- Oshawa, Ont., Canada (I wish I was in Brissie)
- Posts
- 331
Here you go drivesafe.....

This is module number 1 going together as it sits on my mitre saw table...... which is what I should be working on finishing but what the hey!
Naturally it's an N-Scale layout that will make it's home in our basement. Essentially it's a shelf layout but I'm building much of it as modules that I can work on from all sides so I'm not impeded by the rest of the scenery and track when I'm detailing something.

This is the plan for Shelf B. Each shelf will be 20'8" long with 3' depth available at the left end and 4' at the right end for loops and such. The left end will house the helix's bringing consists up from Shelf A (staging) through Shelf B and finally Shelf C.
A single main line comes up from A to B but it's a double main from B to C.
Module 1 is the lightly shaded area (8' x 10") while Module 2 (8' x 15") is waiting to be started. All the modules will be built on 1/2" ply and the framing is being built from 2x fir that I'm milling to 11/4"x31/4". Each frame section will be 32" long - for 16"OC wall studs - and up to 30" deep. I intend to use a cleat system to hang them as well as cantilevers back to the studs for support. The whole idea is to make it relatively easy to break everything down and move it should that be necessary.
Woodland Scenics sub-terrain system is being used to support elevation changes but for larger areas I'll have ply panels in place for support such as the yard on Shelf B which is mostly module 2 and 2" above module 1's base panel. 2% is the maximum grade I plan to run anywhere on the layout.
While the scenery will be based on the SW USA and the main road will be the AT&SF/BNSF I'm not sticking rigidly to prototype modelling. I've already started making my own road decals for a ficticious branch called the Brisbane Southern Railway and many of the place names on the layout will be familiar to Southsiders like me.
Oh and while I'm doing this I'm also building a much simpler layout for my girls featuring - who else!? - Thomas and friends.
-
23rd February 2010, 07:12 PM #39
GOLD MEMBER
- Join Date
- Sep 2002
- Location
- Paignton. Devon. U.K.
- Posts
- 6,062
Nice looking work, show us the finished layout one day.
woody U.K.
"Common looking people are the best in the world: that is the reason the Lord makes so many of them." ~ Abraham Lincoln
-
24th February 2010, 12:07 AM #40
Intermediate Member
- Join Date
- Sep 2007
- Location
- Gold Coast
- Posts
- 37
Good stuff Expat and dont forget to show us some local real train shots
-
24th February 2010, 02:57 AM #41
Senior Member
- Join Date
- Dec 2008
- Location
- Oshawa, Ont., Canada (I wish I was in Brissie)
- Posts
- 331
Many of the shots would be a bit boring seeing as the major industry in and around Oshawa is the GM plant down by Lake Ontario. We have CP and CN lines serving the plant so lots and lots of autoracks. Not sure what grade the CP hump line over Hwy 401 is but it must be close to 4% on the plant side! There are a bunch of GM, Ford, Chrysler and Toyota plants in Southern Ontario so you see lots of very long auto trains. Via Rail shares the CN line all the way to Montreal and the GO train ends in Oshawa also on the CN side of the highway. We don't see any Ontario Northern around here but you see the occasional SOO or StL loco hooked up to a CP consist every now and again. Still I'll see what I can do for you. I miss seeing the red and silver war bonnets around Denver and Colo Springs. Originally Posted by drivesafe

I'm thinking about adding a small branch into the center of the loop at the right end of the shelf to serve a couple of industries. Not sure how or what yet. Maybe I'll do two spurs - one inside the loop and another outside? That end comes out from the wall 4' and I'm not taking up much of that real estate.
-
24th February 2010, 01:33 PM #42
Senior Member
- Join Date
- Dec 2008
- Location
- Oshawa, Ont., Canada (I wish I was in Brissie)
- Posts
- 331
Okay I'm dumb....... I can turn around here at my desk and look at the right rear corner of where the layout will go and I completely overlooked the bulkhead in that corner! So I had to revise the design.

The good thing about doing that was I added the 2 spurs I was talking about. I've decided one will be the Maleny Dairy Company and the other Crestmead Furniture. The big yard will be the Holland Park Yards and I added a loco service spur as well.
I found that going to Y switches in a couple of places made things a lot smoother so all in all the redo has worked out okay. Module 1 is now ready for plaster and some shaping. Module 2 will be worked on in earnest after the weekend once I pick up a bunch more flex, switches, section track and roadbed. I think I need another 40 or more sets of powered rail joiners too so the soldering iron will get a workout in between the woodworking that needs finishing!
-
25th February 2010, 10:01 AM #43
Senior Member
- Join Date
- Dec 2008
- Location
- Oshawa, Ont., Canada (I wish I was in Brissie)
- Posts
- 331
Got an email from Ted asking if I could post a larger image of the track plan for Shelf B so more of the detail could be seen. Well there are limits to how large an image you an post on these forums although if I could figure out how to do it I suppose I could just attach it. Anyway this will do for now. Oh and module 1 is just waiting for plaster now. All the track is laid and wiring run. Got it stored away ready for scenery and assembly.
So from left to right on the shelf:
Module-4 - 5' x 3'

Module 2 - 8' x 15"

Module 1 - shaded area only - 8' x 10"

Module 3 - largest module for this shelf - 8' x 4'
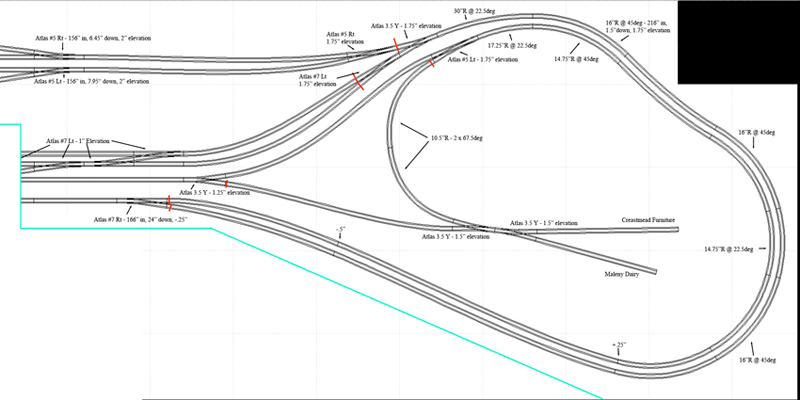
Told you there were going to be place names on this layout that people would recognise! The lines on the plans are 10"x10" to give you an idea of the size of the shelf and each module. Overall it's 20'8" long and I can use 3' at the left end and 4' at the right end along the walls.
Now I can get working on module 2 - the Holland Park Yard and Loco Service although I think the most fun will be module 3 because of the industries and the many main, branch and spur lines plus all the changes in elevation of those lines.
Oh and if you're wondering what the red lines are across some of the rails those are the electrical breaks for the DCC blocks.
Main line on this shelf is 41' which is a not too shabby for what is a fairly simple run.
-
1st March 2010, 03:09 AM #44
Senior Member
- Join Date
- Dec 2008
- Location
- Oshawa, Ont., Canada (I wish I was in Brissie)
- Posts
- 331
I was thinking I have some photos from laying the roadbed and track for Module 1 on Shelf B that I haven't put up here so I made some time between my usual work and here they are.

That's the last of WS risers and 2% inclines in place. I've cut all the roadbed now it's time to attach it all.

Only a little more gluing of roadbed to do here. I had to use up the 2' pieces I had laying around before switching to the rolls. I'll sand the joins like I do the foam. You might note a slight overhang on the right side of the tall riser. That's because the roadbed is straight but the risers aren't and that was as close as I could get them. No matter. I start my scenery using wadded newsprint soaked in diluted glue. Then I apply strips of plaster cloth once I have a basic shape and go from there so that overhang will be long gone by the time you see grass and rocks and things!

How to make a dead straight track part 1: Take a 48" long x 3/4" wide piece of scrap hard maple from your cut-offs bin and run it down to 47/128" thick using a micro-adjuster on your TS fence to get it just right.

Part 2 you take said piece of milled hardwood and you slide it between the rails and Bob's your Aunty's best friend! Apply glue with a glue spreader, place track on top of glue and very lightly hold the hardwood and rail in the middle of the roadbed which is laid centred on the track line drawn on the base. If necessary I can "tweak" the hardwood if it's a fraction out of line. It might look it in the photo but it's not. I think the lens is getting a bit wonky.
I did clean the saw dust off the roadbed before I glued the track down! Lazy me didn't have the DC turned on when I was milling that maple. Yuck.
More to come...............
-
28th February 2011, 12:39 AM #45
Intermediate Member
- Join Date
- Sep 2007
- Location
- Gold Coast
- Posts
- 37
Hi folks and its been a while but I am absolutely flat out with my business.
Anyway, my original plan to build double sided modules, with a G scale layout on one side and the other side was to be used for an HO layout.
Since my last post, reality has kicked in and I have now abandoned the idea of a double sided set up and will now concentrate solely on the G scale layout.
Now my true passion is trams, trollies and street cars, and to that end I was wondering if any body on this forum might know of a source of erection drawings for Australian trams.
In the past I have tried a number of tram forums but got no where, so any info would be appreciated.
BTW, while the layout is on hold at this time, I hope to get back to it in the near future.

 Reply With Quote
Similar Threads
-
Hercus Model 0
By SurfinNev in forum THE HERCUS AREAReplies: 92Last Post: 9th February 2011, 04:37 PM -
A T Model Toy
By Ruddy in forum TOY MAKINGReplies: 14Last Post: 26th February 2009, 07:03 PM -
1930 model A
By barg2757 in forum MOTOR VEHICLESReplies: 0Last Post: 17th December 2008, 09:48 PM -
model bicycle
By mikeyfreeman in forum WOODTURNING - GENERALReplies: 1Last Post: 15th February 2005, 12:33 PM
