

 Thanks: 0
 Likes: 0
 Needs Pictures: 0
 Picture(s) thanks: 0
Results 1 to 15 of 19
-
7th March 2006, 07:11 PM #1
 Banned


- Join Date
- Apr 2005
- Location
- kyogle N.S.W
- Age
- 50
- Posts
- 4,844
 Cutting sliding dovetail pins by hand plane.
Hi,
This threads a continuation of the thread " A sliding dovetail study " ....its here if interested
http://www.woodworkforums.ubeaut.com...ad.php?t=25000
Ultimately want to cut these joints by hand. Trying to avoid powered routers if possible. I did this one this arvo.
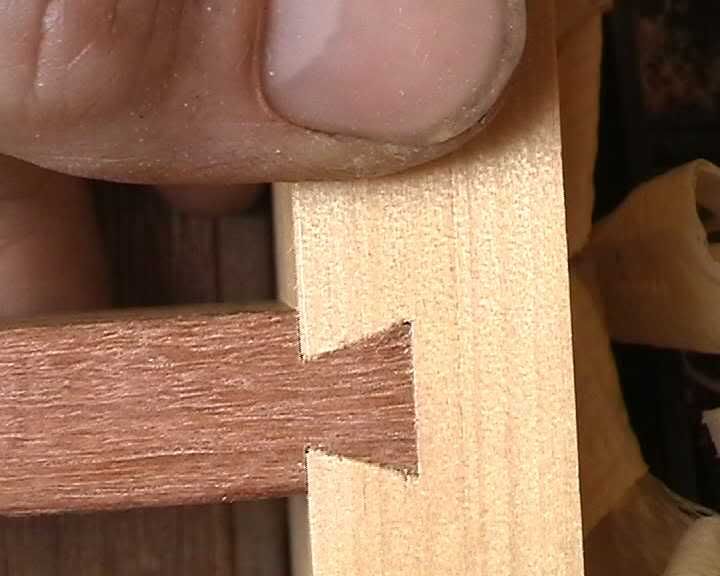
In that old thread the focus was on making the tails part of joint by hand... The pins part I used to cut by powered router. Unlike some, I can't cut them well enough by saw. Long shallow cuts with a saw is just too inaccurate for me. I prefer hand planes.
SO, what I've been working on is a plane that can cut the sloping sides of the pins part of the joint, accurately.......and this is what I've come up with.
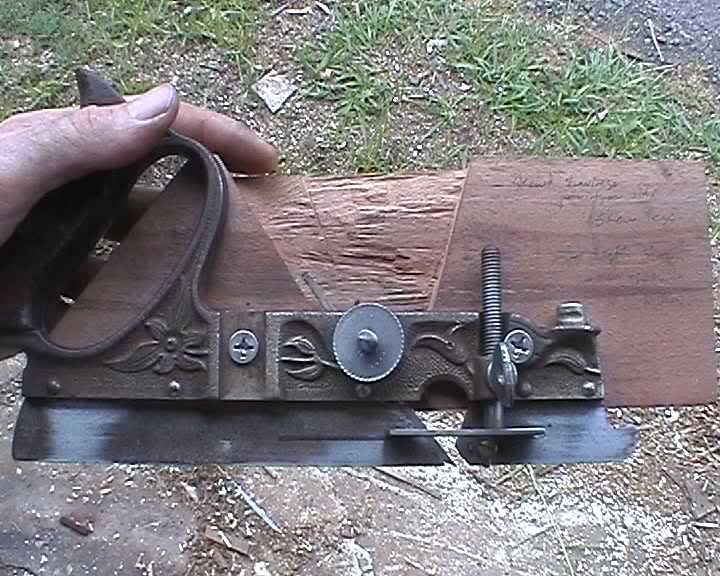
Its an old stanley 45 body. The rest of the parts were missing. I've crudely attached a thicknessed board to it, by running a couple of bolts through the bar holes into threaded inserts within the wood.
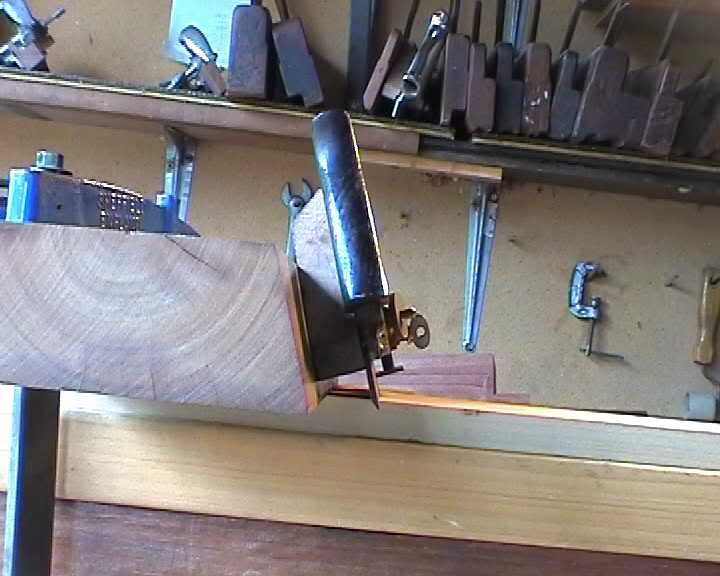
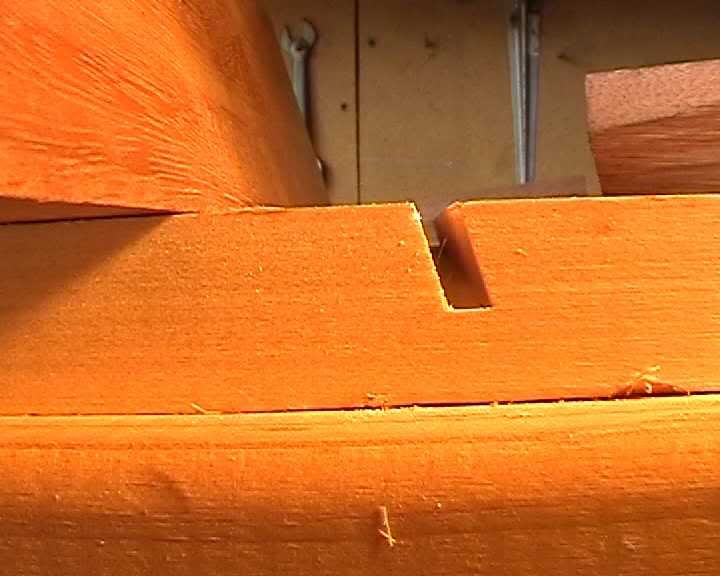
It only has one nicker though. The regular 3-point spur, which I reluctantly kept. (I don't like them, cause their not depth adjustable). So, on the other side of the skate I've routed in a groove, shaped a 2nd nicker to fit the groove....here
Then sharpened up a main blade to plough out a shaving from the middle, after the nickers have done their job....Sort of see it in this picture here. Angles a bit crooked in the picture (I had trouble getting the camera to focus right). The nickers should line up to the sides of the blade. Both nickers should flare. And the depth of the nickers must be cutting at a slightly deeper depth to the main blade.
Anyway, the whole thing runs along a high fence. The height is important to give you all the laterial stability you need. I've planed this fence angled, to match the angle of the tails. (12 degrees ? I don't remember) .
This fence is setup basically like a T-square. With the cross piece of the T-square working to support against breakout at the end of each pass. Uno, as your plane exits your work, it can tearout the timber.
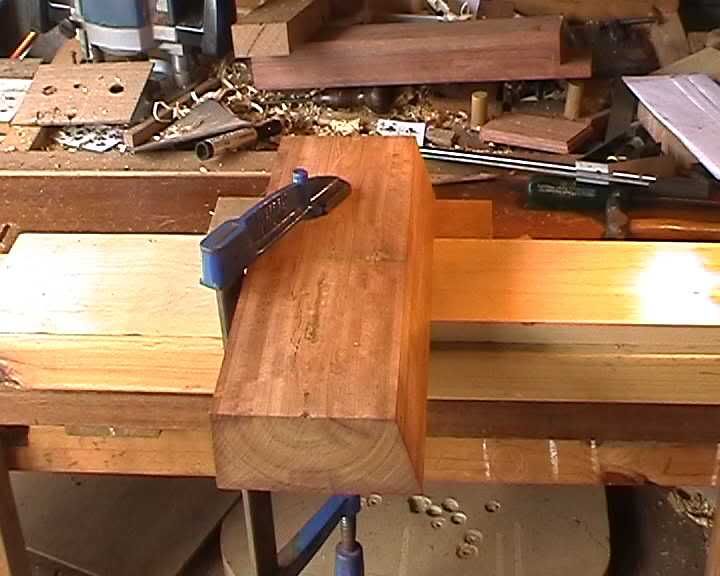
So, each pass is made with plenty of side pressure from your hands to ensure the planes board lies flat on the fence throughout.
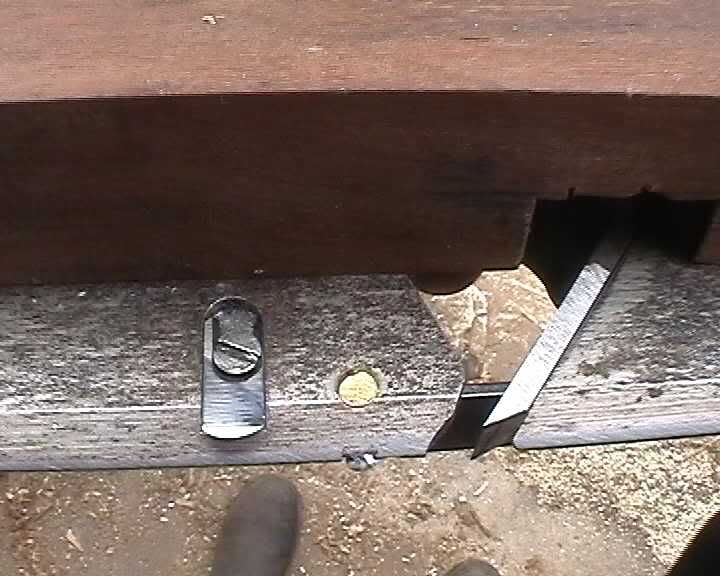
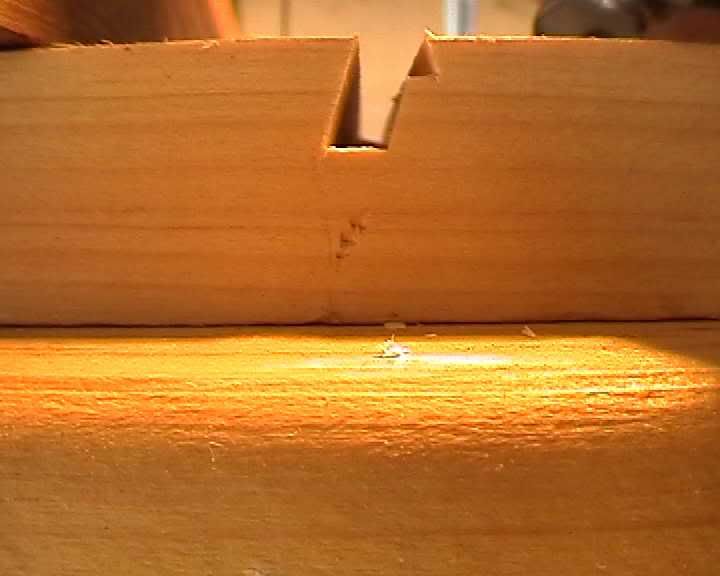
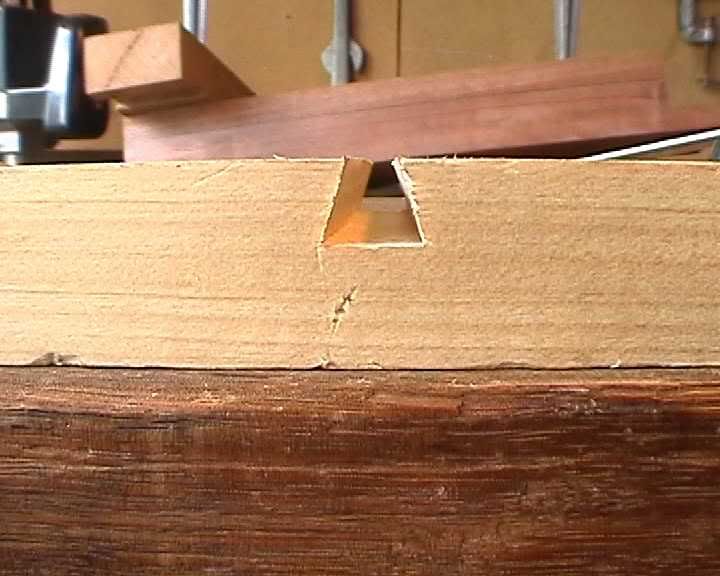
2nd picture shows the nicker cuts and the shaving thats taken from in between. Can see the importance of the nickers. Without them there'd be tearout all over the place, especially on softwoods, like the pine I'm using.
3rd picture shows the completion of the cut. The depth stop, stops the cut, ensuring the same depth throughout.
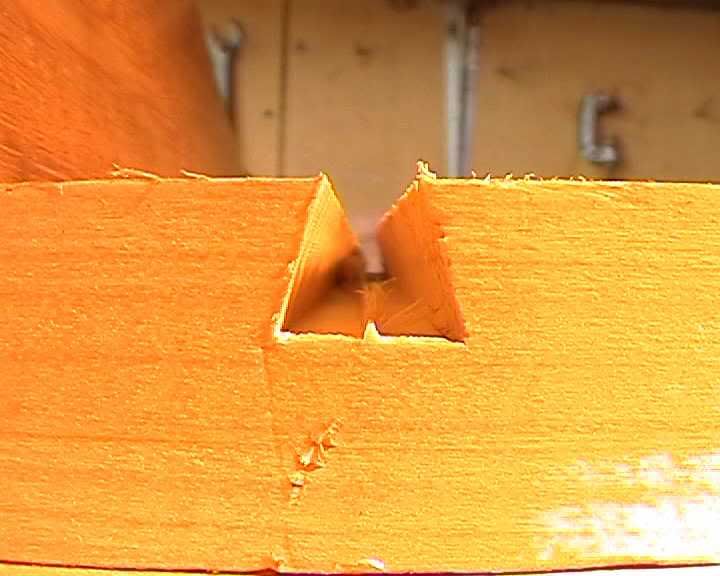
Ok, one sides done. I now flip the board and start cutting the other slope. First make sure its all line up properly. It helps to first just run a nicker along the wood lightly (and not the main blade) to see how parallel this little line is to the first cut. Once I'm sure the fence is fixed right, I rip into it till I bottom out like before...
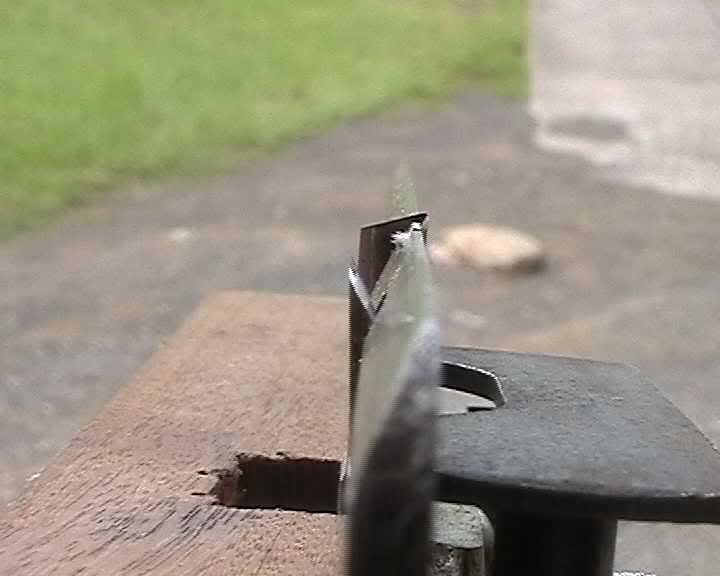
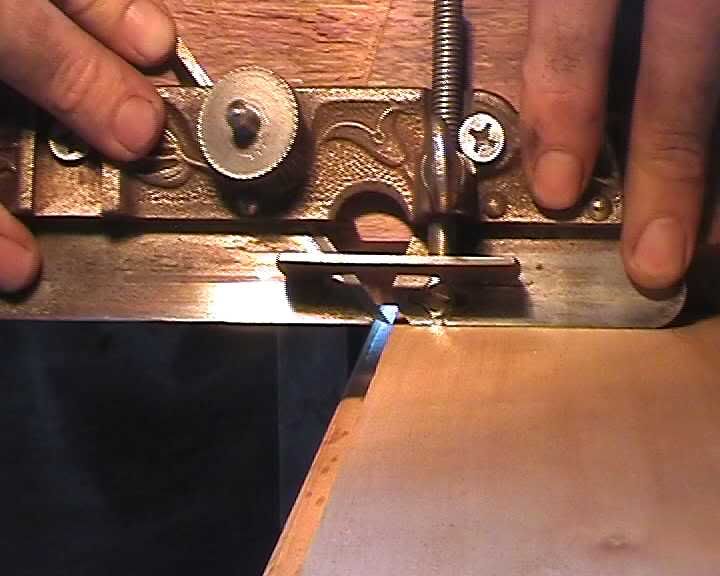
Hard parts done. Now you have to rout out that little line of wood thats left. I REAKON, you need one of these. Its a "shoe" blade. It sits in a Record 071 hand router. Found it, rusted, in a box of old tools. Didn't know what to make of it at first. After cleaning it up I couldn't believe my eyes ! never seen anything like it !
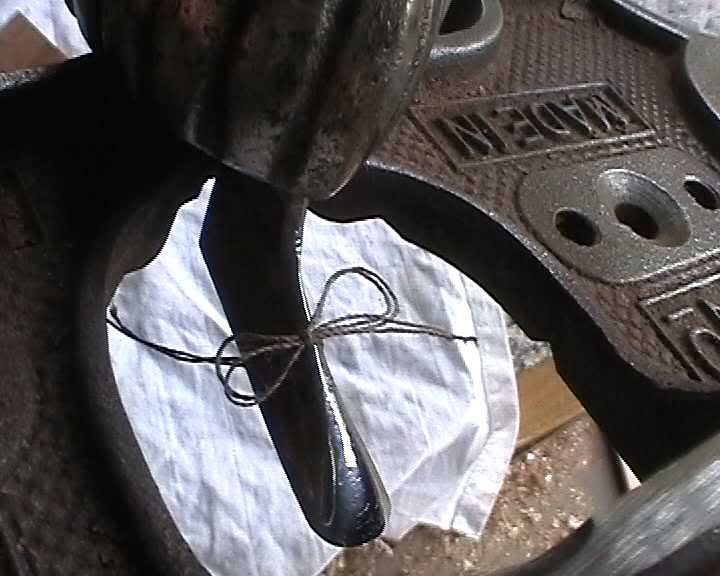
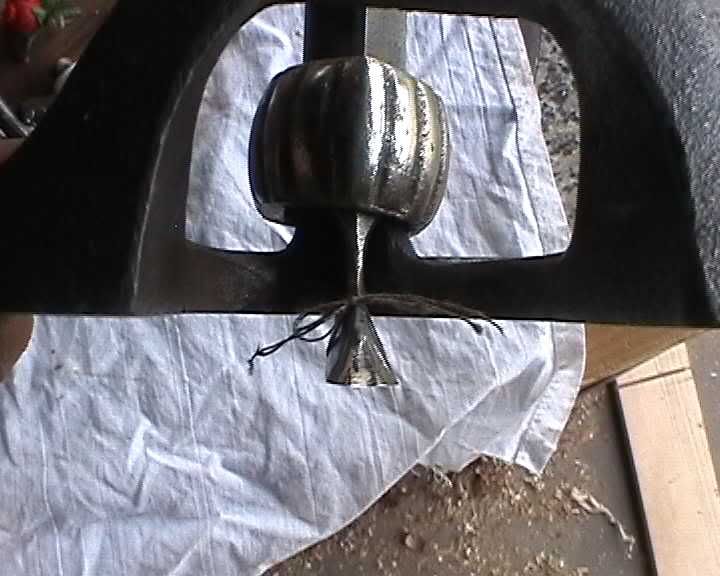
According to that Blood and Gore bloke their incredibly rare. Even harder to find with its origional laces. But what would that bloke know about record planes anyway ...
 Anyway, its ideal, cause its got that dovetail profile, so it can get into the groove and clean out the bottom neatly.
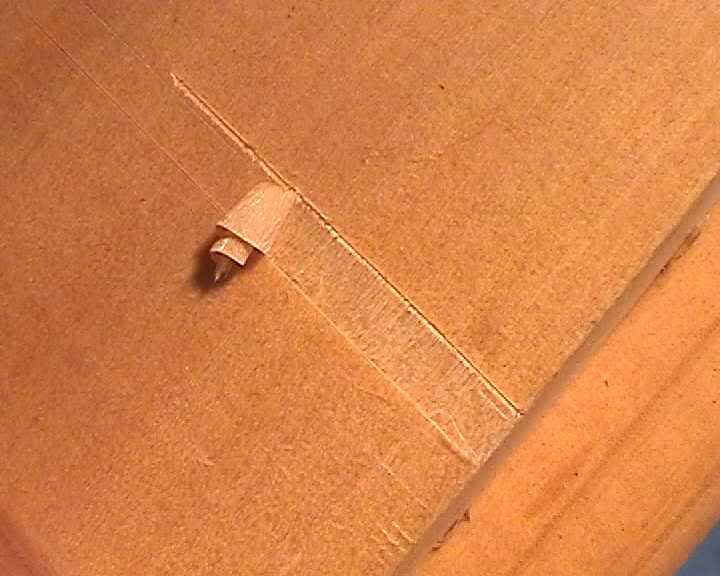
Ta da !!!
The finish still looks a little untidy. Keep in mind its really soft pine. And cutting pine cross grain cleanly is tricky IMO. Hardwood leaves a nicer cleaner looking finish.
-
7th March 2006 07:11 PM # ADSGoogle Adsense Advertisement
- Join Date
- Always
- Location
- Advertising world
- Age
- 2010
- Posts
- Many
-
7th March 2006, 07:19 PM #2
Deceased
- Join Date
- Feb 2005
- Location
- East Bentleigh, Melbourne, Vic
- Age
- 68
- Posts
- 4,494
G'day Jake,
So what you have here is..... wait for it.... a dovetail plane, like this
Which, I have to admit, I've yet to seriously play with as there have been too many other projects backing up....
-
7th March 2006, 07:26 PM #3
Cool dude
- Join Date
- Oct 2001
- Location
- Warwick, QLD
- Age
- 45
- Posts
- 3,462
Fascinating reading Jake. Always a pleasure to see one of your posts like this.
Have a nice day - Cheers
-
7th March 2006, 07:27 PM #4
Wood Wrecker
- Join Date
- Jan 2004
- Location
- Over there a bit
- Age
- 17
- Posts
- 2,511
Jake. Your an idiot. Shoe plane, complete with laces. Your just lucky this red wine is so nice. Have a greenie.
Steve, wheredyagetit? Was there some mention earlier when you first acquired said plane?Boring signature time again!
-
7th March 2006, 08:38 PM #5
Producer of fine shavings
- Join Date
- Oct 2004
- Location
- Melbourne
- Posts
- 945
BUT WAITTTTTT. THERE'S MORE!

Jake you are an inspiration mate, keep it up!You can never have enough planes, that is why Mr Stanley invented the 1/2s
-
7th March 2006, 08:46 PM #6
hardly human

- Join Date
- Jun 2005
- Location
- Sydney
- Posts
- 3,101
Seriously good stuff mate. Well done.
How long did you spend thinking about that?
I really appreciate blokes that think about a problem and come up with a way around....9 out of 10 don't go real well, but that 10th one is usually a bottler. (and the 9 failed goes usually belong to me!)
-
7th March 2006, 11:55 PM #7

Super Moderator
Dodgy brother
- Join Date
- May 2004
- Location
- Pakenham, outer Melb SE suburb, Vic
- Age
- 55
- Posts
- 4,158
Goodonya Jake, love it.

That shoe cutter looks like fun to sharpen
Did you need to be taught how to do up the laces
Cheers..............Sean
The beatings will continue until morale improves.
-
8th March 2006, 12:53 PM #8
Banned
- Join Date
- Apr 2005
- Location
- kyogle N.S.W
- Age
- 50
- Posts
- 4,844
Ta.
Sorry about the shoe gag. well,,,its not even funny I spose. Felt that things were getting too serious.
Had a hard time doing up those laces all right. Had to use tweezers . No, serious ! Its a really small blade. Looks big in the photos. ....Kept cutting myself on the blade
  ...Thank god nobody saw me cutting up my fingers trying to tie a bow around a miniture blade....Now thats embarrissing. Almost as bad as telling everyone on the net :eek: Oh, &&&&& I just did.
You see, I wanted a blade that would fit the slot, was sharp along its sides as well so I could slice right into the corner if need be, and before I new it, the old blade resembled a shoe....A clowns boot. Who cares anyway ...
-
8th March 2006, 07:20 PM #9
Deceased
- Join Date
- Feb 2005
- Location
- East Bentleigh, Melbourne, Vic
- Age
- 68
- Posts
- 4,494
Hi! Originally Posted by outback
From Steve Knight. See http://www.knight-toolworks.com/speciality.htm#Dovetail He certainly took his own sweet time in shipping it, but it is nice . Fairly tricky to use until familiar (which I'm not, yet!), but does seem to do a great job for sliding dovetails - which is why I bought it.
Much more, I must say, that an infill Spiers replica smoothing plane kit that I ordered last September from the Shepherd Tool Company, paid for, and have yet to see the sight of....:mad: :mad: :mad: :mad:
-
8th March 2006, 07:58 PM #10
hardly human
- Join Date
- Jun 2005
- Location
- Sydney
- Posts
- 3,101
I think it is in the same package that has your
#1, #2, #4, #41/2, #5, #6, #6C, #7, #7C, 8, #8C for $35 including postage...
-
8th March 2006, 11:06 PM #11
Ox and Herdsman Vanished
- Join Date
- May 2005
- Location
- Eden Hills, South Australia
- Age
- 63
- Posts
- 3,458

Apricot: you are a tribute to darksidedness. Me, I use one of the attached (pic1) and a chisel + #71. BTW, some articles I've seen recommend the dovetail configuration in pic2 for hand-cut versions (half the work

Loved the shoelace. Lucky I wasn't drinking anything at the time.
Those are my principles, and if you don't like them . . . well, I have others.
-
8th March 2006, 11:33 PM #12
Banned
- Join Date
- Apr 2005
- Location
- kyogle N.S.W
- Age
- 50
- Posts
- 4,844
Originally Posted by zenwood
Thanks Zenwood.
How do you find using that saw you've pictured ? Can you keep it vertical enough ?.....that's where I'm guessing I'd come unstuck, using something like that. I'd worry that I was going off vertical, without knowing while pulling it along.
-
8th March 2006, 11:56 PM #13
The rain is horizontal???
- Join Date
- Apr 2005
- Location
- Japan。
- Age
- 49
- Posts
- 1,622
Jake, you hang an enormous fence of that poor little plane, and yet you can't see that the same principle could be applied to the saw...
Unbolt the fence, clamp it to the work and saw away. The body of the saw is the depth stop.
Can you go for three days in a row where I have to tell you what the heck to do? :eek:
(BTW, very slick sliding dovetail. I'll stick with my tailed demon even so.)
-
8th March 2006, 11:59 PM #14
Be inspired. Be creative. Be bold.
- Join Date
- Apr 2001
- Location
- Perth
- Posts
- 10,872
Jake, boys and girls
Thanks for the inspiration/motivation to make a plane for the pins (female section). I've been a bit busy with other projects, but will soon be able to finish off my sliding dovetail "trio". I do like this idea better than my current saw/router plane method.
My plan for the "pin plane" was to make it out of an old molding plane, but your use of a #45 (or another combination - the #46 with its skew blade?!!!)is definitely an alternative.
So far I can cut a good line with the stairsaw I recently made. It runs up against an angled fence like yours (the same one I used in my review of the Veritas Router Plane, where I demoed cutting a sliding dovetail).
Here is the stairsaw again for those that missed it when I posted it a little while ago.
<center> <div><img src="http://i13.photobucket.com/albums/a262/Derek50/Tools%20that%20I%20have%20made/StairsawcomboWC.jpg" border="0" alt="" /> <br /></center>
And the dovetail plane I made (just because I cannot let Steve be the only one to show off one )
<center> <div><img src="http://i13.photobucket.com/albums/a262/Derek50/Tools%20that%20I%20have%20made/SlidingdovetailplaneUB.jpg" border="0" alt="" /> <br /></center>
Regards from Perth
Derek
-
9th March 2006, 12:01 AM #15
Bricoleur
- Join Date
- Jul 2005
- Location
- Toowoomba Qld.
- Age
- 65
- Posts
- 2,792
Hi Jake,
Interesting reading, I like the way you went about it! The plane you used for cleaning up afterwards, is that called an old woman's tooth router or something similar?
One day I must learn to do this posting with multiple images. Your pics have heaps of detail so must be large files?:confused:
Thanks,Andy Mac
Change is inevitable, growth is optional.


 Reply With Quote


Similar Threads
-
Q: Simple jig to help cut sliding dovetail breadboard ends?
By BrettC in forum WOODWORK - GENERALReplies: 14Last Post: 25th February 2006, 12:15 AM -
Dovetail Cutting
By gazaly in forum HAND TOOLS - POWEREDReplies: 0Last Post: 2nd June 2005, 01:09 PM -
Sliding Dovetail Lid - anyone know how?
By dan2004 in forum WOODWORK - GENERALReplies: 5Last Post: 3rd November 2004, 03:13 PM -
Sliding dovetail in slab table
By Suresh in forum WOODWORK - GENERALReplies: 2Last Post: 21st October 2004, 11:58 AM
