

 Thanks:
  Likes:
  Needs Pictures:
  Picture(s) thanks:
Results 16 to 30 of 96
-
18th December 2011, 06:12 PM #16
 .
.


- Join Date
- Nov 2008
- Location
- Perth WA
- Age
- 71
- Posts
- 5,650

Ray,
My intention was to use the old heavily perforated 3M table as a source of cast iron for some plugs. The reason being a hopeful match of cast iron colour.
I have not progressed past the intention stage.
I mentioned a while back that Fiora Machinery, Waldown sellers over here, have refurbished a number of school drill presses. They fill the drill holes with Devcon Steel Putty then flycut the table. Servicable but it still looks like a table riddled with filled holes.
BT
-
18th December 2011 06:12 PM # ADSGoogle Adsense Advertisement
- Join Date
- Always
- Location
- Advertising world
- Age
- 2010
- Posts
- Many
-
18th December 2011, 07:14 PM #17Dave J Guest
Hi Ray,
I would use undercoat even if it's just on the bare cast iron bits or the paint wont stick properly and could fish eye. It would be better to lightly coat the lot if you can.
If your only using enamel paint, you can buy undercoat in the spray can from Supercheap in the same brand as the paint, or you can buy auto primer/putty in spray cans if you need to try to blend where the layers or paint meet the cast iron spots, or have small imperfections you need to fill, as it will build up a lot quicker than just plain undercoat.
The primer/putty can also be bought in a can if you want to spray it yourself, thinned down it is just plain primer, or mixed thick it's a spray putty. It's easy to sand wet or dry and is around the same price as normal primer.
I only use this myself as it's a good 2 in one undercoat. With the the standard primer and putty system, you would have to primer it, then spray putty it, then primer again as the paint wouldn't stick to the putty.
Dave
-
18th December 2011, 10:14 PM #18
GOLD MEMBER
- Join Date
- Jul 2010
- Location
- Melbourne
- Posts
- 7,775
Fully understanding I maybe stoned for suggesting this. Is there a Waldown table with a hole in the middle that you could "copy"? That would get rid of most of your holes.
I'll run away now
Stuart
-
18th December 2011, 11:15 PM #19
GOLD MEMBER
- Join Date
- Jun 2008
- Location
- Victoria, Australia
- Age
- 74
- Posts
- 6,132
 Originally Posted by Stustoys

 Thanks.... Now where did I put those rocks....
Regards
Ray
-
19th December 2011, 07:09 AM #20
Philomath in training
- Join Date
- Oct 2011
- Location
- Adelaide
- Age
- 59
- Posts
- 3,149
You mean like this one?
Attachment 191602
Michael
-
20th December 2011, 01:56 AM #21
GOLD MEMBER

- Join Date
- Oct 2010
- Location
- melbourne, laverton
- Posts
- 1,469
maybe
In stead of devcon ect and this would be some sort of colour match you could cut some pieces of the bottom of the table underneath where you cant see it. Then braze up the holes using the pieces of table as filler wire. Then fly cut it flat.
hope that makes sense i was planing on repairing a few dawn drill vises this way.
I think i have possibly the most butchered waldown table of all.on a drill. ill post some pics
Originally Posted by Anorak Bob
Last edited by azzrock; 20th December 2011 at 05:38 PM. Reason: some spelling i spotd
-
20th December 2011, 05:48 PM #22
GOLD MEMBER
- Join Date
- Oct 2010
- Location
- melbourne, laverton
- Posts
- 1,469
besides under the table. under the bass of the drill there maybe metal you can remove for the filler wire purpose. I have all so herd of using chipped up pieces of the same cast to fill up holes. Only problem is i could never get the cast iron chip to stay in place while i heated them up.. i suppose you could get a pool of molten cast where you need the repair done and then add the chips slowly to add to the pool. This sounds tedious to me and it would have to cool slowly.
-
20th December 2011, 07:06 PM #23
GOLD MEMBER
- Join Date
- Oct 2010
- Location
- melbourne, laverton
- Posts
- 1,469
think your table is bad
Attachment 191803
Attachment 191803
here is a table thats seen better days. some times at auctions you should leave you card with you best mate. In all seriousness the rest of the drill seems ok and it was sitting on a kick #### stand
-
20th December 2011, 07:07 PM #24
SENIOR MEMBER
- Join Date
- Sep 2011
- Location
- Ballarat
- Age
- 65
- Posts
- 2,659
Hi Ray Originally Posted by RayG
Keep it traditional and try some Beaumontague
Phil
-
20th December 2011, 07:41 PM #25
GOLD MEMBER
- Join Date
- Jul 2010
- Location
- Melbourne
- Posts
- 7,775
Hi azzrock,
I think that table is the new record holder, I've seen some vices that were as bad but I dont recall a table anything like that. Still better in your shed than the tip.
Stuart
-
20th December 2011, 07:54 PM #26
GOLD MEMBER
- Join Date
- Jun 2008
- Location
- Victoria, Australia
- Age
- 74
- Posts
- 6,132
Hi Phil, Originally Posted by Steamwhisperer
Hey, that's my normal method... (I had to google it)....
Regards
Ray
PS That USB stick with the shaper information arrived, I've just started browsing tooling ... many thanks!
-
20th December 2011, 10:09 PM #27
GOLD MEMBER
- Join Date
- Oct 2010
- Location
- melbourne, laverton
- Posts
- 1,469
how are you stuart it very interesting it came from a machine shop packed with well maintained and quality machines and tooling. its all most like its been done on purpose . the rest seems in good nick
-
21st December 2011, 12:34 PM #28
GOLD MEMBER
- Join Date
- Jun 2008
- Location
- Victoria, Australia
- Age
- 74
- Posts
- 6,132
Hi All,
Does anyone have any experience with Salcomix 2 pack paints?
The stuff I've got is Salcomix - 729/732 TPC-ACR
Supposed to be tough... I guess we will see..
Regards
Ray
-
26th December 2011, 12:58 PM #29
.
- Join Date
- Nov 2008
- Location
- Perth WA
- Age
- 71
- Posts
- 5,650
Switches, Pulleys and Motors
Following up on a discussion I had with Ray.
Photos of the original switch, etc.
If anyone has a spare 1/2, 3/4 or 1 horse single phase CMG motor of the same vintage as the one shown that they would like to sell, you know where there is a buyer.
BTLast edited by Anorak Bob; 26th December 2011 at 01:40 PM. Reason: Tough stuff removed. Nothing to do with thread.
-
26th December 2011, 02:16 PM #30
GOLD MEMBER
- Join Date
- Jun 2008
- Location
- Victoria, Australia
- Age
- 74
- Posts
- 6,132
Hi BT,
Thanks for that, I'm still a little unclear on what the original on/off switch should be, I'm leaning towards the red/green push on/push off style. Mine had a white plastic clipsal light switch fitted.
Here is the clean up of the column that I mentioned.
Surface rust, but few deep scratches.

A while back Stuart got a special deal on 3M Roloc scotch-brite pads, fitted to a cheap angle grinder and speed control, the speed control is essential to avoid scratches. A bit of Lanox ( or kerosene) for lubricant, and keep wiping down as you go.
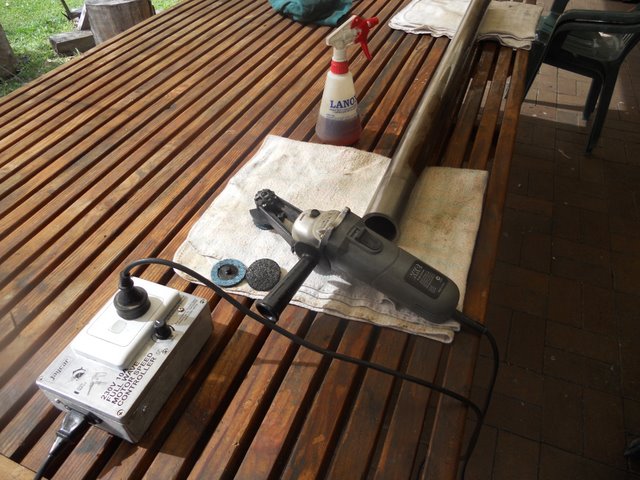
A few hours later.....
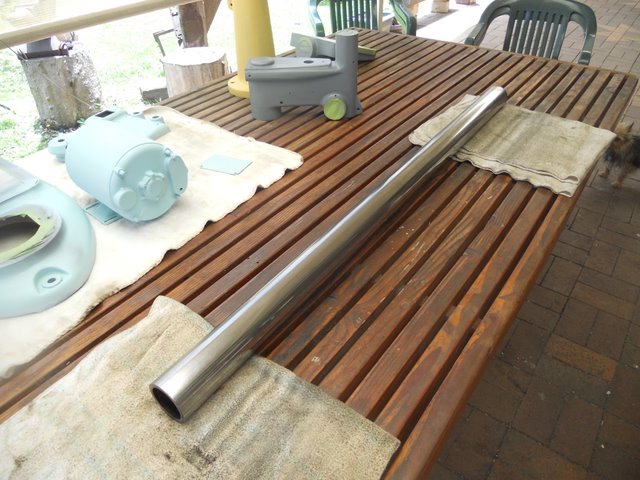
Sorted and cleaned the other parts, oil blackened the screws, and cleaned the grease off everything, it will be re-greased when it goes back together...
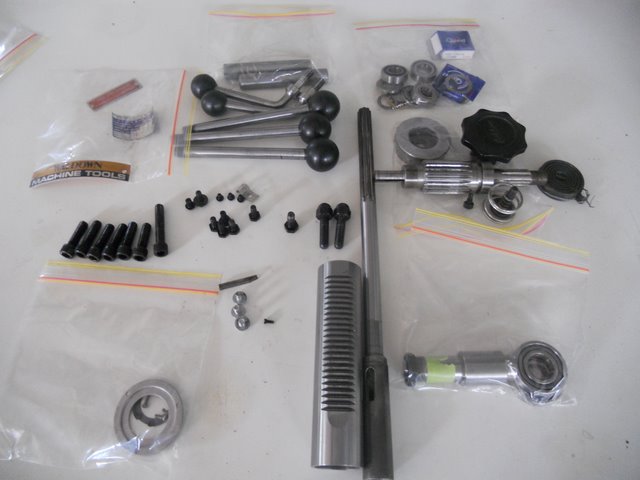
So that's the parts clean up all finished, next job is to get new bearings for the top spindle, and finish the sanding and painting, then it will start to go back together. (I hope)
Regards
Ray


Similar Threads
-
Another Waldown - this time a tart up.
By Anorak Bob in forum METALWORK FORUMReplies: 66Last Post: 26th January 2013, 01:28 PM -
Another Waldown
By Anorak Bob in forum METALWORK FORUMReplies: 5Last Post: 17th September 2011, 12:06 AM -
Hello and Waldown question
By craoni in forum GENERAL & SMALL MACHINERYReplies: 0Last Post: 2nd May 2010, 01:17 PM -
Waldown drill press
By mikm in forum GENERAL & SMALL MACHINERYReplies: 5Last Post: 17th August 2009, 10:35 AM
