

 Thanks: 0
 Likes: 0
 Needs Pictures: 0
 Picture(s) thanks: 0
Results 1 to 15 of 37
Thread: horizontal cylinderical box
-
3rd May 2009, 07:35 PM #1
 GOLD MEMBER


- Join Date
- Sep 2002
- Location
- Paignton. Devon. U.K.
- Posts
- 6,062
 horizontal cylinderical box
Preview of box description
Another new design for me but no doubt there are others around.
Information on geometrical details was given me by members of this Australian forum.
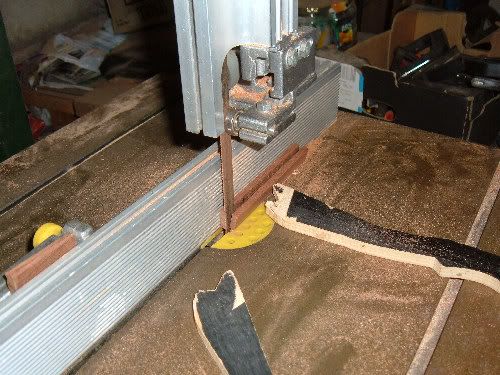
(To create a cyclinder using 16 pieces of timber, divide 360 degrees by 16 and obtain the figure of 22.5%, half this amount and you need a cutting angle of 11.25% each side of strip. This I obtained using a protractor finding 11% and estimating the odd .25 figur, I then made a former which I set the tilt of blade.)
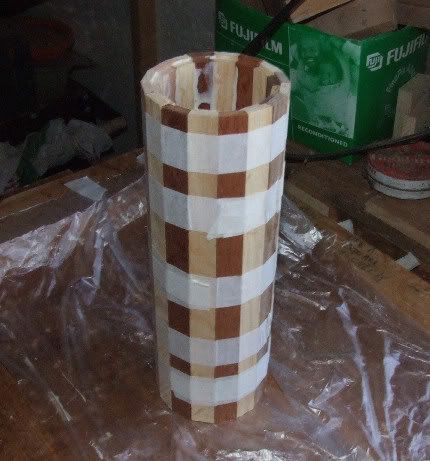
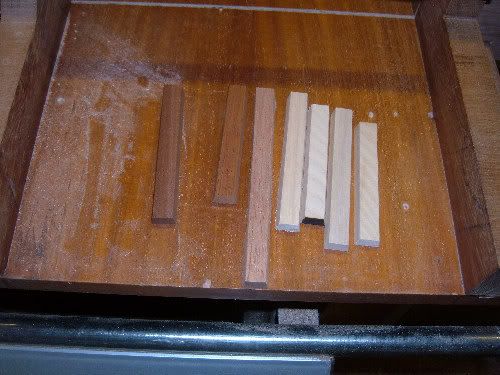
I found four pieces of contrasting coloured timber, (B.walnut, Meranti, Sapelle, and Br. Mahogany) plus American Ash for white.
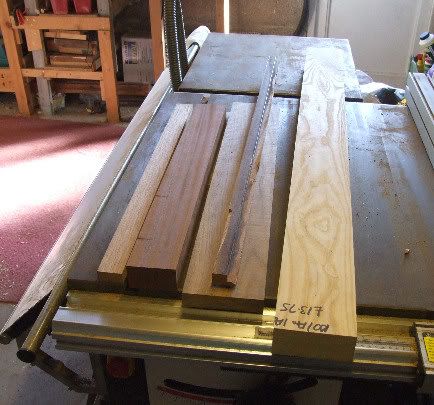
I prepared and reduced to strips in my usual fashion using the strip jig on the tablesaw.

Set out on my flat board in colour choice.
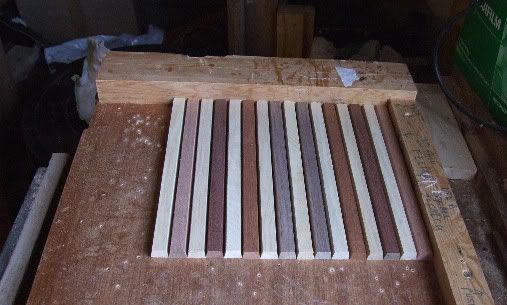
Put he 11.25% angle to each strip using the stripping jig again with the blade angle set this time.
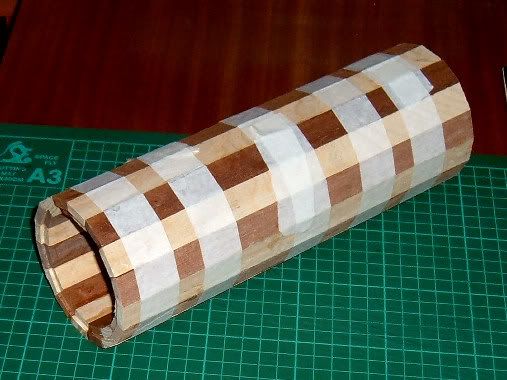
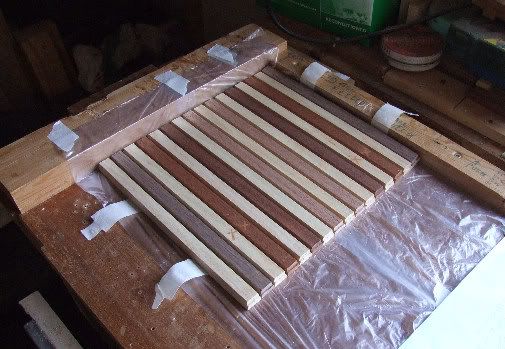
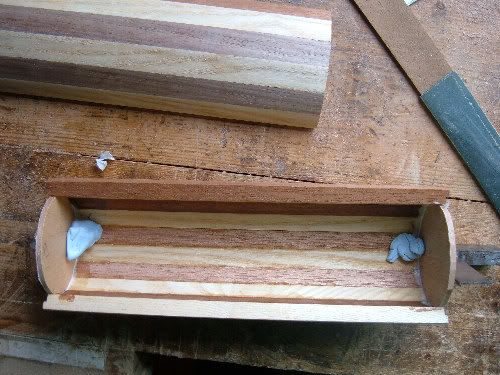
Placed on my flat board with masking tape under, this means when the tube is rolled up with glue on each edge. the tape holds while glue sets.
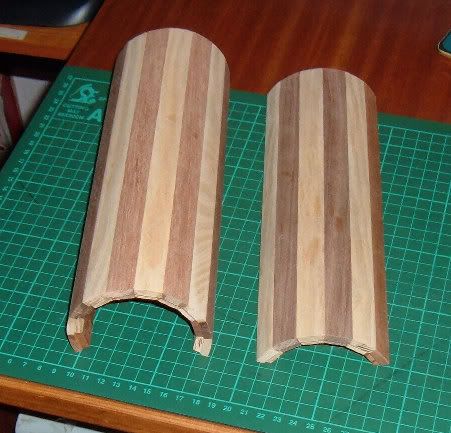
In addition I did not glue between sections 4 & 5 or 13 & 14 so that I would have a lid formed which is removable when tape is removed after the other glued sections have set.
A rebate was put on each end of strip to close up tube at a later date.
Tube glued and awaiting set
 woody U.K.
"Common looking people are the best in the world: that is the reason the Lord makes so many of them." ~ Abraham Lincoln
-
3rd May 2009 07:35 PM # ADSGoogle Adsense Advertisement
- Join Date
- Always
- Location
- Advertising world
- Posts
- Many
-
3rd May 2009, 09:41 PM #2
GOLD MEMBER
- Join Date
- Jun 2003
- Location
- Paralowie SA
- Age
- 62
- Posts
- 1,315
great wip looks very interesting thats what I wanted to for the box chalange last year but could not do cause my table saw blade does not tilt
I will follow this one with interest
Regards Michaelenjoy life we are only here a short time not a long time
-
3rd May 2009, 11:49 PM #3
SENIOR MEMBER
- Join Date
- Apr 2003
- Location
- Tolmie - Victoria
- Age
- 68
- Posts
- 4,010
Looking really great John
- Wood Borer
-
4th May 2009, 12:22 PM #4
GOLD MEMBER
- Join Date
- Feb 2008
- Location
- Northern Sydney
- Age
- 49
- Posts
- 2,764
Looks great... will follow this one with interest.
Try getting yourself one of these.
http://www.axminster.co.uk/product-A...Box-564900.htm
There are several types around, but that was the first result Google threw back at me. I have used it on a triton to get some very accurate angles in crosscut mode. When I did the box for the comp it was a (irregular) hexagon. Using this thing I got the angles perfect on it (about the only thing that was perfect, mind you!!)
Seriously worth every cent/penny!
Cheers,
Dave...but together with the coffee civility flowed back into him
Patrick O'Brian, Treason's Harbour
-
4th May 2009, 01:21 PM #5
GOLD MEMBER
- Join Date
- Mar 2007
- Location
- Munruben, Qld
- Age
- 83
- Posts
- 10,027
Looking good John, another interesting project.
Reality is no background music.
Cheers John
-
4th May 2009, 01:27 PM #6
GOLD MEMBER
- Join Date
- Aug 2004
- Location
- Brisbane
- Posts
- 5,003
Jow
As I mentioned in a recent post by Derek Cohen, it's not good practice to rip with the blade tilted towards the fence, but I can see that your jig would allow good control over the work and allow you to easily feed the work. But have you considered ripping with the fence on the other side of the blade? This would be even safer and I think you would have even more control. When you are ripping the second bevel with the fence in this position the edge that is contacting the the fence is undercut and bears fully on the fence, the other way round the bevel has a chance of slipping under the fence making an inaccurate cut.
Cheers
Michael
-
4th May 2009, 04:41 PM #7
Dances with splinters
- Join Date
- Jul 2005
- Location
- Oberon, NSW
- Age
- 64
- Posts
- 13,366
There's a trick that can be used if you're having troubles getting the blade's angles "spot on" and the last piece of timber just won't fit without a gap no matter what you do:
First, cut 4 segment/staves a mm or two wider than the rest. When you glue up the cylinder, glue it up as two halves with these wider pieces as the "edges" of each half.
Once the glue has dried, you can scribe a line on the outside of each edge to indicate the thickness should have been, then offer up the piece to a linisher, sanding both edges flatly back to the scribed line at the same time. (A rasp/file held so it flattens both edges simultaneously will also work, but a linisher is sooo much quicker. )
)
Repeat with the other half.
A near perfect fit every time! And, done well, no-one will pick any discrepancy.
- Andy Mc
-
4th May 2009, 06:08 PM #8
GOLD MEMBER
- Join Date
- Sep 2002
- Location
- Paignton. Devon. U.K.
- Posts
- 6,062
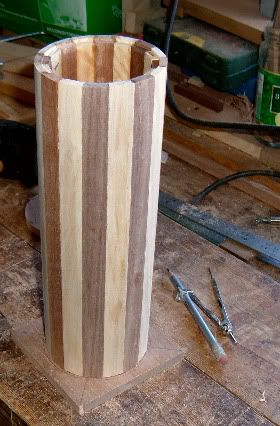
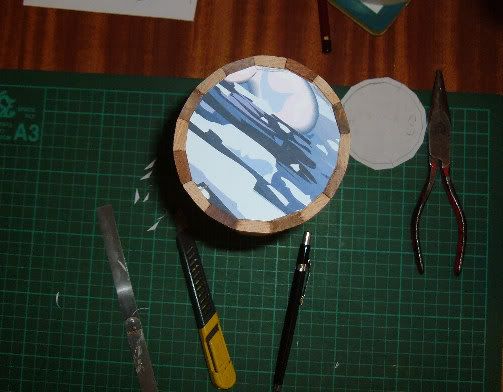
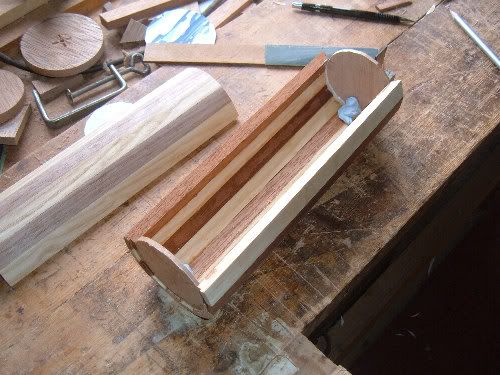
Thanks for all the comments and helpful tips. I am very happy to tell you that the tube went well this time, I put the item on to my bench sander and cleaned the outside edges up with a 60 grit belt and tidied it up with some 320 W & Dry.
Micd, your comments are valid, but my fence stripping jig clings to the table top and nothing seem to creep under as would do with the ali fence supplied with the saw.
Ozkaban, looks a handy tool, however I could kick myself, I forgot to make a template of the 11.25 blade tilt angle for another time.
Skew, I suspect that because my strips are only 17mm wide and not the traditional 75 mm staves, my discrepancy if there is one has not stood out.
Prepared some end disks using my small lathe (no chuck, so faces are a bit disfigured). I have not committed myself to gluing these to the ends at the moment, I would prefer a harder timber than these original cuts, so am going to pull my timber stocks out and see what else can be used. However the guys on the English forum have given me some clues how to cut the internal straight edges that are required to make a clean appearance inside.
Photographs below show the progress todate.
making end caps
showing end caps (trial run)
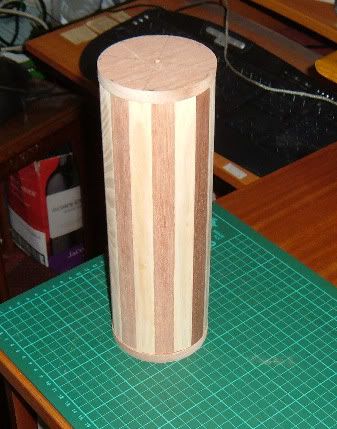
Showing base and lid portions (before fitting of any end caps)
 woody U.K.
"Common looking people are the best in the world: that is the reason the Lord makes so many of them." ~ Abraham Lincoln
-
4th May 2009, 06:21 PM #9
Dances with splinters
- Join Date
- Jul 2005
- Location
- Oberon, NSW
- Age
- 64
- Posts
- 13,366
I suspect that it's more likely because you're more studious in setting the angles accurately in the first place... unlike those of us who work on the principle of "near enough is good enough." Originally Posted by jow104


Are you planning on butt-joining the ends (as they are now) or recessing them into the ends, so the strips run the full width of the box? The latter would, in my opinion, look better... but is a LOT of finicky work.Prepared some end disks using my small lathe (no chuck, so faces are a bit disfigured). I have not committed myself to gluing these to the ends at the moment, I would prefer a harder timber than these original cuts, so am going to pull my timber stocks out and see what else can be used.
[Ears perked!] Now that's one way of earning my undivided attention...However the guys on the English forum have given me some clues how to cut the internal straight edges that are required to make a clean appearance inside.
- Andy Mc
-
4th May 2009, 06:52 PM #10
GOLD MEMBER
- Join Date
- Sep 2002
- Location
- Paignton. Devon. U.K.
- Posts
- 6,062
Skew, you have inspired me.
quote.... Are you planning on butt-joining the ends (as they are now) or recessing them into the ends, so the strips run the full width of the box? The latter would, in my opinion, look better... but is a LOT of finicky work.
Veneers from the same timbers making a 16 ray sunburst is getting my juices going.
In fact I would like to suggest that the members here make a box of similar design and have a friendly display or competition. Any size box, the construction I can assure you is quite basic.woody U.K.
"Common looking people are the best in the world: that is the reason the Lord makes so many of them." ~ Abraham Lincoln
-
4th May 2009, 06:56 PM #11
Dances with splinters
- Join Date
- Jul 2005
- Location
- Oberon, NSW
- Age
- 64
- Posts
- 13,366
I like the way this box is going.
- Andy Mc
-
5th May 2009, 10:25 AM #12
GOLD MEMBER
- Join Date
- Mar 2007
- Location
- Munruben, Qld
- Age
- 83
- Posts
- 10,027
It's looking fantastic.
Reality is no background music.
Cheers John
-
5th May 2009, 06:12 PM #13
GOLD MEMBER
- Join Date
- Sep 2002
- Location
- Paignton. Devon. U.K.
- Posts
- 6,062
Thinking of dropping the end caps and fitting a sunburst marquetry design and hopefully having flush ends.
So made a paper template,
managed to salvage the waste ends of strips (which are already machined)
resawing those waste strips on the bandsaw so they are now around 2.5mm thick.
Thinking I should have finished with 1 mm thickness
Never done any marquetry before so might be a few days before I am back
woody U.K.
"Common looking people are the best in the world: that is the reason the Lord makes so many of them." ~ Abraham Lincoln
-
6th May 2009, 05:44 PM #14
GOLD MEMBER
- Join Date
- Sep 2002
- Location
- Paignton. Devon. U.K.
- Posts
- 6,062
Fitted the two end closures using some 3mm ply which I intend to attempt some marquetry later.
 woody U.K.
"Common looking people are the best in the world: that is the reason the Lord makes so many of them." ~ Abraham Lincoln
-
7th May 2009, 05:40 PM #15
GOLD MEMBER
- Join Date
- Sep 2002
- Location
- Paignton. Devon. U.K.
- Posts
- 6,062
How odd?
I posted this thread the 30th April 09
http://www.woodworkforums.ubeaut.com...ad.php?t=95432
Fine woodworking magazine article by Derek Cohen, (Perth) ? 2n May 2009
http://finewoodworking.taunton.com/i...ring-a-box-lidwoody U.K.
"Common looking people are the best in the world: that is the reason the Lord makes so many of them." ~ Abraham Lincoln


 Reply With Quote


Similar Threads
-
Horizontal router
By MikeThePom in forum HOMEMADE TOOLS AND JIGS ETC.Replies: 1Last Post: 27th June 2008, 12:07 AM -
horizontal bandsaw?
By ScottM in forum BANDSAWSReplies: 1Last Post: 2nd July 2007, 02:48 PM -
Horizontal drill
By smidsy in forum HAND TOOLS - POWEREDReplies: 5Last Post: 24th January 2007, 05:21 PM -
Horizontal routing jig
By aniceone2hold in forum ROUTER JIGSReplies: 2Last Post: 12th September 2006, 06:38 PM -
Horizontal scrub
By dadpad in forum TIMBERReplies: 3Last Post: 2nd January 2006, 10:12 PM
