

 Thanks: 0
 Likes: 0
 Needs Pictures: 0
 Picture(s) thanks: 0
Results 1 to 15 of 33
Thread: panel tissue box
-
15th April 2012, 05:54 PM #1
 GOLD MEMBER


- Join Date
- Sep 2002
- Location
- Paignton. Devon. U.K.
- Posts
- 6,062
 panel tissue box
I have got some veneers ( I think Zebrano) which were given to me by a member some years ago together with other timbers.
I think there will be enough to face some 6mm mdf outside and a less decorative internally.
To make the box I want to make the panels and then frame the faces with mitred edgings.
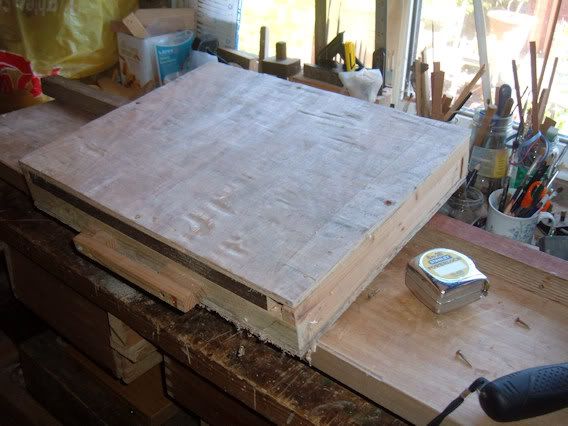
So I have started a new jig to make mitre corners (like picture framing), the old jig I used was some cheap ply packing sheet and it doesn't lay flat any more. So using an old (1930's) laboratory laminated cupboard door for the platform. Progress so far.
Brought indoors for the night to save from frost expected again.woody U.K.
"Common looking people are the best in the world: that is the reason the Lord makes so many of them." ~ Abraham Lincoln
-
15th April 2012 05:54 PM # ADSGoogle Adsense Advertisement
- Join Date
- Always
- Location
- Advertising world
- Posts
- Many
-
16th April 2012, 02:27 AM #2
GOLD MEMBER
- Join Date
- Sep 2002
- Location
- Paignton. Devon. U.K.
- Posts
- 6,062
A good day tho. nippy in the WS., rebuilt the sliders for the mitre jig, and this afternoon it looks good, stored it in the conservatory (90far) and that should cure it. The glue failed on the effort I did yesterday, it stayed in the WS until around 8pm and never matured I assume because of low temperture.
I have prepared some black walnut with a roundover bit for the panel edgings, the vertical ones will be wider to start with to accommodate the mitre joints with wastage, then will roundover the horizontal pieces to equal dimensions.
Got out the veneer box which is stored away under some benches.
Over the years I have stored them safely like this, (with packing to keep from knocking about)
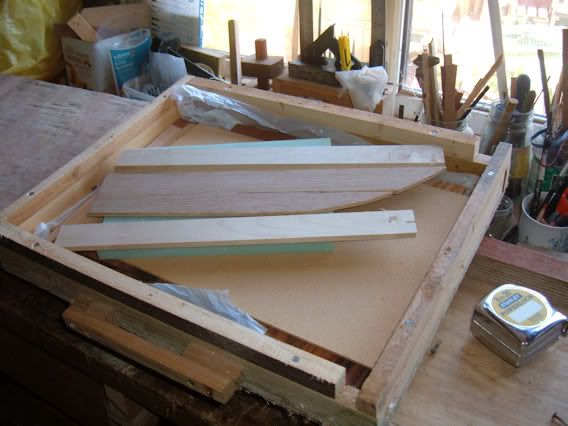
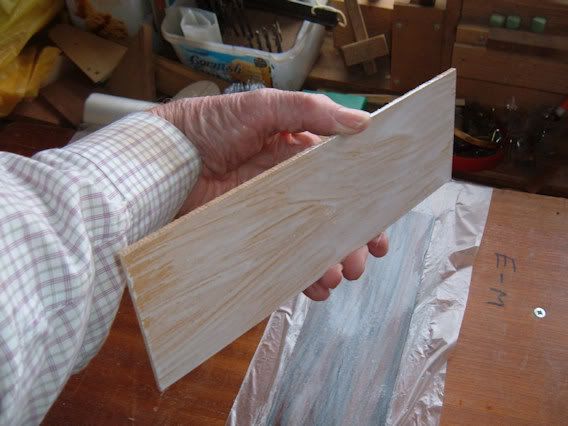
Selected enough of what I think is Zebrano.
(and some plain backing pieces)
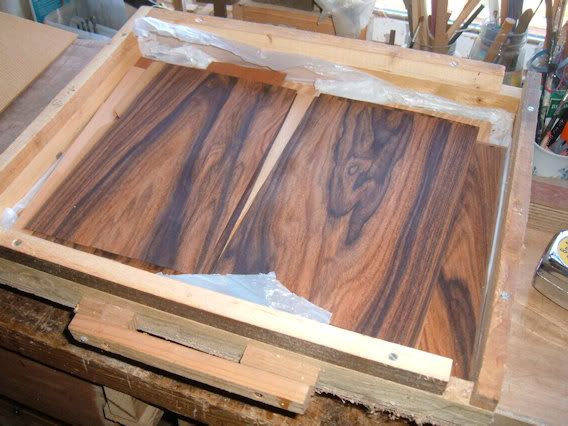
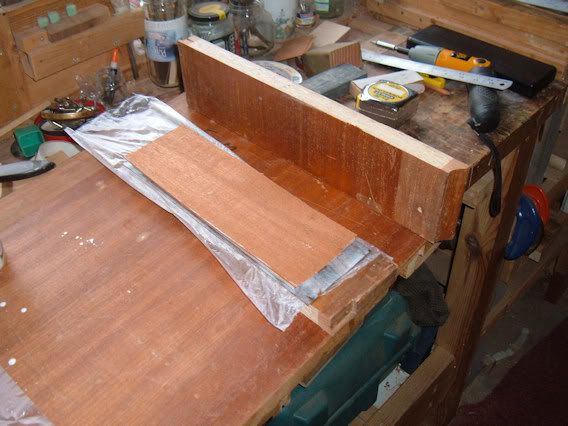
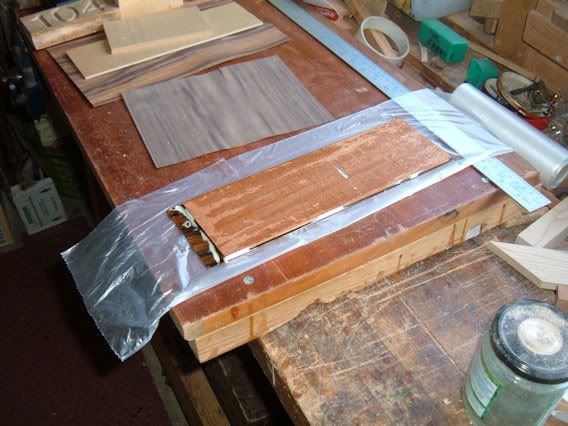
Got out some cheap pva glue and thinned it down, pasted the first sheet of veneer
Then a piece of mdf 3mm thick.
finally a plain backing piece to stop hopefully any unequal pull.
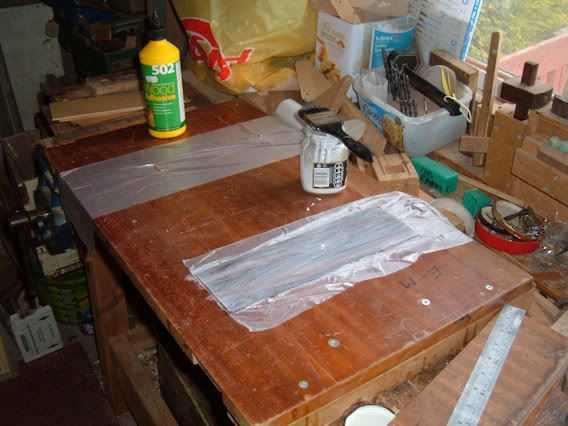
Finally used my improvised veneer clamping system (it has worked before) and brought into the kitchen when the wife was have her afternoon siesta.
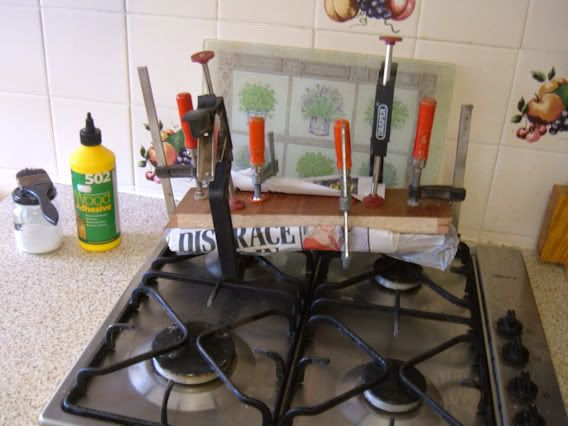
The next three pieces will hold things up a bit being done one at a time.woody U.K.
"Common looking people are the best in the world: that is the reason the Lord makes so many of them." ~ Abraham Lincoln
-
16th April 2012, 01:06 PM #3
SENIOR MEMBER
- Join Date
- Feb 2012
- Location
- Nowra, NSW, Australia
- Age
- 66
- Posts
- 3,003
Looking good as usual.
I don't think that veneer is Zebrawood, (Zebrano). I might be wrong, but the colour doesnt look right. Looks pretty good, though, whatever it is.
Here's a piece of Zebrano for comparison. (The piece I used for my second glasses case. Still got some left.: -... Steve
-- Monkey see, monkey do --
-
16th April 2012, 05:26 PM #4
GOLD MEMBER
- Join Date
- Sep 2002
- Location
- Paignton. Devon. U.K.
- Posts
- 6,062
Zebrano grain certainly varies, yours is nothing like what I see at one of our local timber merchants, we have splotches of orangey colour variations. Will go and have a look over the web and see what is there.
Havent taken off the clamps yet, not good drying weather up here, its freezing again.woody U.K.
"Common looking people are the best in the world: that is the reason the Lord makes so many of them." ~ Abraham Lincoln
-
16th April 2012, 05:41 PM #5
SENIOR MEMBER
- Join Date
- Feb 2012
- Location
- Nowra, NSW, Australia
- Age
- 66
- Posts
- 3,003
A thought - you'll know if it's Zebrano or not when you're working it. Zebrano stinks like cow or camel sh17. Good ventilation helps. Originally Posted by jow104
 ... Steve
-- Monkey see, monkey do --
-
16th April 2012, 05:59 PM #6
GOLD MEMBER
- Join Date
- Sep 2002
- Location
- Paignton. Devon. U.K.
- Posts
- 6,062
Obviously we get more refined timber up here, anyway the box will have tissues handy when finished.
https://www.google.co.uk/search?q=ze...w=1077&bih=585woody U.K.
"Common looking people are the best in the world: that is the reason the Lord makes so many of them." ~ Abraham Lincoln
-
16th April 2012, 06:07 PM #7
SENIOR MEMBER
- Join Date
- Feb 2012
- Location
- Nowra, NSW, Australia
- Age
- 66
- Posts
- 3,003
Yep. And it will look good. Originally Posted by jow104
[/QUOTE] https://www.google.co.uk/search?q=ze...w=1077&bih=585[/QUOTE]
While much of it looks similar to mine, there is a lot of variation, isn't there?
Miserable stuff to work with, but it looks great when finished.... Steve
-- Monkey see, monkey do --
-
16th April 2012, 08:44 PM #8
GOLD MEMBER
- Join Date
- Sep 2002
- Location
- Paignton. Devon. U.K.
- Posts
- 6,062
10.30 am couldn't resist opening up my press and having a look after 16 hours, I think it should be OK but will leave next ones a full 24 hours.
face side.
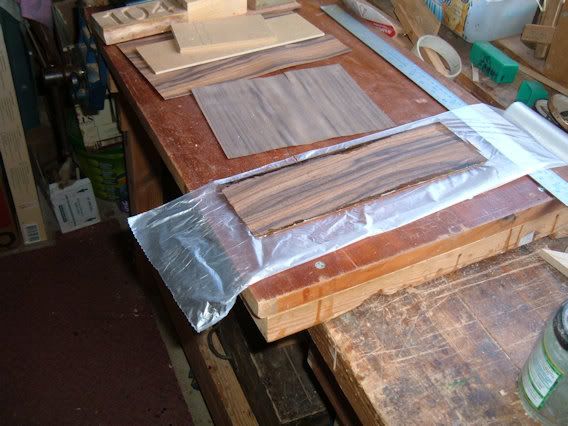
rear side
 woody U.K.
"Common looking people are the best in the world: that is the reason the Lord makes so many of them." ~ Abraham Lincoln
-
16th April 2012, 09:46 PM #9
SENIOR MEMBER
- Join Date
- Feb 2012
- Location
- Nowra, NSW, Australia
- Age
- 66
- Posts
- 3,003
 ... Steve
-- Monkey see, monkey do --
-
18th April 2012, 06:07 PM #10
GOLD MEMBER
- Join Date
- Sep 2002
- Location
- Paignton. Devon. U.K.
- Posts
- 6,062
The mitre sled is well under way and the board slides nicely.
Front and rear rails fitted together with the first 45 degree guide.
The two ends for the tissue box have been worked on, veneers glued and press boards taken off later today.woody U.K.
"Common looking people are the best in the world: that is the reason the Lord makes so many of them." ~ Abraham Lincoln
-
18th April 2012, 07:08 PM #11
SENIOR MEMBER
- Join Date
- Feb 2012
- Location
- Nowra, NSW, Australia
- Age
- 66
- Posts
- 3,003
Coming along nicely - it's looking pretty good.
... Steve
-- Monkey see, monkey do --
-
19th April 2012, 02:15 PM #12
GOLD MEMBER
- Join Date
- Mar 2007
- Location
- Munruben, Qld
- Age
- 83
- Posts
- 10,027
Progressing nicely, looks good John
 Reality is no background music.
Cheers John
-
19th April 2012, 06:57 PM #13
GOLD MEMBER
- Join Date
- Sep 2002
- Location
- Paignton. Devon. U.K.
- Posts
- 6,062
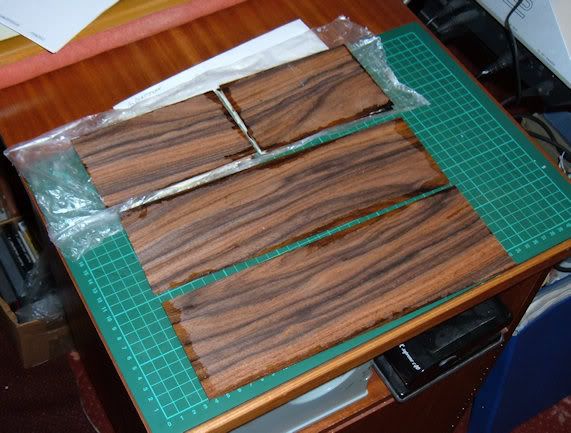
The four veneered panels are shown, they look messy but there is plenty of waste to cut away.
The sliding mitre sled is not going as well as it should.
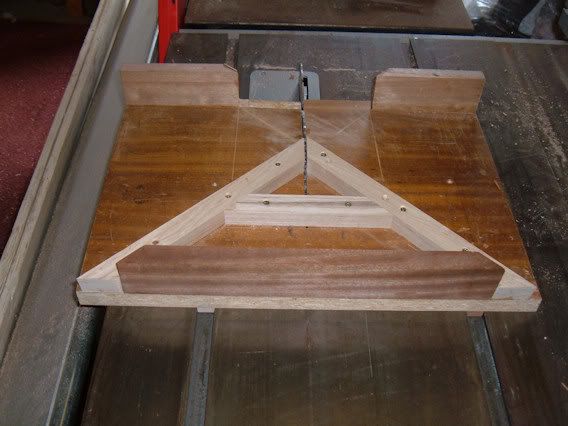
This is one of the problems.
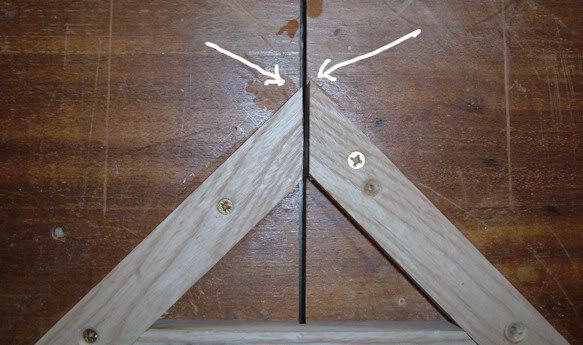
This came about working off the hoof so to speak. the first former was glued and screwed on and run through the blade, the second guide had a 45% angle cut and then placed against the first already in place, but as you can see it does not form a perpendicular (?) point.
However all is not lost because the angles are correct and a test run produced perfect 45% mitres. Its the cutting point that changes depending which guide is used. I can upend a mitred end and cut on same guide for the other end to avoid set up problems, but I cannot use each guide consecutively like 1 2 3 4 with a measurement stop block if doing a rectangle.
Looking back its difficult to create that perfect point without thinking about it because both guides need to cross the cutting line and cut through at the same time and still be making a perfect 45% cutting jig.
Perhaps I should have gone looking for that jig Nikki displayed here.
edit found it
http://www.woodworkingtalk.com/f27/c...ers-45-a-6387/woody U.K.
"Common looking people are the best in the world: that is the reason the Lord makes so many of them." ~ Abraham Lincoln
-
20th April 2012, 05:50 PM #14
GOLD MEMBER
- Join Date
- Sep 2002
- Location
- Paignton. Devon. U.K.
- Posts
- 6,062
Using the mitre sled jig turned out to be a waste of effort.
Because the mouldings have already been formed I could not get a decent set to the guides when cutting mitres. I also didn't want to use metal clamps because there was a risk (because of mouldings causing instability) of a clamp coming loose and perhaps hitting the spinning saw blade.
So in the finish I roughly cut mitres by hand and finished to a decent face on the sander table.
picture below.
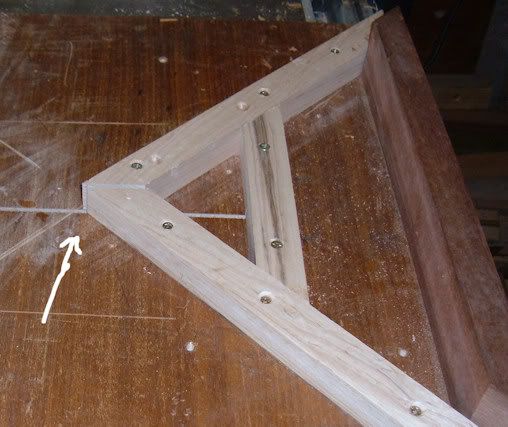
At this point I usually mitre the ends to form the box, but I am not happy about getting the cut line of mitre to equal the top and bottom edges of box, so I have in mind something entirely different in the way of a corner joint.woody U.K.
"Common looking people are the best in the world: that is the reason the Lord makes so many of them." ~ Abraham Lincoln
-
20th April 2012, 07:20 PM #15
SENIOR MEMBER
- Join Date
- Feb 2012
- Location
- Nowra, NSW, Australia
- Age
- 66
- Posts
- 3,003
No wonder I'm so nervous about attempting mitre corners. Might stick to my shaped boxes, for now at least. Originally Posted by jow104
I'll be interested to see your 'different' corner joints.... Steve
-- Monkey see, monkey do --


 Reply With Quote

Similar Threads
-
The last three tissue boxes
By jow104 in forum BOX MAKINGReplies: 6Last Post: 21st September 2010, 05:12 PM -
Canarywood tissue box
By ciscokid in forum BOX MAKINGReplies: 4Last Post: 9th June 2010, 05:25 PM -
two day tissue box
By jow104 in forum BOX MAKINGReplies: 10Last Post: 15th May 2010, 12:31 AM -
tissue box ASP
By jow104 in forum BOX MAKINGReplies: 25Last Post: 1st October 2009, 05:51 PM -
Tissue box
By ciscokid in forum BOX MAKINGReplies: 14Last Post: 23rd December 2006, 12:08 AM
